“MYZR-SAMA5-EK200 Linux-3.18 Test Manual”的版本间的差异
小 (Admin移动页面MY-SAMA5-EK200 Linux-3.18 Test Manual至MYZR-SAMA5-EK200 Linux-3.18 Test Manual,不留重定向) |
|
(没有差异)
| |
2020年10月22日 (四) 17:24的最新版本
目录
[隐藏]preparation before test
1)Please refer to "connection of device"->"Linux fast boot" in 《Linux fast boot manual》 for the connection.
2)Please refer to "booting device" ->"Linux fast boot" in 《Linux fast boot manual》 for the booting.
Test item
Lan port test
- MYZR-SAMA5-EK200 support dual lan port(one Mbps ethernet lan port,one Gbps ethernet lan port).
Test instruction
- The first Ethernet port is located on the front side of the base plate "J3", and the second Ethernet port is located on the front side of the base plate "J2".
Test method
1)Test the first ethernet lan port(Mbps ethernet lan port).
- Connect lan line:connect “J3”on evaluation board with computer lan port through network.
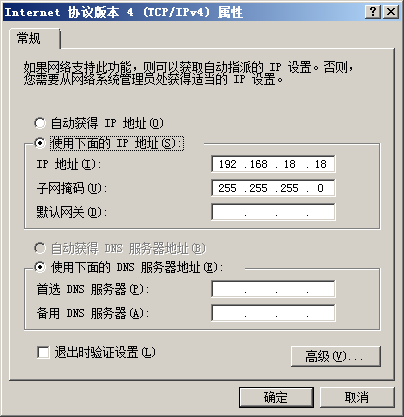
- Set computer IP:set computer lan port IP as 192.168.18.18.
- Set the evaluation board IP:
# ifconfig eth0 192.168.18.81 # configure the eth0
# ifconfig eth1 down
- Execute test command
# ping 192.168.18.18 -c 2 -w 4 # send ICMP to HOST
- Observe test result:system will output information like below:
--- 192.168.18.18 ping statistics --- 2packets transmitted, 2 packets received, 0% packet loss
- Test result:“0% packet loss”represent test passing.
- Figure
2)Test the second Ethernet port (Gigabit Ethernet port)
- Connect lan line:take out lan line from the first lan port then plug in “J2”on evaluation board,another end of lan line is kept in connection with lan port of computer.
- Set computer IP:set computer lan port IP as 192.168.18.18(if the setting was already done then go direclty into next step).
- Set the second lan port IP:
# ifconfig eth1 192.168.18.82 # configure the eth1
# ifconfig eth0 down
3)After the setting system will output working condition of the second lan port, as below:
- macb f0028000.ethernet eth1: link up (1000/Full)
- macb f0028000.ethernet eth1: link up (1000/Full)
- Run test command:
# ping 192.168.18.18 -c 2 -w 4 # send ICMP to HOST
- Observe test result:system will output the following message:
--- 192.168.18.18 ping statistics ---
2packets transmitted, 2 packets received, 0% packet loss
- Test result:“0% packet loss”represent test passing
- Figures
USB test
Test instruction
MYZR-IMX6-EK200 has two USB HOST ports,in“J8”in top view of base board.
Test method
1)Start test
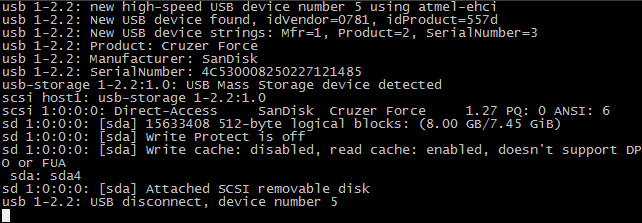
Plug USB device in USB port in base board,system will output the following message:
- usb *-*.*: new high-speed USB device number * using atmel-ehci
- ……
- usb *-*.*: new high-speed USB device number * using atmel-ehci
2)Complete test
Take out USB device from the base board,system will output the following message:
- usb *-*.*: USB disconnect, device number *
- usb *-*.*: USB disconnect, device number *
Figures

Instruction:insert U disk in USB port, system will output information like below:
SD card interface test
Test instruction
SD card interface is in“J29”in bottom view of base board.
Start test
1)Insert device in SD card slot
Insert SD card in SD card port in base board, system will output following message(see attached image),e.g.SD port is normal:
- mmc*: new high speed SD card at address ****
- ……
- mmc*: new high speed SD card at address ****
2)Pop-up device from SD card slot
Press again SD card in SD card slot,base board will pop-up SD card。system will output following message(see attached image),e.g.function of SD card port pop-up is normal:
- mmc*: card **** removed
- mmc*: card **** removed
3)Complete test
Take out SD card after SD card pop-up,to end the test.
Figures
LED(GPIO)test
LED(GPIO)definition
There are 4 LEDs on the base board of MYZR-SAMA5-EK200,details as below:
| silk screen | CPU pin | LED property | application |
| D12 | PE1 | default | brighten after booting of kernel |
| D13 | PE2 | heartbeat | flash when CPU is in working |
| D14 | PE3 | gpio | user control output |
| D15 | PE4 | timer | Timer demonstration |
Led-default test
1)Led-default corresponds with D12. when booting of system is completed,the LED is brightened defaulty,which is ususally ussed as power indicator,in other words,brightenness of the LED represent a switching on of devices on the condition that user doesn't control the LED.Of course,user can control on and off of the LED,in this case,there is not any relation between on/off of the LED and working condition of power source.
2)Control command as below:
# echo 0 > /sys/class/leds/default/brightness
# echo 1 > /sys/class/leds/default/brightness
![]()
led-heartbeat
Led-heartbeat corresponds to D13. After the system is started, the LED flashes and the status of the LED indicates the operating status of the CPU. Blinking indicates that the CPU is working properly. If the indicator is steady on or off, the CPU is not working properly (that is, the CPU may not work).
led-gpio test
1)Led-gpio corresponds to D14. After the system is started, the LED is kept off by default. After entering the system, we can control the LED's on and off by commands.
2)The CPU pin used by the LED is PE3, and its properties are represented in the system by the relevant files in the /sys/class/leds/gpioE3/ directory.
3)Controling commands as below:
# echo 1 > /sys/class/leds/gpioE3/brightness
# echo 0 > /sys/class/leds/gpioE3/brightness
![]()
led-timer test
1)led-timer corresponds with D15,this mainly demonstrate GPIO as timer signal.
2)Its property is represented by the relevant files under directory of /sys/class/leds/timer in the system.
3)We can set dealy to control holding time of high/low electrical level of GPIO
4)Controling commands as below:
# echo 1000 > /sys/class/leds/timer/delay_off
5)Control holding time of low electrical level via delay_off,1000 means 1000ms.
# echo 2000 > /sys/class/leds/timer/delay_on
6)Control holding time of low electrical level via delay_on,2000 means 2000ms.
7)After execution of the above two commands,the result: 1 second after D15 goes out,then lit for 2 seconds,cycle this way.
![]()
Serial port test
- MYZR-SAMA5-EK200 evaluation board has 6 serial ports, 5 of them are user serial port, 1 of them is debug serial port(in"P1" on top view of based board).
| MPU definition | function realization | Linux device file | position of connection |
|---|---|---|---|
| DBGU | debug serial port | /dev/ttyS0 | P1 |
| USART0 | RS232 | /dev/ttyS1 | J27:5,6(RX,TX) |
| USART1 | RS232,RS485 | /dev/ttyS2 | J26:14,11(RX,TX) |
| USART2 | RS232,RS485 | /dev/ttyS3 | J26:10,7(RX,TX) |
| USART3 | RS232 | /dev/ttyS4 | J27:1,2(RX,TX) |
| UART0 | RS232 | /dev/ttyS5 | J27:3,4(RX,TX) |
- We will test the 5 user serial port in the test of serial port
Test instruction
- Instruction of test method
Adopt method of self-sending & self-receiving of serial port.
- Instruction of test result
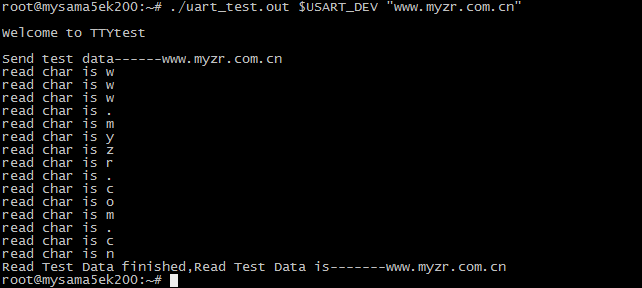
通过测试程序向串口发送字符串,并输出串口接收到的字符串。
send charater string to serial port via test program,and output the charater string received by the serial port
测试方法(test method)
1)Short connect transceiver pins of serial port.
Please find the corresponding pins according to the serial ports which need to be tested and check carefully to make sure 100% correct. if you are not sure of how to do it please ask hardware engineer for a support.it may cause damage to the evaluation board by a wrong short connection
2)Prepare test program
- Download test application
- Download uart_test.out to the evaluation board,reference command as below:
# tftp –gr uart_test.out 192.168.18.18
![]()
- Add executable authority for the test program
# chmod +x uart_test.out
![]()
3)Test USART0(ttyS1)
- Specify serial port which need to be tested
- Specify USART0 as device tested,according to the previous form,UASRT0 correspond with ttyS1
- Execute test command
# ./uart_test.out $USART_DEV "www.myzr.com.cn"

3)Test of other serial ports
- To test other serial ports, you also need to specify the corresponding device file and execute the test command.
# USART_DEV="/dev/ttyS2"
# ./uart_test.out $USART_DEV "www.myzr.com.cn"
![]()
# USART_DEV="/dev/ttyS3"
# ./uart_test.out $USART_DEV "www.myzr.com.cn"
![]()
# USART_DEV="/dev/ttyS4"
# ./uart_test.out $USART_DEV "www.myzr.com.cn"
![]()
# USART_DEV="/dev/ttyS5"
# ./uart_test.out $USART_DEV "www.myzr.com.cn"
![]()
RTC test
Test instruction
Due to restrictions in transportation,MY-SAMA5-EK200 evaluation board doesn't contatin battery in delivery。before RTC test please prepare button cell to install on “BT1”in bottom view of base board(beside silkscreened name of“RTC”).
Test method
1)Power off then reboot device,to check the current time of system and hardware.
- Command to check current system clock as below:
# date
- Message outputed by system as below:
- Tue Nov 17 06:07:13 UTC 2015
2)Command to check clock of RTC chip as below:
# hwclock
- Message outputed by system as below:
Tue Nov 17 06:08:14 2015 0.000000 seconds
![]()
3)Set system clock and synchronously set to RTC chip)
- Command to set system clock as below:
# date -s "2015-11-23 12:34:56"
- Command to write system clock into hardware as below:
# hwclock –w

4)Power off and reboot evaluation board,to check current system clock and hardware clock)
- Please refer to the first step
5)Test result
It will be a newly-set clock after execution of step 3.
SPI test
There are a group of SPI interfaces on MY-SAMA5-EK200,they are on "J22".
Test instruction
- Adopt way of SPI self-sending(output)self-receiving(input).
- MISO pin and MOSI pin of SPI port will be used for the test。MISO pin of SPI port is “no.5 of J22”on the base board,and MOSI pin is “no.1 of J22”.)
Test method
1)Short connect transceiver pin of SPI
Short connect pins no.1 and no.5 of J22 ,and check carefully to make sure 100% correct. if you are not sure of how to do it please ask hardware engineer for a support it may cause damage to the evaluation board by a wrong short connection.
2)Prepare test program
- Download test application
Download spi_test.out to evaluation board, reference command as below:
# tftp –gr spidev_test.out 192.168.18.18
![]()
- Add executable authority for the test program
# chmod +x spidev_test.out
![]()
3)Execute test
# ./spidev_test.out -D /dev/spidev32765.0

4)Test result
If SPI is normal,you can see on terminal the following charaters:
FF FF FF FF FF FF
40 00 00 00 00 95
FF FF FF FF FF FF
FF FF FF FF FF FF
FF FF FF FF FF FF
DE AD BE EF BA AD
F0 0D
CAN infterface test
Test instruction
- Oscilloscope will be used for CAN test,please skip this step for users who don't have oscilloscope.
- Here demonstrate the test for CAN0,the same way for CAN1.
Test method
1)Configure CAN0
Exampled command as below:
# ip link set can0 up type can bitrate 125000

2)Configure connection to oscilloscope
Connect CH1 and CH2 of oscilloscope with “J12”of evaluation board(the blue stand on topside on top view of base board)
Configure oscilloscope(for users who don't know how to use oscilloscope ,please ask hardware engineers for assistance )
3)Execute test command
# cansend can0 5A1#11.2233.44556677.88
![]()
4)Test result
When exectue the test command,at the same time you can see a change of wave shape on oscilloscope.
WIFI test
1)Download WIFI module “8188eu.ko”compiled under directory of “4_programing support/mysama5ek200_image”on the network disk
2)Transfer 8188eu.ko to the directory of “~/my-demo/linux-3.18/”of development board
3)Test
# insmod ~/my-demo/linux-3.18/8188eu.ko
# wpa_passphrase WIFI name WIFI password> /etc/wpa_supplicant.conf
# wpa_supplicant -Dwext -iwlan0 -c/etc/wpa_supplicant.conf -B
# udhcpc -i wlan0
</div>


