“MYZR-IMX6-EK140 Linux-4.1.15 测试手册”的版本间的差异
(→测试方法(test method)) |
|||
| 第1行: | 第1行: | ||
<div> | <div> | ||
| − | =''' | + | ='''测试项目'''= |
------- | ------- | ||
| − | ===测试说明 | + | ===测试说明=== |
:开发板的登录密码是:root。 | :开发板的登录密码是:root。 | ||
| − | |||
| − | == '''网口测试 | + | == '''网口测试''' == |
| − | ===测试方法 | + | ===测试方法=== |
1)连接网线,将板子和电脑的网口用网线相连。<br> | 1)连接网线,将板子和电脑的网口用网线相连。<br> | ||
| − | |||
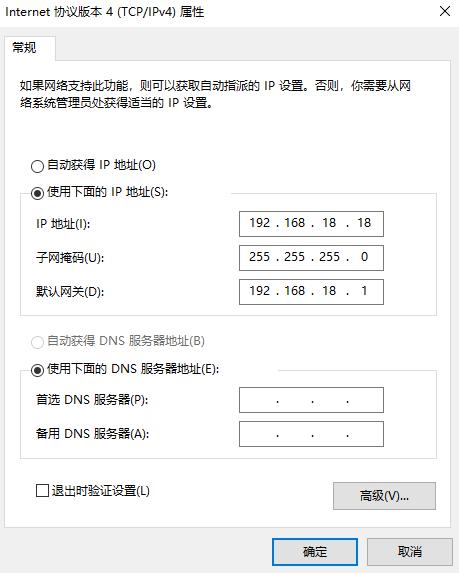
2)设置计算机有线网卡IP为192.168.18.18<br> | 2)设置计算机有线网卡IP为192.168.18.18<br> | ||
| − | |||
<br> | <br> | ||
[[文件:MY-IMX6-ek140 L41115 1.2.1.0 .jpg|520px]]<br> | [[文件:MY-IMX6-ek140 L41115 1.2.1.0 .jpg|520px]]<br> | ||
3) 设置评估板IP:ifconfig eth0 192.168.18.100<br> | 3) 设置评估板IP:ifconfig eth0 192.168.18.100<br> | ||
| − | |||
4)执行测试命令:ping 192.168.18.18 -c 4<br> | 4)执行测试命令:ping 192.168.18.18 -c 4<br> | ||
| − | |||
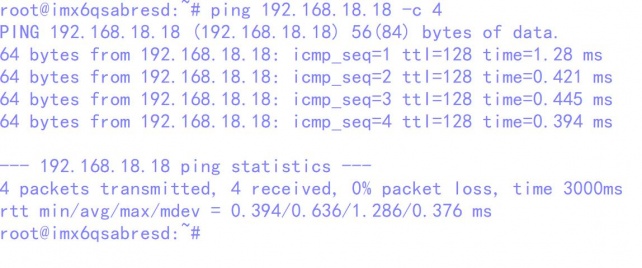
5)测试结果:“0% packet loss”表示测试通过<br> | 5)测试结果:“0% packet loss”表示测试通过<br> | ||
| − | |||
测试通过会出现如下信息:<br> | 测试通过会出现如下信息:<br> | ||
| − | + | 附图:<br> | |
| − | |||
<br> | <br> | ||
[[文件:MY-IMX6-ek140 L41115_1.2.1.1.jpg|642px]] | [[文件:MY-IMX6-ek140 L41115_1.2.1.1.jpg|642px]] | ||
| − | == '''USB测试 | + | == '''USB测试''' == |
| − | ===测试方法 | + | ===测试方法=== |
1)将U盘插入开发板,系统会输出类似如下信息:<br> | 1)将U盘插入开发板,系统会输出类似如下信息:<br> | ||
| − | |||
[[文件:MY-IMX6-ek140 L41115_1.3.1.0.jpg|642px]] <br> | [[文件:MY-IMX6-ek140 L41115_1.3.1.0.jpg|642px]] <br> | ||
2)能识别U盘的大小,则测试通过。<br> | 2)能识别U盘的大小,则测试通过。<br> | ||
| − | |||
| − | == '''SD卡测试 | + | == '''SD卡测试''' == |
| − | ===测试方法 | + | ===测试方法=== |
1)断电,插入SD卡,上电。<br> | 1)断电,插入SD卡,上电。<br> | ||
| − | |||
2)进入系统后,用命令:dmesg | grep mmc0 查询,会有以下输出:<br> | 2)进入系统后,用命令:dmesg | grep mmc0 查询,会有以下输出:<br> | ||
| − | |||
[[文件:MY-IMX6-140_L41115_1.4.1.0.jpg|840px]] | [[文件:MY-IMX6-140_L41115_1.4.1.0.jpg|840px]] | ||
| − | == '''RGB屏测试 | + | == '''RGB屏测试''' == |
| − | ===测试说明 | + | ===测试说明=== |
1)开发板开机进入系统后,屏幕上有几行文字,如图:<br> | 1)开发板开机进入系统后,屏幕上有几行文字,如图:<br> | ||
| − | |||
[[文件:MY-IMX6-ek140 L41115_1.5.1.0.jpg|642px]]<br> | [[文件:MY-IMX6-ek140 L41115_1.5.1.0.jpg|642px]]<br> | ||
2)出现以上显示则说明屏幕正常<br> | 2)出现以上显示则说明屏幕正常<br> | ||
| − | |||
| − | == '''串口测试 | + | == '''串口测试''' == |
| − | ===测试说明 | + | ===测试说明===<br> |
1)评估板总共有8路串口,其中uart1用作调试串口,uart6,uart7,uart8用作LCD,所以有4路串口可供测试使用。<br> | 1)评估板总共有8路串口,其中uart1用作调试串口,uart6,uart7,uart8用作LCD,所以有4路串口可供测试使用。<br> | ||
| − | |||
2)uart1对应的操作文件是/dev/ttymxc0,uart2对应的是/dev/ttymxc1,以此类推。<br> | 2)uart1对应的操作文件是/dev/ttymxc0,uart2对应的是/dev/ttymxc1,以此类推。<br> | ||
| − | |||
3)以uart2为例,通过自发自收的方式来测试。<br> | 3)以uart2为例,通过自发自收的方式来测试。<br> | ||
| − | |||
| − | ===测试方法 | + | ===测试方法=== |
1)将uart2_rxd和uart2_txd短接,查看原理,分别对应P7的11和12脚,将他们短接。<br> | 1)将uart2_rxd和uart2_txd短接,查看原理,分别对应P7的11和12脚,将他们短接。<br> | ||
| − | |||
2)执行测试命令:/home/root/my-demo/linux-4.1.15/uart_test.out /dev/ttymxc1<br> | 2)执行测试命令:/home/root/my-demo/linux-4.1.15/uart_test.out /dev/ttymxc1<br> | ||
| − | |||
3)测试结果如下显示则表示测试通过<br> | 3)测试结果如下显示则表示测试通过<br> | ||
| − | |||
[[文件:MY-IMX6-ek140-L41115_1.6.1.0.jpg|840px]]<br> | [[文件:MY-IMX6-ek140-L41115_1.6.1.0.jpg|840px]]<br> | ||
4)其他串口测试和uart2的方法一样。<br> | 4)其他串口测试和uart2的方法一样。<br> | ||
| − | |||
== '''SPI测试''' == | == '''SPI测试''' == | ||
| − | ===测试说明 | + | ===测试说明:=== |
1)评估板一共有2路SPI,SPI1对应的设备文件是/dev/spidev0.0;SPI2对应的文件是/dev/spidev1.0。<br> | 1)评估板一共有2路SPI,SPI1对应的设备文件是/dev/spidev0.0;SPI2对应的文件是/dev/spidev1.0。<br> | ||
| − | |||
2)以SPI1为测试例子<br> | 2)以SPI1为测试例子<br> | ||
| − | |||
| − | ===测试方法 | + | ===测试方法=== |
1)将P8的24和26脚短接。<br> | 1)将P8的24和26脚短接。<br> | ||
| − | |||
2)执行测试命令:/home/root/my-demo/linux-4.1.15/spidev_test.out -D /dev/spidev0.0<br> | 2)执行测试命令:/home/root/my-demo/linux-4.1.15/spidev_test.out -D /dev/spidev0.0<br> | ||
| − | |||
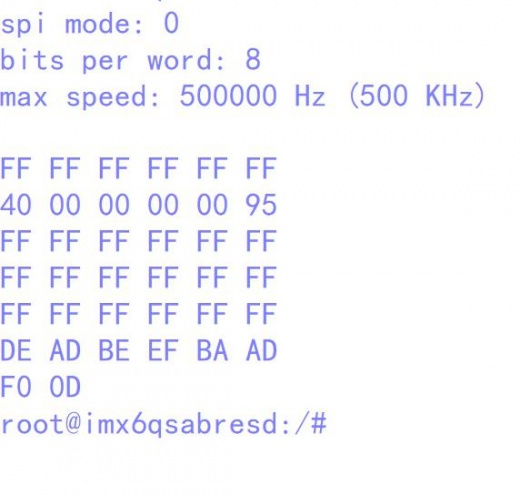
3)测试结果如下显示则表示测试通过<br> | 3)测试结果如下显示则表示测试通过<br> | ||
| − | |||
[[文件:MY-IMX6-ek140-L41115_1.7.2.0.jpg|520px]]<br> | [[文件:MY-IMX6-ek140-L41115_1.7.2.0.jpg|520px]]<br> | ||
说明:SPI2测试方法同SPI1(即同上)。<br> | 说明:SPI2测试方法同SPI1(即同上)。<br> | ||
| − | |||
== '''CAN测试''' == | == '''CAN测试''' == | ||
| − | ===测试说明 | + | ===测试说明=== |
评估板有2路CAN,因为CAN的测试需要焊接CAN的收发芯片,此评估板没有焊接CAN的收发芯片,若需要测试可以参照[[MY-IMX6-EK140P_L4115_测试手册|MY-IMX6-EK140P Linux-4.1.15 测试手册]]<br> | 评估板有2路CAN,因为CAN的测试需要焊接CAN的收发芯片,此评估板没有焊接CAN的收发芯片,若需要测试可以参照[[MY-IMX6-EK140P_L4115_测试手册|MY-IMX6-EK140P Linux-4.1.15 测试手册]]<br> | ||
| − | |||
| − | == '''标准GPIO测试 | + | == '''标准GPIO测试''' == |
| − | ===测试说明 | + | ===测试说明=== |
| − | 1)接口属性 | + | 1)接口属性 |
{| class="wikitable" | {| class="wikitable" | ||
|评估板型号 | |评估板型号 | ||
| − | |||
|CPU接口 | |CPU接口 | ||
| − | + | |系统设备 | |
| − | | 系统设备 | ||
| − | |||
|信号名称 | |信号名称 | ||
| − | |||
|接口位置 | |接口位置 | ||
| − | |||
|- | |- | ||
|rowspan=2|MY-IMX6-EK140 | |rowspan=2|MY-IMX6-EK140 | ||
| 第123行: | 第91行: | ||
|} | |} | ||
2)GPIO序号的计算方法。例如SNVS_TAMPER2,查看arch/arm/boot/dts/imx6ul-pinfunc.h文件,可以看到它属于GPIO组5的第2个IO,IO序号 = (GPIO组-1)*32 + IO 。所以SNVS_TAMPER2 = (5-1)*32 + 2 = 130。 | 2)GPIO序号的计算方法。例如SNVS_TAMPER2,查看arch/arm/boot/dts/imx6ul-pinfunc.h文件,可以看到它属于GPIO组5的第2个IO,IO序号 = (GPIO组-1)*32 + IO 。所以SNVS_TAMPER2 = (5-1)*32 + 2 = 130。 | ||
| − | |||
| − | ===测试方法 | + | ===测试方法=== |
1)设置需要测试的GPIO的IO序号:OUT_IO_NUMBER=130。<br> | 1)设置需要测试的GPIO的IO序号:OUT_IO_NUMBER=130。<br> | ||
| − | |||
2)导出GPIO:echo ${OUT_IO_NUMBER} > /sys/class/gpio/export<br> | 2)导出GPIO:echo ${OUT_IO_NUMBER} > /sys/class/gpio/export<br> | ||
| − | |||
3)设置GPIO方向:echo out > /sys/class/gpio/gpio130/direction。<br> | 3)设置GPIO方向:echo out > /sys/class/gpio/gpio130/direction。<br> | ||
| − | |||
4)控制输出电平:echo 0 > /sys/class/gpio/gpio130/value。<br> | 4)控制输出电平:echo 0 > /sys/class/gpio/gpio130/value。<br> | ||
| − | |||
:执行命令后可用万用表测P8的32脚为低电平。<br> | :执行命令后可用万用表测P8的32脚为低电平。<br> | ||
| − | |||
:执行命令后可用万用表测P8的32脚为高电平。<br> | :执行命令后可用万用表测P8的32脚为高电平。<br> | ||
| − | |||
:其他GPIO的测试方法同上例子。<br> | :其他GPIO的测试方法同上例子。<br> | ||
| − | |||
</div> | </div> | ||
2018年7月27日 (五) 10:55的版本
目录
测试项目
测试说明
- 开发板的登录密码是:root。
网口测试
测试方法
1)连接网线,将板子和电脑的网口用网线相连。
2)设置计算机有线网卡IP为192.168.18.18

3) 设置评估板IP:ifconfig eth0 192.168.18.100
4)执行测试命令:ping 192.168.18.18 -c 4
5)测试结果:“0% packet loss”表示测试通过
测试通过会出现如下信息:
附图:

USB测试
测试方法
1)将U盘插入开发板,系统会输出类似如下信息:

2)能识别U盘的大小,则测试通过。
SD卡测试
测试方法
1)断电,插入SD卡,上电。
2)进入系统后,用命令:dmesg | grep mmc0 查询,会有以下输出:

RGB屏测试
测试说明
1)开发板开机进入系统后,屏幕上有几行文字,如图:

2)出现以上显示则说明屏幕正常
串口测试
===测试说明===
1)评估板总共有8路串口,其中uart1用作调试串口,uart6,uart7,uart8用作LCD,所以有4路串口可供测试使用。
2)uart1对应的操作文件是/dev/ttymxc0,uart2对应的是/dev/ttymxc1,以此类推。
3)以uart2为例,通过自发自收的方式来测试。
测试方法
1)将uart2_rxd和uart2_txd短接,查看原理,分别对应P7的11和12脚,将他们短接。
2)执行测试命令:/home/root/my-demo/linux-4.1.15/uart_test.out /dev/ttymxc1
3)测试结果如下显示则表示测试通过

4)其他串口测试和uart2的方法一样。
SPI测试
测试说明:
1)评估板一共有2路SPI,SPI1对应的设备文件是/dev/spidev0.0;SPI2对应的文件是/dev/spidev1.0。
2)以SPI1为测试例子
测试方法
1)将P8的24和26脚短接。
2)执行测试命令:/home/root/my-demo/linux-4.1.15/spidev_test.out -D /dev/spidev0.0
3)测试结果如下显示则表示测试通过

说明:SPI2测试方法同SPI1(即同上)。
CAN测试
测试说明
评估板有2路CAN,因为CAN的测试需要焊接CAN的收发芯片,此评估板没有焊接CAN的收发芯片,若需要测试可以参照MY-IMX6-EK140P Linux-4.1.15 测试手册
标准GPIO测试
测试说明
1)接口属性
| 评估板型号 | CPU接口 | 系统设备 | 信号名称 | 接口位置 |
| MY-IMX6-EK140 | SNVS_TAMPER2 | gpio130 | SNVS_TAMPER2 | P8:32 |
| SNVS_TAMPER3 | gpio131 | SNVS_TAMPER3 | P8:34 |
2)GPIO序号的计算方法。例如SNVS_TAMPER2,查看arch/arm/boot/dts/imx6ul-pinfunc.h文件,可以看到它属于GPIO组5的第2个IO,IO序号 = (GPIO组-1)*32 + IO 。所以SNVS_TAMPER2 = (5-1)*32 + 2 = 130。
测试方法
1)设置需要测试的GPIO的IO序号:OUT_IO_NUMBER=130。
2)导出GPIO:echo ${OUT_IO_NUMBER} > /sys/class/gpio/export
3)设置GPIO方向:echo out > /sys/class/gpio/gpio130/direction。
4)控制输出电平:echo 0 > /sys/class/gpio/gpio130/value。
- 执行命令后可用万用表测P8的32脚为低电平。
- 执行命令后可用万用表测P8的32脚为高电平。
- 其他GPIO的测试方法同上例子。