“MY-IMX6 L3035编译手册”的版本间的差异
(→u-boot配置) |
|||
| 第1行: | 第1行: | ||
| − | = '''准备源码包''' = | + | = '''准备源码包(prepare source code pacakge)'''= |
---- | ---- | ||
| − | == '''3.0.35版本代码''' == | + | == '''3.0.35版本代码(3.0.35 version code)'''== |
| − | === u-boot源码 === | + | |
| + | |||
| + | === u-boot源码(u-boot source code) === | ||
文件名:uboot-imx-imx_v2009.08_3.0.35_4.1.0.tar.bz2<br> | 文件名:uboot-imx-imx_v2009.08_3.0.35_4.1.0.tar.bz2<br> | ||
| − | === kernel源码 === | + | <span style="background:#CCCCCC">name of file:uboot-imx-imx_v2009.08_3.0.35_4.1.0.tar.bz2</span><br> |
| + | |||
| + | |||
| + | === kernel源码(kernel source code) === | ||
文件名:linux-2.6-imx-imx_3.0.35_4.1.0.tar.bz2<br> | 文件名:linux-2.6-imx-imx_3.0.35_4.1.0.tar.bz2<br> | ||
| − | === 交叉编译工具 === | + | <span style="background:#CCCCCC">name of file:linux-2.6-imx-imx_3.0.35_4.1.0.tar.bz2</span><br> |
| + | |||
| + | |||
| + | === 交叉编译工具 (cross compifer tool)=== | ||
文件名:gcc-4.6.2-glibc-2.13-linaro-multilib-2011.12.tar.bz2<br> | 文件名:gcc-4.6.2-glibc-2.13-linaro-multilib-2011.12.tar.bz2<br> | ||
| − | = '''配置编译环境''' = | + | <span style="background:#CCCCCC">name of file:gcc-4.6.2-glibc-2.13-linaro-multilib-2011.12.tar.bz2</span><br> |
| + | |||
| + | |||
| + | = '''配置编译环境(configuration of compifer environment)'''= | ||
---- | ---- | ||
| − | == '''准备源码''' == | + | == '''准备源码(prepare source code)'''== |
| − | === 准备源码包 === | + | |
| + | |||
| + | === 准备源码包 (prepare source code package)=== | ||
1)创建工作目录<br> | 1)创建工作目录<br> | ||
| + | <span style="background:#CCCCCC">create working directory</span><br> | ||
创建 ~/my-imx6 作为工作目录<br> | 创建 ~/my-imx6 作为工作目录<br> | ||
| − | <span style="background:# | + | <span style="background:#CCCCCC">create ~/my-imx6 as working directory</span><br> |
| + | |||
| + | $ mkdir ~/my-imx6<br> | ||
[[文件: myimx6l3035_build_2.1.1.1.jpg]]<br> | [[文件: myimx6l3035_build_2.1.1.1.jpg]]<br> | ||
| + | |||
创建 ~/my-imx6/02_source/imx_3.0.35_4.1.0 作为源码目录<br> | 创建 ~/my-imx6/02_source/imx_3.0.35_4.1.0 作为源码目录<br> | ||
| − | <span style="background:# | + | <span style="background:#CCCCCC">create ~/my-imx6/02_source/imx_3.0.35_4.1.0 as source code directory</span><br> |
| + | |||
| + | $ mkdir ~/my-imx6/02_source/imx_3.0.35_4.1.0 -p<br> | ||
[[文件: myimx6l3035_build_2.1.1.2.jpg]]<br> | [[文件: myimx6l3035_build_2.1.1.2.jpg]]<br> | ||
| + | |||
创建 ~/my-imx6/03_tools 作为工具目录<br> | 创建 ~/my-imx6/03_tools 作为工具目录<br> | ||
| − | <span style="background:# | + | <span style="background:#CCCCCC">create ~/my-imx6/03_tools as tool directory</span><br> |
| + | |||
| + | $ mkdir ~/my-imx6/03_tools -p<br> | ||
[[文件: myimx6l3035_build_2.1.1.3.jpg]]<br> | [[文件: myimx6l3035_build_2.1.1.3.jpg]]<br> | ||
| + | |||
2)复制源码包到开发主机中<br> | 2)复制源码包到开发主机中<br> | ||
| + | <span style="background:#CCCCCC">copy source code package to the development host</span><br> | ||
这一步骤自己采取相应的方式进行。<br> | 这一步骤自己采取相应的方式进行。<br> | ||
| − | + | <span style="background:#CCCCCC">do it in this step in your own way。</span><br> | |
| + | ''提示:这里将网盘中“02_源码”复制到Linux开发主机的“~/my-imx6/02_source/imx_3.0.35_4.1.0”,将网盘中“03_工具/toolchain”复制到Linux开发主机的“~/my-imx6/03_tools”。''<br> | ||
| + | <span style="background:#CCCCCC">tip:this step is to copy “02_source code”from network disk to “~/my-imx6/02_source/imx_3.0.35_4.1.0”in development host,and copy “03_tool/toolchain”to “~/my-imx6/03_tools”。''in development host</span><br> | ||
| − | === 解压源码包 === | + | |
| + | === 解压源码包 (decompress source code package)=== | ||
1)解压u-boot源码和内核源码<br> | 1)解压u-boot源码和内核源码<br> | ||
| − | <span style="background:# | + | <span style="background:#CCCCCC">decompress u-boot source code and kernel source code</span><br> |
| − | + | ||
| − | + | $ cd ~/my-imx6/02_source/imx_3.0.35_4.1.0<br> | |
| + | $ tar jxf uboot-imx-imx_v2009.08_3.0.35_4.1.0.tar.bz2<br> | ||
| + | $ tar jxf linux-2.6-imx-imx_3.0.35_4.1.0.tar.bz2<br> | ||
[[文件: myimx6l3035_build_2.1.2.1.jpg]]<br> | [[文件: myimx6l3035_build_2.1.2.1.jpg]]<br> | ||
| + | |||
2)解压交叉编译工具<br> | 2)解压交叉编译工具<br> | ||
| − | <span style="background:# | + | <span style="background:#CCCCCC">decompress cross compiler tool</span><br> |
| − | + | ||
| + | $ cd ~/my-imx6/03_tools/<br> | ||
| + | $ tar jxf gcc-4.6.2-glibc-2.13-linaro-multilib-2011.12.tar.bz2<br> | ||
[[文件: myimx6l3035_build_2.1.2.2.jpg]]<br> | [[文件: myimx6l3035_build_2.1.2.2.jpg]]<br> | ||
| − | == '''开发环境配置''' == | + | |
| − | === 安装需要的包 === | + | |
| + | == '''开发环境配置(development environment configuration)'''== | ||
| + | === 安装需要的包 (install package needed)=== | ||
1)更新源列表<br> | 1)更新源列表<br> | ||
| − | <span style="background:# | + | <span style="background:#CCCCCC">list of updated source</span><br> |
| + | |||
| + | $ sudo apt-get update<br> | ||
[[文件: myimx6l3035_build_2.2.1.1.jpg]]<br> | [[文件: myimx6l3035_build_2.2.1.1.jpg]]<br> | ||
更新完成后如下图所示:<br> | 更新完成后如下图所示:<br> | ||
| − | <span style="background:# | + | <span style="background:#CCCCCC">after update,it will look like below:</span><br> |
| + | |||
| + | $ sudo apt-get update<br> | ||
[[文件: myimx6l3035_build_2.2.1.2.jpg]]<br> | [[文件: myimx6l3035_build_2.2.1.2.jpg]]<br> | ||
| + | |||
2)安装aptitude包管理工具和ia32-libs<br> | 2)安装aptitude包管理工具和ia32-libs<br> | ||
| + | <span style="background:#CCCCCC">install aptitude package management tool and ia32-libs</span><br> | ||
''提示:如果编译主机的Linux是32位的,可以跳过此步骤。''<br> | ''提示:如果编译主机的Linux是32位的,可以跳过此步骤。''<br> | ||
| + | <span style="background:#CCCCCC">tips:if Linux of compiler host is 32bit,you can skip this step。</span><br> | ||
| + | |||
* 安装aptitude包管理工具<br> | * 安装aptitude包管理工具<br> | ||
| + | <span style="background:#CCCCCC">install aptitude package management tool</span><br> | ||
[[文件: myimx6l3035_build_2.2.1.3.jpg]]<br> | [[文件: myimx6l3035_build_2.2.1.3.jpg]]<br> | ||
| − | + | ||
| + | $ sudo apt-get –y install aptitude<br> | ||
| + | |||
* 使用aptitude安装ia32-libs<br> | * 使用aptitude安装ia32-libs<br> | ||
| − | <span style="background:# | + | <span style="background:#CCCCCC">install ia32-libs with aptitude</span><br> |
| + | |||
| + | $ sudo aptitude –y install ia32-libs<br> | ||
''提示:下图为安装过aptitude和ia32-libs后,再次执行安装命令的截图。''<br> | ''提示:下图为安装过aptitude和ia32-libs后,再次执行安装命令的截图。''<br> | ||
| + | <span style="background:#CCCCCC">tips:following is the screenshots with re-execution of installation command after installation of aptitude and ia32-libs is finished。</span><br> | ||
[[文件: myimx6l3035_build_2.2.1.4.jpg]]<br> | [[文件: myimx6l3035_build_2.2.1.4.jpg]]<br> | ||
| + | |||
3)安装mkimage工具<br> | 3)安装mkimage工具<br> | ||
| − | <span style="background:# | + | <span style="background:#CCCCCC">install mkimage tool</span><br> |
| + | |||
| + | $ sudo apt-get -y install uboot-mkimage<br> | ||
''提示:下图为安装过mkimage工具后,再次执行安装命令的截图。''<br> | ''提示:下图为安装过mkimage工具后,再次执行安装命令的截图。''<br> | ||
| + | <span style="background:#CCCCCC">tips:following is the screenshots with re-execution of installation command after installation of mkimage tool is finished。</span><br> | ||
[[文件: myimx6l3035_build_2.2.1.5.jpg]]<br> | [[文件: myimx6l3035_build_2.2.1.5.jpg]]<br> | ||
| + | |||
4)安装ncurses-dev<br> | 4)安装ncurses-dev<br> | ||
| + | <span style="background:#CCCCCC">install ncurses-dev</span><br> | ||
<span style="color: red">说明:make menuconfig对其具有依赖性质。</span><br> | <span style="color: red">说明:make menuconfig对其具有依赖性质。</span><br> | ||
| − | <span style="background:# | + | <span style="background:#CCCCCC"><span style="color: red">instruction:make menuconfig is dependent on it。</span></span><br> |
| + | $ sudo aptitude -y install ncurses-dev<br> | ||
| + | |||
''提示:下图为安装过ncurses-dev工具后,再次执行安装命令的截图。''<br> | ''提示:下图为安装过ncurses-dev工具后,再次执行安装命令的截图。''<br> | ||
| + | <span style="background:#CCCCCC">tips:following is the screenshots with re-execution of installation command after installation of ncurses-dev tool is finished。</span><br> | ||
[[文件: myimx6l3035_build_2.2.1.6.jpg]]<br> | [[文件: myimx6l3035_build_2.2.1.6.jpg]]<br> | ||
| − | === 配置MY-IMX6编译的环境变量 === | + | |
| + | |||
| + | === 配置MY-IMX6编译的环境变量 (configure environment variables of MY-IMX6 compilation)=== | ||
1)将平台信息写入到一个新的配置文件<br> | 1)将平台信息写入到一个新的配置文件<br> | ||
| − | <span style="background:# | + | <span style="background:#CCCCCC">write platform information to a new configured file</span><br> |
| + | |||
| + | $ echo "export ARCH=arm" > ~/my-imx6/03_tools/myimx6_3035_build_env<br> | ||
| + | |||
2)将交叉编译工具链路径写入到配置文件<br> | 2)将交叉编译工具链路径写入到配置文件<br> | ||
| + | <span style="background:#CCCCCC">write compiler tool chain path to configured file</span><br> | ||
| + | |||
* 进入交叉编译工具目录<br> | * 进入交叉编译工具目录<br> | ||
| − | <span style="background:# | + | <span style="background:#CCCCCC">enter cross compiler tool directory</span><br> |
| + | $ cd ~/my-imx6/03_tools/gcc-4.6.2-glibc-2.13-linaro-multilib-2011.12/fsl-linaro-toolchain/bin/<br> | ||
| + | |||
* 将路径写入到配置文件<br> | * 将路径写入到配置文件<br> | ||
| − | <span style="background:# | + | <span style="background:#CCCCCC">write path to configured file</span><br> |
| + | |||
| + | $ sed -i "\$a IMX6_GCC462_PATH=$PWD" ~/my-imx6/03_tools/myimx6_3035_build_env<br> | ||
| + | |||
* 将交叉编译工具写入到配置文件<br> | * 将交叉编译工具写入到配置文件<br> | ||
| − | <span style="background:# | + | <span style="background:#CCCCCC">write cross compiler tool to configured file</span><br> |
| + | |||
| + | $ sed -i "\$a export CROSS_COMPILE=\$IMX6_GCC462_PATH/arm-none-linux-gnueabi-" ~/my-imx6/03_tools/myimx6_3035_build_env<br> | ||
| + | |||
3)查看配置文件<br> | 3)查看配置文件<br> | ||
| − | <span style="background:# | + | <span style="background:#CCCCCC">view configured file</span><br> |
| + | |||
| + | $ cat ~/my-imx6/03_tools/myimx6_3035_build_env<br> | ||
| + | |||
4)附图<br> | 4)附图<br> | ||
| + | <span style="background:#CCCCCC">figures</span><br> | ||
[[文件: myimx6l3035_build_2.2.2.1.jpg]]<br> | [[文件: myimx6l3035_build_2.2.2.1.jpg]]<br> | ||
| + | |||
注意:如果在某一步操作错误,则需要删除 ~/my-imx6/03_tools/myimx6_3035_build_env 文件,并重新按照本小节操作。<br> | 注意:如果在某一步操作错误,则需要删除 ~/my-imx6/03_tools/myimx6_3035_build_env 文件,并重新按照本小节操作。<br> | ||
| + | <span style="background:#CCCCCC">note:if an error occurs in any step, need to delect ~/my-imx6/03_tools/myimx6_3035_build_env ,and operate again all steps of this segment。</span><br> | ||
| + | |||
| − | = '''编译u-boot''' = | + | = '''编译u-boot(compile u-boot)'''= |
---- | ---- | ||
| − | == '''进入u-boot源码目录''' == | + | == '''进入u-boot源码目录(enter u-boot source code directory)'''== |
| − | + | $ cd ~/my-imx6/02_source/imx_3.0.35_4.1.0/uboot-imx-imx_v2009.08_3.0.35_4.1.0/<br> | |
[[文件: myimx6l3035_build_3.1.0.1.jpg]]<br> | [[文件: myimx6l3035_build_3.1.0.1.jpg]]<br> | ||
| − | == '''使配置文件生效''' == | + | |
| + | |||
| + | == '''使配置文件生效(validate configured file)'''== | ||
* 执行source命令<br> | * 执行source命令<br> | ||
| − | <span style="background:# | + | <span style="background:#CCCCCC">execute source command</span><br> |
| + | |||
| + | $ source ~/my-imx6/03_tools/myimx6_3035_build_env<br> | ||
[[文件: myimx6l3035_build_3.2.0.1.jpg]]<br> | [[文件: myimx6l3035_build_3.2.0.1.jpg]]<br> | ||
| + | |||
* 查看编译配置<br> | * 查看编译配置<br> | ||
| − | <span style="background:# | + | <span style="background:#CCCCCC">view compiler configuration</span><br> |
| − | < | + | |
| + | $ echo $ARCH<br> | ||
| + | $ echo $CROSS_COMPILE<br> | ||
| + | |||
''提示:可看到ARCH和CROSS_COMPILE被设置''<br> | ''提示:可看到ARCH和CROSS_COMPILE被设置''<br> | ||
| + | <span style="background:#CCCCCC">tips:you can see that ARCH和CROSS_COMPILE is configured</span><br> | ||
[[文件: myimx6l3035_build_3.2.0.2.jpg]]<br> | [[文件: myimx6l3035_build_3.2.0.2.jpg]]<br> | ||
| + | |||
* 验证交叉编译工具配置<br> | * 验证交叉编译工具配置<br> | ||
| − | <span style="background:# | + | <span style="background:#CCCCCC">verify cross compiler tool configuration</span><br> |
| + | |||
| + | $${CROSS_COMPILE}gcc –v<br> | ||
''提示:执行命令后可以看到终端显示出交叉编译工具的版本信息。如下图:''<br> | ''提示:执行命令后可以看到终端显示出交叉编译工具的版本信息。如下图:''<br> | ||
| + | <span style="background:#CCCCCC">tips:you can see version information of cross compiler tool shown on terminal after execution of command.as below:</span><br> | ||
[[文件: myimx6l3035_build_3.2.0.3.jpg]]<br> | [[文件: myimx6l3035_build_3.2.0.3.jpg]]<br> | ||
| − | == '''清除u-boot配置''' == | + | |
| − | + | ||
| + | == '''清除u-boot配置(remove u-boot configuration)'''== | ||
| + | $ make distclean<br> | ||
[[文件: myimx6l3035_build_3.3.0.1.jpg]]<br> | [[文件: myimx6l3035_build_3.3.0.1.jpg]]<br> | ||
| − | == '''u-boot配置''' == | + | |
| + | |||
| + | == '''u-boot配置(u-boot configuration)'''== | ||
* 评估板及对应的 u-boot 编译配置:<br> | * 评估板及对应的 u-boot 编译配置:<br> | ||
| + | <span style="background:#CCCCCC">evaluation board and its corresponding u-boot compiler configuration:</span><br> | ||
{| class="wikitable" | {| class="wikitable" | ||
|- | |- | ||
| − | !评估板主型号 | + | !评估板主型号<br>(evaluation board main model) |
| − | !CPU类型-内存容量 | + | !CPU类型-内存容量<br>(CPU type-memory capacity) |
| − | !对应的u-boot配置 | + | !对应的u-boot配置<br>(corresponding u-boot configuration) |
|- | |- | ||
|rowspan=4|MY-IMX6-EK200 | |rowspan=4|MY-IMX6-EK200 | ||
| − | |6Q(四核)- 1G | + | |6Q(四核)- 1G <br>(6Q(quad. core)- 1G) |
|myimx6ek200_6q_config | |myimx6ek200_6q_config | ||
|- | |- | ||
| − | |6Q(四核)- 2G | + | |6Q(四核)- 2G <br>(6Q(quad core)- 2G) |
|myimx6ek200_6q_2g_config | |myimx6ek200_6q_2g_config | ||
|- | |- | ||
| − | |6U(双核简化)- 1G | + | |6U(双核简化)- 1G<br>(6U(dual core tile)- 1G) |
|myimx6ek200_6u_config | |myimx6ek200_6u_config | ||
|- | |- | ||
| − | |6S(单核)- 512M | + | |6S(单核)- 512M<br>(6S(single core)- 512M) |
|myimx6ek200_6s_config | |myimx6ek200_6s_config | ||
|- | |- | ||
|rowspan=4|MY-IMX6-EK314 | |rowspan=4|MY-IMX6-EK314 | ||
| − | |6Q(四核)- 1G | + | |6Q(四核)- 1G <br>(6Q(quad.core)- 1G) |
|myimx6ek314_6q_config | |myimx6ek314_6q_config | ||
|- | |- | ||
| − | |6Q(四核)- 2G | + | |6Q(四核)- 2G <br>(6Q(quad.core)- 2G) |
|myimx6ek314_6q_2g_config | |myimx6ek314_6q_2g_config | ||
|- | |- | ||
| − | |6U(双核简化)- 1G | + | |6U(双核简化)- 1G<br>(6U(dual core tile)- 1G) |
|myimx6ek314_6u_config | |myimx6ek314_6u_config | ||
|- | |- | ||
| − | |6S(单核)- 512M | + | |6S(单核)- 512M<br>(6S(single core)- 512M) |
|myimx6ek314_6s_config | |myimx6ek314_6s_config | ||
|} | |} | ||
* MYIMX6EK200-6Qxx-1G配置示例:<br> | * MYIMX6EK200-6Qxx-1G配置示例:<br> | ||
| − | + | <span style="background:#CCCCCC">MYIMX6EK200-6Qxx-1G configuration example:</span><br> | |
| + | |||
| + | $ make myimx6ek200_6q_config<br> | ||
[[文件: myimx6l3035_build_3.3.0.2.jpg]]<br> | [[文件: myimx6l3035_build_3.3.0.2.jpg]]<br> | ||
| − | == '''编译''' == | + | |
| + | == '''编译(compilation)'''== | ||
* 执行编译<br> | * 执行编译<br> | ||
| − | <span style="background:# | + | <span style="background:#CCCCCC">execute compilation</span><br> |
| + | |||
| + | $ make<br> | ||
''提示:这里为了提高编译速度,在make后面加了“-j4”。这里编译的Linux主机是双核4线程的,所以“-j”后面用了4,也就是采用4线程编译。“-j”后面的数字可以根据系统资源分配,但是不应该超过编译主机最大支持的线程数。''<br> | ''提示:这里为了提高编译速度,在make后面加了“-j4”。这里编译的Linux主机是双核4线程的,所以“-j”后面用了4,也就是采用4线程编译。“-j”后面的数字可以根据系统资源分配,但是不应该超过编译主机最大支持的线程数。''<br> | ||
| + | <span style="background:#CCCCCC">Tips:To speed up the compilation,add "-j4" after make.The Linux host used to compile is dual-core ,4 threads .So "-j" is followed by 4, which takes 4 threads to compile. The number behind "-j" is allocated based on system resources,but It should not exceed the maximum threads the host support。</span><br> | ||
[[文件: myimx6l3035_build_3.5.0.1.jpg]]<br> | [[文件: myimx6l3035_build_3.5.0.1.jpg]]<br> | ||
| + | |||
* 编译完成<br> | * 编译完成<br> | ||
| + | <span style="background:#CCCCCC">complete compilation</span><br> | ||
''提示:u-boot编译过程大概需要几分钟时间。''<br> | ''提示:u-boot编译过程大概需要几分钟时间。''<br> | ||
| + | <span style="background:#CCCCCC">tips:u-boot compilation process will take a few minustes or so。</span><br> | ||
[[文件: myimx6l3035_build_3.5.0.2.jpg]]<br> | [[文件: myimx6l3035_build_3.5.0.2.jpg]]<br> | ||
| − | == '''目标文件''' == | + | |
| + | |||
| + | == '''目标文件(target file)'''== | ||
编译完成后通过ls命令即可看到编译得到的目标文件u-boot.bin<br> | 编译完成后通过ls命令即可看到编译得到的目标文件u-boot.bin<br> | ||
| − | <span style="background:# | + | <span style="background:#CCCCCC">you can get the compiled file u-boot.bin with ls command after compilation</span><br> |
| + | |||
| + | $ ls<br> | ||
[[文件: myimx6l3035_build_3.6.0.1.jpg]]<br> | [[文件: myimx6l3035_build_3.6.0.1.jpg]]<br> | ||
| − | = '''编译内核''' = | + | |
| + | |||
| + | = '''编译内核(compile kernel)'''= | ||
---- | ---- | ||
| − | == '''进入内核源码目录''' == | + | == '''进入内核源码目录(enter kernel source directory)'''== |
| − | + | $ cd ~/my-imx6/02_source/imx_3.0.35_4.1.0/linux-2.6-imx-imx_3.0.35_4.1.0/<br> | |
[[文件: myimx6l3035_build_4.1.0.1.jpg]]<br> | [[文件: myimx6l3035_build_4.1.0.1.jpg]]<br> | ||
| − | == '''使配置文件生效''' == | + | |
| + | |||
| + | == '''使配置文件生效(validate configured file)'''== | ||
* 执行source命令<br> | * 执行source命令<br> | ||
| − | <span style="background:# | + | <span style="background:#CCCCCC">execute source command</span><br> |
| + | |||
| + | $ source ~/my-imx6/03_tools/myimx6_3035_build_env<br> | ||
[[文件: myimx6l3035_build_4.2.0.1.jpg]]<br> | [[文件: myimx6l3035_build_4.2.0.1.jpg]]<br> | ||
| + | |||
* 查看编译配置<br> | * 查看编译配置<br> | ||
| − | <span style="background:# | + | <span style="background:#CCCCCC">view compiler configuration</span><br> |
| − | < | + | |
| + | $ echo $ARCH<br> | ||
| + | $ echo $CROSS_COMPILE<br> | ||
| + | |||
''提示:可看到ARCH和CROSS_COMPILE被设置''<br> | ''提示:可看到ARCH和CROSS_COMPILE被设置''<br> | ||
| + | <span style="background:#CCCCCC">tips:you can see that ARCH和CROSS_COMPILE is configured</span><br> | ||
[[文件: myimx6l3035_build_4.2.0.2.jpg]]<br> | [[文件: myimx6l3035_build_4.2.0.2.jpg]]<br> | ||
| + | |||
* 验证交叉编译工具配置<br> | * 验证交叉编译工具配置<br> | ||
| − | <span style="background:# | + | <span style="background:#CCCCCC">verify cross compiler tool configuration</span><br> |
| + | |||
| + | $ ${CROSS_COMPILE}gcc –v<br> | ||
| + | |||
''提示:执行命令后可以看到终端显示出交叉编译工具的版本信息。如下图:''<br> | ''提示:执行命令后可以看到终端显示出交叉编译工具的版本信息。如下图:''<br> | ||
| + | <span style="background:#CCCCCC">tips:you can see version information of cross compiler tool shown on terminal after execution of command.as below:</span><br> | ||
[[文件: myimx6l3035_build_4.2.0.3.jpg]]<br> | [[文件: myimx6l3035_build_4.2.0.3.jpg]]<br> | ||
| − | == '''准备配置内核''' == | + | |
| + | |||
| + | == '''准备配置内核(prepare for kernel configuration)'''== | ||
* 清除内核配置<br> | * 清除内核配置<br> | ||
| − | <span style="background:# | + | <span style="background:#CCCCCC">remove kernel configuration</span><br> |
| + | |||
| + | $ make distclean<br> | ||
[[文件: myimx6l3035_build_4.3.0.1.jpg]]<br> | [[文件: myimx6l3035_build_4.3.0.1.jpg]]<br> | ||
| + | |||
* 生成.config文件<br> | * 生成.config文件<br> | ||
| + | <span style="background:#CCCCCC">generated.config file</span><br> | ||
| + | |||
说明:MY-IMX6-EK200系列评估板及MY-IMX6-EK314系列评估板使用的配置文件是myimx6_defconfig<br> | 说明:MY-IMX6-EK200系列评估板及MY-IMX6-EK314系列评估板使用的配置文件是myimx6_defconfig<br> | ||
| − | <span style="background:# | + | <span style="background:#CCCCCC">instructions:configuration files used for MY-IMX6-EK200 seires of evaluation board and MY-IMX6-EK314 series of evaluation board is myimx6_defconfig</span><br> |
| + | $ make myimx6_defconfig<br> | ||
[[文件: myimx6l3035_build_4.3.0.2.jpg]]<br> | [[文件: myimx6l3035_build_4.3.0.2.jpg]]<br> | ||
| − | == '''编译内核''' == | + | |
| + | |||
| + | == '''编译内核(compile kernel)'''== | ||
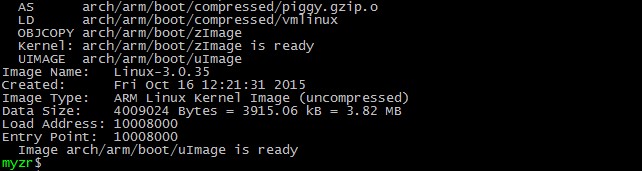
* 编译uImage<br> | * 编译uImage<br> | ||
| − | <span style="background:# | + | <span style="background:#CCCCCC">compile uImage</span><br> |
| + | $ make uImage<br> | ||
| + | |||
说明:截图中使用了4线程编译。<br> | 说明:截图中使用了4线程编译。<br> | ||
| + | <span style="background:#CCCCCC">instruction:4 threads compilation is used in the screenshots。</span><br> | ||
[[文件: myimx6l3035_build_4.4.0.1.jpg]]<br> | [[文件: myimx6l3035_build_4.4.0.1.jpg]]<br> | ||
| + | |||
* 编译完成<br> | * 编译完成<br> | ||
| + | <span style="background:#CCCCCC">complete compilation</span><br> | ||
[[文件: myimx6l3035_build_4.4.0.2.jpg]]<br> | [[文件: myimx6l3035_build_4.4.0.2.jpg]]<br> | ||
| + | |||
* 目标文件<br> | * 目标文件<br> | ||
| + | <span style="background:#CCCCCC">target file</span><br> | ||
| + | |||
arch/arm/boot/uImage即为编译得到的目标文件,使用ls命令可查看文件信息。<br> | arch/arm/boot/uImage即为编译得到的目标文件,使用ls命令可查看文件信息。<br> | ||
| − | <span style="background:# | + | <span style="background:#CCCCCC">arch/arm/boot/uImage is the target file through compilation,you can view the file information with ls command。</span><br> |
| + | |||
| + | $ ls arch/arm/boot/uImage –la<br> | ||
[[文件: myimx6l3035_build_4.4.0.3.jpg]]<br> | [[文件: myimx6l3035_build_4.4.0.3.jpg]]<br> | ||
| − | == '''编译模块''' == | + | |
| + | |||
| + | == '''编译模块(compile module)'''== | ||
* 编译<br> | * 编译<br> | ||
| − | <span style="background:# | + | <span style="background:#CCCCCC">compile</span><br> |
| + | |||
| + | $ make<br> | ||
说明:截图中使用了4线程编译。<br> | 说明:截图中使用了4线程编译。<br> | ||
| + | <span style="background:#CCCCCC">instruction:4 threads compilation is used in the screenshots。</span><br> | ||
[[文件: myimx6l3035_build_4.5.0.1.jpg]]<br> | [[文件: myimx6l3035_build_4.5.0.1.jpg]]<br> | ||
| + | |||
* 编译完成<br> | * 编译完成<br> | ||
| + | <span style="background:#CCCCCC">complete compilation</span><br> | ||
[[文件: myimx6l3035_build_4.5.0.2.jpg]]<br> | [[文件: myimx6l3035_build_4.5.0.2.jpg]]<br> | ||
| + | |||
* 目标文件<br> | * 目标文件<br> | ||
| + | <span style="background:#CCCCCC">target file</span><br> | ||
编译完成后各模块的.ko文件位于代码所在的目录,通过find命令可以找出编译完成的模块,参考命令如下:<br> | 编译完成后各模块的.ko文件位于代码所在的目录,通过find命令可以找出编译完成的模块,参考命令如下:<br> | ||
| − | <span style="background:# | + | <span style="background:#CCCCCC">.ko file of each module is in the directory where code is located after compilation ,you can find the module compiled with find command after compilation,refering command as below:</span><br> |
| + | $ find -name *.ko<br> | ||
[[文件: myimx6l3035_build_4.5.0.3.jpg]]<br> | [[文件: myimx6l3035_build_4.5.0.3.jpg]]<br> | ||
| − | = '''Linux应用程序编译''' = | + | |
| + | |||
| + | = '''Linux应用程序编译(Linux application compilation)'''= | ||
---- | ---- | ||
| − | == '''编写应用程序''' == | + | == '''编写应用程序(write application)'''== |
1) 创建应用程序目录 <br> | 1) 创建应用程序目录 <br> | ||
| − | <span style="background:# | + | <span style="background:#CCCCCC">create application directory</span><br> |
| − | + | ||
| + | $ mkdir ~/my-imx6/02_source/application/ -p <br> | ||
| + | $ cd ~/my-imx6/02_source/application/ <br> | ||
[[文件: myimx6l3035_build_5.1.0.1.jpg]]<br> | [[文件: myimx6l3035_build_5.1.0.1.jpg]]<br> | ||
| + | |||
2) 编写应用程序(这里以hello.c为例) <br> | 2) 编写应用程序(这里以hello.c为例) <br> | ||
| + | <span style="background:#CCCCCC">write application(here take hello.c as example</span><br> | ||
创建 hello.c 文件写入以下代码并保存:<br> | 创建 hello.c 文件写入以下代码并保存:<br> | ||
| − | <span style="background:# | + | <span style="background:#CCCCCC">create hello.c and write following code and save:</span><br> |
| + | #include <stdio.h> <br> | ||
int main(int argc, char **argv) <br> | int main(int argc, char **argv) <br> | ||
{ <br> | { <br> | ||
| 第220行: | 第383行: | ||
<br> | <br> | ||
return; <br> | return; <br> | ||
| − | } | + | } <br> |
| + | |||
3) 查看代码 <br> | 3) 查看代码 <br> | ||
| − | <span style="background:# | + | <span style="background:#CCCCCC">view code</span><br> |
| + | $ cat hello.c <br> | ||
[[文件: myimx6l3035_build_5.1.0.2.jpg]]<br> | [[文件: myimx6l3035_build_5.1.0.2.jpg]]<br> | ||
| − | == '''使编译配置文件生效''' == | + | |
| + | |||
| + | == '''使编译配置文件生效(validate compiler configured file)'''== | ||
* 执行source命令<br> | * 执行source命令<br> | ||
| − | <span style="background:# | + | <span style="background:#CCCCCC">execute source command</span><br> |
| + | $ source ~/my-imx6/03_tools/myimx6_3035_build_env<br> | ||
[[文件: myimx6l3035_build_5.2.0.1.jpg]]<br> | [[文件: myimx6l3035_build_5.2.0.1.jpg]]<br> | ||
| + | |||
* 查看编译配置<br> | * 查看编译配置<br> | ||
| − | <span style="background:# | + | <span style="background:#CCCCCC">view compiler configuration</span><br> |
| − | < | + | $ echo $ARCH<br> |
| + | $ echo $CROSS_COMPILE<br> | ||
''提示:可看到ARCH和CROSS_COMPILE被设置''<br> | ''提示:可看到ARCH和CROSS_COMPILE被设置''<br> | ||
| + | <span style="background:#CCCCCC">tips:you can see that ARCH和CROSS_COMPILE is configured</span><br> | ||
[[文件: myimx6l3035_build_5.2.0.2.jpg]]<br> | [[文件: myimx6l3035_build_5.2.0.2.jpg]]<br> | ||
| + | |||
* 验证交叉编译工具配置<br> | * 验证交叉编译工具配置<br> | ||
| − | <span style="background:# | + | <span style="background:#CCCCCC">verify cross compiler tool configuration</span><br> |
| + | $ ${CROSS_COMPILE}gcc –v<br> | ||
| + | |||
''提示:执行命令后可以看到终端显示出交叉编译工具的版本信息。如下图:''<br> | ''提示:执行命令后可以看到终端显示出交叉编译工具的版本信息。如下图:''<br> | ||
| + | <span style="background:#CCCCCC">tips:you can see version information of cross compiler tool shown on terminal after execution of command.as below:</span><br> | ||
[[文件: myimx6l3035_build_5.2.0.3.jpg]]<br> | [[文件: myimx6l3035_build_5.2.0.3.jpg]]<br> | ||
| − | == '''编译应用程序 ''' == | + | |
| + | |||
| + | == '''编译应用程序 (compile application)'''== | ||
2) 编译 <br> | 2) 编译 <br> | ||
| − | <span style="background:# | + | <span style="background:#CCCCCC">compile</span><br> |
| + | $ ${CROSS_COMPILE}gcc hello.c -o hello.out <br> | ||
| + | |||
注意:上面的命令有包含“$”号,即“${CROSS_COMPILE}gcc”,是引用我们source时产生的环境变量。 <br> | 注意:上面的命令有包含“$”号,即“${CROSS_COMPILE}gcc”,是引用我们source时产生的环境变量。 <br> | ||
| + | <span style="background:#CCCCCC">note:the above commands contain charater“$”,e.g“${CROSS_COMPILE}gcc”,which is the environment variable generated when referring to our source。</span><br> | ||
[[文件: myimx6l3035_build_5.3.0.1.jpg]]<br> | [[文件: myimx6l3035_build_5.3.0.1.jpg]]<br> | ||
| + | |||
3) 查看目标文件类型<br> | 3) 查看目标文件类型<br> | ||
| − | <span style="background:# | + | <span style="background:#CCCCCC">view type of target file</span><br> |
| + | $ file hello.out <br> | ||
| + | |||
可以看到目标文件 hello.out 的属性。 <br> | 可以看到目标文件 hello.out 的属性。 <br> | ||
| + | <span style="background:#CCCCCC">you can get the property of target file hello.out。</span><br> | ||
[[文件: myimx6l3035_build_5.3.0.2.jpg]]<br> | [[文件: myimx6l3035_build_5.3.0.2.jpg]]<br> | ||
| − | = '''文件系统''' = | + | |
| + | |||
| + | = '''文件系统(file system)'''= | ||
---- | ---- | ||
| − | == '''文件系统说明''' == | + | == '''文件系统说明(file system instruction)'''== |
文件系统包位于网盘对应的镜像文件夹中。支持的文件系统类型及下载方式可参照《MY-IMX6 烧录指导》。<br> | 文件系统包位于网盘对应的镜像文件夹中。支持的文件系统类型及下载方式可参照《MY-IMX6 烧录指导》。<br> | ||
| − | == '''解压文件系统到编译主机''' == | + | <span style="background:#CCCCCC">file system package is located in image file folder in the network disk。as to type of file system supported and way of download please refer to《MY-IMX6 buring guide》。</span><br> |
| + | |||
| + | |||
| + | == '''解压文件系统到编译主机(decompress file system to compiler host)'''== | ||
1)创建文件系统的目录并进入<br> | 1)创建文件系统的目录并进入<br> | ||
| − | <span style="background:# | + | <span style="background:#CCCCCC">create directory of file system and enter</span><br> |
| − | + | ||
| + | $ mkdir ~/my-imx6/04_rootfs/ -p<br> | ||
| + | $ cd ~/my-imx6/04_rootfs/<br> | ||
[[文件: myimx6l3035_build_6.2.0.1.jpg]]<br> | [[文件: myimx6l3035_build_6.2.0.1.jpg]]<br> | ||
| + | |||
2)将文件系统复制到~/my-imx6/04_rootfs/目录<br> | 2)将文件系统复制到~/my-imx6/04_rootfs/目录<br> | ||
| + | <span style="background:#CCCCCC">copy file system to ~/my-imx6/04_rootfs/directory</span><br> | ||
这一步骤自己采取相应的方式进行<br> | 这一步骤自己采取相应的方式进行<br> | ||
| + | <span style="background:#CCCCCC">this step sbould be done in your own way</span><br> | ||
| + | |||
3)解压文件系统到指定目录<br> | 3)解压文件系统到指定目录<br> | ||
| − | <span style="background:# | + | <span style="background:#CCCCCC">decompress file system to specified directory</span><br> |
| − | < | + | $ mkdir rootfs<br> |
| + | $ sudo tar jxf rootfs-linux.tar.bz2 -C rootfs<br> | ||
[[文件: myimx6l3035_build_6.2.0.2.jpg]]<br> | [[文件: myimx6l3035_build_6.2.0.2.jpg]]<br> | ||
| − | == '''添加应用到文件系统''' == | + | |
| − | + | ||
| + | == '''添加应用到文件系统(add application to file system)'''== | ||
| + | $ cp ~/my-imx6/02_source/application/hello.out rootfs/app_test/<br> | ||
[[文件: myimx6l3035_build_6.3.0.1.jpg]]<br> | [[文件: myimx6l3035_build_6.3.0.1.jpg]]<br> | ||
| + | |||
5)重新打包文件系统<br> | 5)重新打包文件系统<br> | ||
| − | <span style="background:# | + | <span style="background:#CCCCCC">re-pakcage file system</span><br> |
| − | + | $ rm -rf rootfs-linux.tar.bz2<br> | |
| − | + | $ cd rootfs/<br> | |
| + | $ sudo tar cjf ../rootfs-linux.tar.bz2 *<br> | ||
[[文件: myimx6l3035_build_6.3.0.2.jpg]]<br> | [[文件: myimx6l3035_build_6.3.0.2.jpg]]<br> | ||
| − | == '''添加模块到文件系统''' == | + | |
| + | |||
| + | == '''添加模块到文件系统(add module to file system)'''== | ||
准备需要模块的.ko文件,其它请参照“添加应用到文件系统”。<br> | 准备需要模块的.ko文件,其它请参照“添加应用到文件系统”。<br> | ||
| + | <span style="background:#CCCCCC">prepare .ko file of module needed,as to other operations please refer to“add application to file system”。</span><br> | ||
2017年6月8日 (四) 11:15的版本
目录
- 1 = 准备源码包(prepare source code pacakge)=
- 2 3.0.35版本代码(3.0.35 version code)
- 3 = 配置编译环境(configuration of compifer environment)=
- 4 准备源码(prepare source code)
- 5 开发环境配置(development environment configuration)
- 6 = 编译u-boot(compile u-boot)=
- 7 进入u-boot源码目录(enter u-boot source code directory)
- 8 使配置文件生效(validate configured file)
- 9 清除u-boot配置(remove u-boot configuration)
- 10 u-boot配置(u-boot configuration)
- 11 编译(compilation)
- 12 目标文件(target file)
- 13 = 编译内核(compile kernel)=
- 14 进入内核源码目录(enter kernel source directory)
- 15 使配置文件生效(validate configured file)
- 16 准备配置内核(prepare for kernel configuration)
- 17 编译内核(compile kernel)
- 18 编译模块(compile module)
- 19 = Linux应用程序编译(Linux application compilation)=
- 20 编写应用程序(write application)
- 21 include <stdio.h>
= 准备源码包(prepare source code pacakge)=
3.0.35版本代码(3.0.35 version code)
u-boot源码(u-boot source code)
文件名:uboot-imx-imx_v2009.08_3.0.35_4.1.0.tar.bz2
name of file:uboot-imx-imx_v2009.08_3.0.35_4.1.0.tar.bz2
kernel源码(kernel source code)
文件名:linux-2.6-imx-imx_3.0.35_4.1.0.tar.bz2
name of file:linux-2.6-imx-imx_3.0.35_4.1.0.tar.bz2
交叉编译工具 (cross compifer tool)
文件名:gcc-4.6.2-glibc-2.13-linaro-multilib-2011.12.tar.bz2
name of file:gcc-4.6.2-glibc-2.13-linaro-multilib-2011.12.tar.bz2
= 配置编译环境(configuration of compifer environment)=
准备源码(prepare source code)
准备源码包 (prepare source code package)
1)创建工作目录
create working directory
创建 ~/my-imx6 作为工作目录
create ~/my-imx6 as working directory
$ mkdir ~/my-imx6
![]()
创建 ~/my-imx6/02_source/imx_3.0.35_4.1.0 作为源码目录
create ~/my-imx6/02_source/imx_3.0.35_4.1.0 as source code directory
$ mkdir ~/my-imx6/02_source/imx_3.0.35_4.1.0 -p
![]()
创建 ~/my-imx6/03_tools 作为工具目录
create ~/my-imx6/03_tools as tool directory
$ mkdir ~/my-imx6/03_tools -p
![]()
2)复制源码包到开发主机中
copy source code package to the development host
这一步骤自己采取相应的方式进行。
do it in this step in your own way。
提示:这里将网盘中“02_源码”复制到Linux开发主机的“~/my-imx6/02_source/imx_3.0.35_4.1.0”,将网盘中“03_工具/toolchain”复制到Linux开发主机的“~/my-imx6/03_tools”。
tip:this step is to copy “02_source code”from network disk to “~/my-imx6/02_source/imx_3.0.35_4.1.0”in development host,and copy “03_tool/toolchain”to “~/my-imx6/03_tools”。in development host
解压源码包 (decompress source code package)
1)解压u-boot源码和内核源码
decompress u-boot source code and kernel source code
$ cd ~/my-imx6/02_source/imx_3.0.35_4.1.0
$ tar jxf uboot-imx-imx_v2009.08_3.0.35_4.1.0.tar.bz2
$ tar jxf linux-2.6-imx-imx_3.0.35_4.1.0.tar.bz2

2)解压交叉编译工具
decompress cross compiler tool
$ cd ~/my-imx6/03_tools/
$ tar jxf gcc-4.6.2-glibc-2.13-linaro-multilib-2011.12.tar.bz2
![]()
开发环境配置(development environment configuration)
安装需要的包 (install package needed)
1)更新源列表
list of updated source
$ sudo apt-get update

更新完成后如下图所示:
after update,it will look like below:
$ sudo apt-get update

2)安装aptitude包管理工具和ia32-libs
install aptitude package management tool and ia32-libs
提示:如果编译主机的Linux是32位的,可以跳过此步骤。
tips:if Linux of compiler host is 32bit,you can skip this step。
- 安装aptitude包管理工具
install aptitude package management tool


$ sudo apt-get –y install aptitude
- 使用aptitude安装ia32-libs
install ia32-libs with aptitude
$ sudo aptitude –y install ia32-libs
提示:下图为安装过aptitude和ia32-libs后,再次执行安装命令的截图。
tips:following is the screenshots with re-execution of installation command after installation of aptitude and ia32-libs is finished。

3)安装mkimage工具
install mkimage tool
$ sudo apt-get -y install uboot-mkimage
提示:下图为安装过mkimage工具后,再次执行安装命令的截图。
tips:following is the screenshots with re-execution of installation command after installation of mkimage tool is finished。

4)安装ncurses-dev
install ncurses-dev
说明:make menuconfig对其具有依赖性质。
instruction:make menuconfig is dependent on it。
$ sudo aptitude -y install ncurses-dev
提示:下图为安装过ncurses-dev工具后,再次执行安装命令的截图。
tips:following is the screenshots with re-execution of installation command after installation of ncurses-dev tool is finished。

配置MY-IMX6编译的环境变量 (configure environment variables of MY-IMX6 compilation)
1)将平台信息写入到一个新的配置文件
write platform information to a new configured file
$ echo "export ARCH=arm" > ~/my-imx6/03_tools/myimx6_3035_build_env
2)将交叉编译工具链路径写入到配置文件
write compiler tool chain path to configured file
- 进入交叉编译工具目录
enter cross compiler tool directory
$ cd ~/my-imx6/03_tools/gcc-4.6.2-glibc-2.13-linaro-multilib-2011.12/fsl-linaro-toolchain/bin/ - 将路径写入到配置文件
write path to configured file
$ sed -i "\$a IMX6_GCC462_PATH=$PWD" ~/my-imx6/03_tools/myimx6_3035_build_env
- 将交叉编译工具写入到配置文件
write cross compiler tool to configured file
$ sed -i "\$a export CROSS_COMPILE=\$IMX6_GCC462_PATH/arm-none-linux-gnueabi-" ~/my-imx6/03_tools/myimx6_3035_build_env
3)查看配置文件
view configured file
$ cat ~/my-imx6/03_tools/myimx6_3035_build_env
4)附图
figures

注意:如果在某一步操作错误,则需要删除 ~/my-imx6/03_tools/myimx6_3035_build_env 文件,并重新按照本小节操作。
note:if an error occurs in any step, need to delect ~/my-imx6/03_tools/myimx6_3035_build_env ,and operate again all steps of this segment。
= 编译u-boot(compile u-boot)=
进入u-boot源码目录(enter u-boot source code directory)
$ cd ~/my-imx6/02_source/imx_3.0.35_4.1.0/uboot-imx-imx_v2009.08_3.0.35_4.1.0/
![]()
使配置文件生效(validate configured file)
- 执行source命令
execute source command
$ source ~/my-imx6/03_tools/myimx6_3035_build_env
![]()
- 查看编译配置
view compiler configuration
$ echo $ARCH
$ echo $CROSS_COMPILE
提示:可看到ARCH和CROSS_COMPILE被设置
tips:you can see that ARCH和CROSS_COMPILE is configured

- 验证交叉编译工具配置
verify cross compiler tool configuration
$${CROSS_COMPILE}gcc –v
提示:执行命令后可以看到终端显示出交叉编译工具的版本信息。如下图:
tips:you can see version information of cross compiler tool shown on terminal after execution of command.as below:

清除u-boot配置(remove u-boot configuration)
$ make distclean
![]()
u-boot配置(u-boot configuration)
- 评估板及对应的 u-boot 编译配置:
evaluation board and its corresponding u-boot compiler configuration:
| 评估板主型号 (evaluation board main model) |
CPU类型-内存容量 (CPU type-memory capacity) |
对应的u-boot配置 (corresponding u-boot configuration) | |||||||||||||||||||||
|---|---|---|---|---|---|---|---|---|---|---|---|---|---|---|---|---|---|---|---|---|---|---|---|
| MY-IMX6-EK200 |
6Q(四核)- 1G (6Q(quad. core)- 1G)
|
6Q(四核)- 2G (6Q(quad core)- 2G)
|
6U(双核简化)- 1G (6U(dual core tile)- 1G)
|
6S(单核)- 512M (6S(single core)- 512M)
|
6Q(四核)- 2G (6Q(quad.core)- 2G)
|
6U(双核简化)- 1G (6U(dual core tile)- 1G)
|
6S(单核)- 512M (6S(single core)- 512M) |
myimx6ek314_6s_config |
- MYIMX6EK200-6Qxx-1G配置示例:
MYIMX6EK200-6Qxx-1G configuration example:
$ make myimx6ek200_6q_config
![]()
编译(compilation)
- 执行编译
execute compilation
$ make
提示:这里为了提高编译速度,在make后面加了“-j4”。这里编译的Linux主机是双核4线程的,所以“-j”后面用了4,也就是采用4线程编译。“-j”后面的数字可以根据系统资源分配,但是不应该超过编译主机最大支持的线程数。
Tips:To speed up the compilation,add "-j4" after make.The Linux host used to compile is dual-core ,4 threads .So "-j" is followed by 4, which takes 4 threads to compile. The number behind "-j" is allocated based on system resources,but It should not exceed the maximum threads the host support。

- 编译完成
complete compilation
提示:u-boot编译过程大概需要几分钟时间。
tips:u-boot compilation process will take a few minustes or so。


目标文件(target file)
编译完成后通过ls命令即可看到编译得到的目标文件u-boot.bin
you can get the compiled file u-boot.bin with ls command after compilation
$ ls

= 编译内核(compile kernel)=
进入内核源码目录(enter kernel source directory)
$ cd ~/my-imx6/02_source/imx_3.0.35_4.1.0/linux-2.6-imx-imx_3.0.35_4.1.0/
![]()
使配置文件生效(validate configured file)
- 执行source命令
execute source command
$ source ~/my-imx6/03_tools/myimx6_3035_build_env
![]()
- 查看编译配置
view compiler configuration
$ echo $ARCH
$ echo $CROSS_COMPILE
提示:可看到ARCH和CROSS_COMPILE被设置
tips:you can see that ARCH和CROSS_COMPILE is configured

- 验证交叉编译工具配置
verify cross compiler tool configuration
$ ${CROSS_COMPILE}gcc –v
提示:执行命令后可以看到终端显示出交叉编译工具的版本信息。如下图:
tips:you can see version information of cross compiler tool shown on terminal after execution of command.as below:

准备配置内核(prepare for kernel configuration)
- 清除内核配置
remove kernel configuration
$ make distclean
![]()
- 生成.config文件
generated.config file
说明:MY-IMX6-EK200系列评估板及MY-IMX6-EK314系列评估板使用的配置文件是myimx6_defconfig
instructions:configuration files used for MY-IMX6-EK200 seires of evaluation board and MY-IMX6-EK314 series of evaluation board is myimx6_defconfig
$ make myimx6_defconfig

编译内核(compile kernel)
- 编译uImage
compile uImage
$ make uImage
说明:截图中使用了4线程编译。
instruction:4 threads compilation is used in the screenshots。

- 编译完成
complete compilation
- 目标文件
target file

arch/arm/boot/uImage即为编译得到的目标文件,使用ls命令可查看文件信息。
arch/arm/boot/uImage is the target file through compilation,you can view the file information with ls command。
$ ls arch/arm/boot/uImage –la
![]()
编译模块(compile module)
- 编译
compile
$ make
说明:截图中使用了4线程编译。
instruction:4 threads compilation is used in the screenshots。

- 编译完成
complete compilation

- 目标文件
target file
编译完成后各模块的.ko文件位于代码所在的目录,通过find命令可以找出编译完成的模块,参考命令如下:
.ko file of each module is in the directory where code is located after compilation ,you can find the module compiled with find command after compilation,refering command as below:
$ find -name *.ko


= Linux应用程序编译(Linux application compilation)=
编写应用程序(write application)
1) 创建应用程序目录
create application directory
$ mkdir ~/my-imx6/02_source/application/ -p
$ cd ~/my-imx6/02_source/application/
![]()
2) 编写应用程序(这里以hello.c为例)
write application(here take hello.c as example
创建 hello.c 文件写入以下代码并保存:
create hello.c and write following code and save:
include <stdio.h>
int main(int argc, char **argv)
{
printf("Hello, MYZR!\n");
return;
}
3) 查看代码
view code
$ cat hello.c

使编译配置文件生效(validate compiler configured file)
- 执行source命令
execute source command
$ source ~/my-imx6/03_tools/myimx6_3035_build_env
![]()
- 查看编译配置
view compiler configuration
$ echo $ARCH
$ echo $CROSS_COMPILE
提示:可看到ARCH和CROSS_COMPILE被设置
tips:you can see that ARCH和CROSS_COMPILE is configured

- 验证交叉编译工具配置
verify cross compiler tool configuration
$ ${CROSS_COMPILE}gcc –v

提示:执行命令后可以看到终端显示出交叉编译工具的版本信息。如下图:
tips:you can see version information of cross compiler tool shown on terminal after execution of command.as below:

编译应用程序 (compile application)
2) 编译
compile
$ ${CROSS_COMPILE}gcc hello.c -o hello.out
注意:上面的命令有包含“$”号,即“${CROSS_COMPILE}gcc”,是引用我们source时产生的环境变量。
note:the above commands contain charater“$”,e.g“${CROSS_COMPILE}gcc”,which is the environment variable generated when referring to our source。
![]()
3) 查看目标文件类型
view type of target file
$ file hello.out
可以看到目标文件 hello.out 的属性。
you can get the property of target file hello.out。

= 文件系统(file system)=
文件系统说明(file system instruction)
文件系统包位于网盘对应的镜像文件夹中。支持的文件系统类型及下载方式可参照《MY-IMX6 烧录指导》。
file system package is located in image file folder in the network disk。as to type of file system supported and way of download please refer to《MY-IMX6 buring guide》。
解压文件系统到编译主机(decompress file system to compiler host)
1)创建文件系统的目录并进入
create directory of file system and enter
$ mkdir ~/my-imx6/04_rootfs/ -p
$ cd ~/my-imx6/04_rootfs/
![]()
2)将文件系统复制到~/my-imx6/04_rootfs/目录
copy file system to ~/my-imx6/04_rootfs/directory
这一步骤自己采取相应的方式进行
this step sbould be done in your own way
3)解压文件系统到指定目录
decompress file system to specified directory
$ mkdir rootfs
$ sudo tar jxf rootfs-linux.tar.bz2 -C rootfs
![]()
添加应用到文件系统(add application to file system)
$ cp ~/my-imx6/02_source/application/hello.out rootfs/app_test/
![]()
5)重新打包文件系统
re-pakcage file system
$ rm -rf rootfs-linux.tar.bz2
$ cd rootfs/
$ sudo tar cjf ../rootfs-linux.tar.bz2 *

添加模块到文件系统(add module to file system)
准备需要模块的.ko文件,其它请参照“添加应用到文件系统”。
prepare .ko file of module needed,as to other operations please refer to“add application to file system”。