“MY-IMX6-EK314 Linux-3.0.35 Test Manual”的版本间的差异
(创建页面,内容为“<div> = '''Preparation before test''' = ---- 1)Please refer to"Connection of the evaluation board to the computer"in 《MY-IMX6-EK314 booting manual》 for the co...”) |
(没有差异)
|
2018年7月24日 (二) 10:45的版本
目录
- 1 Preparation before test
- 2 Test item
- 2.1 Lan port test
- 2.2 USB Test
- 2.3 SD card interface test
- 2.4 Audio and video test
- 2.5 Video test
- 2.6 GPIO Test
- 2.7 key test
- 2.8 Serial port test
- 2.9 RS232 Serial port test
- 2.10 RTC Test
- 2.11 WatchDog Test
- 2.12 SPI Test
- 2.13 CAN interface test
- 2.14 PCIE interface test
- 2.15 WIFI Test
- 2.16 IPU Test
- 2.17 GPU test
- 2.18 VPU test
- 3 Reveal function test
Preparation before test
1)Please refer to"Connection of the evaluation board to the computer"in 《MY-IMX6-EK314 booting manual》 for the connection.
2)Please refer to"booting of the evaluation board to the computer"in 《MY-IMX6-EK314 booting manual》 for the booting.
Test item
Lan port test
MY-I.MX6 evalution board support dual lan port(1 100M network port and 1 Gigabit network port)
Test instruction
- The first ethernet lan port is “U12”on front view of base board,the second one is “P1”on front view of base board.
Test method
1) Test the first ethernet lan port
- Connect lan line:connect “U12”on evaluation board with computer lan port through network
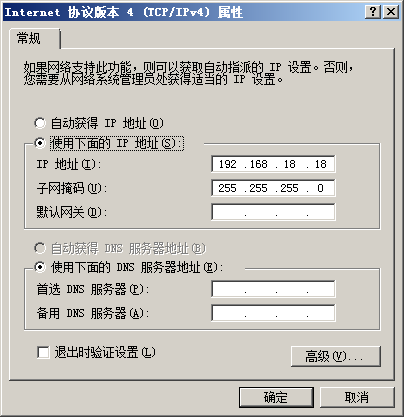
- set computer IP:set computer lan port IP as 192.168.18.18
- Set the evaluation board IP:
- $ ifconfig eth0 192.168.18.36 # configure the eth0
- $ ifconfig eth0 192.168.18.36 # configure the eth0
- run test command :
- $ ifconfig eth1 down # eth1 to be shut down
- $ ping 192.168.18.18 -c 2 -w 4 # send ICMP to HOST
- $ ifconfig eth1 down # eth1 to be shut down
- Observe test result:system will output following information::
--- 192.168.18.18 ping statistics ---
2 packets transmitted, 2 packets received, 0% packet loss
- Test result:“0% packet loss”represent test passing
- reference symbols

2)Test the second ethernet lan port
- connect lan line:take out lan line from the first lan port then plug in “P1”on evaluation board,another end of lan line is kept in connection with lan port of computer.
- Set computer IP:set computer lan port IP as 192.168.18.18(if the setting was already done then go direclty into next step).
- Set the second lan port IP:
- $ ifconfig eth1 192.168.18.27 # configure the eth1
- $ ifconfig eth1 192.168.18.27 # configure the eth1
After the setting system will output working condition of the second lan port, as below:
smsc95xx 1-1.1:1.0 eth1: link up, 100Mbps, full-duplex, lpa 0x4DE1
- Run test command:
- $ ifconfig eth0 down # eth0 to be shut down
- $ ping 192.168.18.18 -c 2 -w 4 # send ICMP to HOST
- $ ifconfig eth0 down # eth0 to be shut down
- Observe test result:system will output the following message:
--- 192.168.18.18 ping statistics ---
2packets transmitted, 2 packets received, 0% packet loss
- Test result:“0% packet loss”represent test passing.
- reference symbols
USB Test
Test instruction
MY-IMX6-EK314evaluation board has two USB HOST ports,in“J2”in base board。
Test method
1) Start test
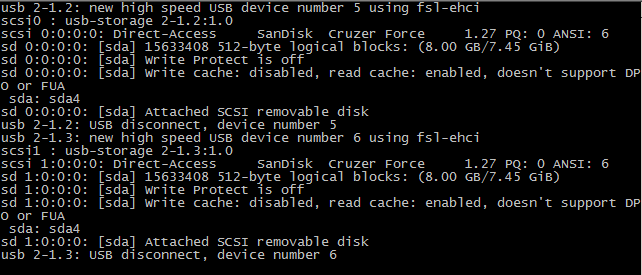
plug USB device in USB port in base board,system will output the following message:
- usb *-*.*: new high speed USB device number * using fsl-ehci
- usb *-*.*: new high speed USB device number * using fsl-ehci
……
2) Test end
Take out USB device from the base board,system will output the following message:
- usb *-*.*: USB disconnect, device number *
- usb *-*.*: USB disconnect, device number *
reference symbols
SD card interface test
Test instruction
SD card interface is in“SD3”in rear view of base board。
Start test
1)Insert device in SD card slot
Insert SD card in SD card port in base board, system will output following message(see attached image),e.g.SD port is normal:
- mmc*: new high speed SD card at address ****
- mmcblk*: mmcx:xxxx SA**G *.**GiB
- mmcblk*: p*
- mmc*: new high speed SD card at address ****
2)Pop-up device from SD card slot
Press again SD card in SD card slot,base board will pop-up SD card。system will output following message(see attached image),e.g.function of SD card port pop-up is normal:
- mmc*: card **** removed
- mmc*: card **** removed
3) End test
Take out SD card after SD card pop-up,to end the test.
reference symbols
Audio and video test
Test instruction
This test is to verify the function of video & audio of evaluation board by playing vocal video.br>
Test method
1)Prepare test
Connect audio output device to audio element in front view of base board,audio element is “J20”in front view of base board,silkscreened as“HP”.
2)Execute test
Play a video with gplay,commanded as below:
# aplay /unit_tests/audio8k16S.wav
The above command will play a file designated by command with aplay.
3)Test result
You can see the vedeo played on display screen of evaluation board and hear the voices outputed by audio device.
reference symbols
Video test
Test instruction
This test is performed by playing the video verification board's audio video feature.
Test method
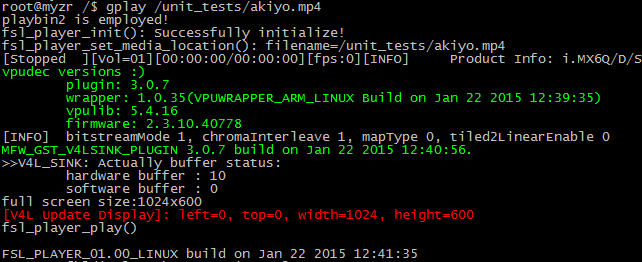
To play a video using gplay, the sample commands are as follows:
# gplay /unit_tests/akiyo.mp4
The above command will use the file specified in the gplay play command.
- Test Results
- After executing the above test command, you will see a video image of approximately 1 second on the evaluation board display.
reference symbols
GPIO Test
Test instruction
On the U14 on the front of the MY-IMX6-EK314 backplane, there are 33 GPIOs, one of which acts as a GPIO-LED.
The CPU of the GPIO-LED uses the pin "EIM_D22" and is connected to the "U14:30 pin" on the backplane.
Tip: The GPIO-LED test requires a multimeter. Users without a multimeter can skip to the next test.
GPIO-LED(GPIO)Test
GPIO's Test method is as follows:
- $ echo 1 > /sys/class/leds/user_led/brightness
- $ echo 1 > /sys/class/leds/user_led/brightness
Test the U14:30 pin with a multimeter, and you can see that the pin is high level.
- $ echo 0 > /sys/class/leds/user_led/brightness
- $ echo 0 > /sys/class/leds/user_led/brightness
Test the U14:30 pin with a multimeter, and you can see that the pin is low level
Universal GPIO testing
Here we take EIM_D21 as an example. Through the schematic we can see that EIM_D21 is finally connected to U14:29.
1)Calculate the serial number of the GPIO
- According to the chip manual, we can find that EIM_D21 PAD can be configured as GPIO3_IO21
- IMX6 GPIO sequence number is calculated as: (where group - 1) * 32 + sequence number, so the pin value of PIO3_IO21 is (3 – 1) * 32 + 21 = 85.
2)Set the IO Number of the GPIO to be tested
- $ IO_NUMBER=85
- $ IO_NUMBER=85
3)Export GPIO
- $ echo ::${IO_NUMBER} > /sys/class/gpio/export
- $ echo ::${IO_NUMBER} > /sys/class/gpio/export
4)Set the GPIO direction
- $ echo out > /sys/class/gpio/gpio::${IO_NUMBER}/direction
- $ echo out > /sys/class/gpio/gpio::${IO_NUMBER}/direction
5)Control output
- $ echo 1 > /sys/class/gpio/gpio::${IO_NUMBER}/value
- $ echo 1 > /sys/class/gpio/gpio::${IO_NUMBER}/value
Using the multimeter to test the corresponding pin of IO_NUMBER, you can see that the pin is high level.
- $ echo 0 > /sys/class/gpio/gpio::${IO_NUMBER}/value
- $ echo 0 > /sys/class/gpio/gpio::${IO_NUMBER}/value
Using the multimeter to test the corresponding pin of IO_NUMBER, you can see that the pin is low level
key test
Test instruction
:Here are 4 keys on MY-IMX6-EK314 evaluation board,three of them are custom function keys(SW2:VOL-,SW3: VOL+,SW4: Sleep Wake),and one reset key(SW5:nRE).test program key_test can test these 3 function keys.
Test method
1)Execute test program
press command in terminalto run test program,example as below:
- $ /app_test/key_test
- $ /app_test/key_test
2)proceed with interactive test
press separately SW4、SW3、SW2,system will output corresponding message as below:
key*** Pressed
key*** Released
Message of“key*** Pressed”is outputed with press of key,message of“key*** Released”is outputed with release of key.
3)End test
press “Ctrl”+“C”on computer to send the test program for keys.
Note:press SW1(system will reset and reboot).
reference symbols
Serial port test
There are 5 serial ports in MY-IMX6-EK314,4 are user serial ports(in “J12”in front view of base board,silkscreened as“UART”),one is debug serial port(in “P3”in front view of base board,Silk screen is DEBUG)。
Test instruction
Instruction of system device file::
- Device file for debug serial port in the system is ttymxc0,device file for user serial port are ttymxc1、ttymxc2、ttymxc3、ttymxc4.
Instruction for transceiver pin of serial ports and their corresponding device file:
- UART2:send 9,receive 10,ttymxc1
- UART3:send 13,receive 14,ttymxc2
- UART4:send 15,receive 17,ttymxc3
- UART5:send 16,receive 18,ttymxc4
Tips:transceiver pins of serial port are listed here,but please refer to schematic for definition of all pins of serial port.
Serial port test
1)Test instruction
- Test method instruction:
Adopt method of self-sending & self-receiving of serial port.
- Test result instruction:
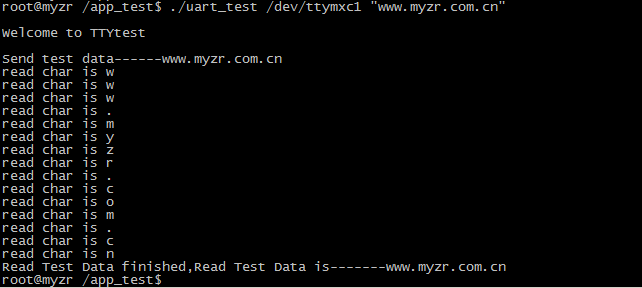
The test program sends a string to the serial port and outputs the string received by the serial port.
2)Enter the test program directory
- $ cd /app_test
- $ cd /app_test
3)UART2 Test
- Prepare test
Short connect sending pin and receiving pin of serial port 2(no.9 and no.10 pin of J12).
- Execute test command
- $ ./uart_test /dev/ttymxc1 "www.myzr.com.cn"
- $ ./uart_test /dev/ttymxc1 "www.myzr.com.cn"
- Test result reference symbols
- Prepare test
Short connect sending pin and receiving pin of serial port 3(no.12 and no.13 pin of J12).
- Execute test command
- $ ./uart_test /dev/ttymxc2 "www.myzr.com.cn"
- $ ./uart_test /dev/ttymxc2 "www.myzr.com.cn"
5)UART4 Test
- Prepare test
Short connect sending pin and receiving pin of serial port 4(no.15 and no.17 pin of J1).
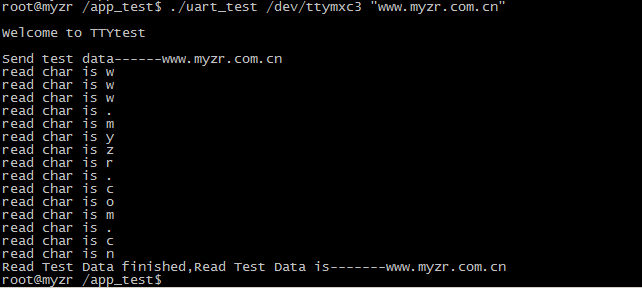
- Execute test command
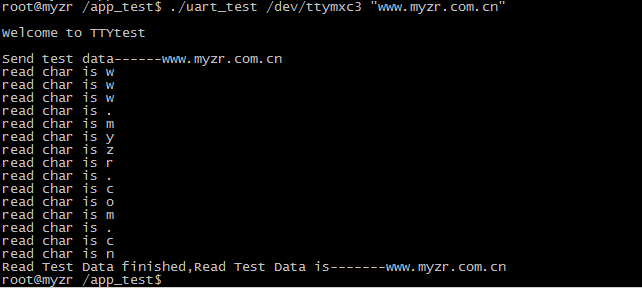
- $ ./uart_test /dev/ttymxc3 "www.myzr.com.cn"
- $ ./uart_test /dev/ttymxc3 "www.myzr.com.cn"
- Test result figured
- Prepare test
Short connect sending pin and receiving pin of serial port 5(no.16 and no.18 pin of J1)。
- Execute test command
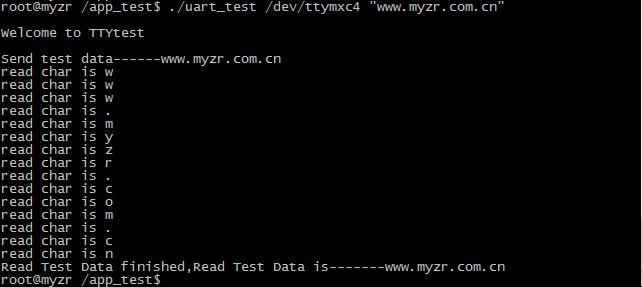
- $ ./uart_test /dev/ttymxc4 "www.myzr.com.cn"
- $ ./uart_test /dev/ttymxc4 "www.myzr.com.cn"
- Test result figured
RS232 Serial port test
Test instruction
The MY-IMX6-EK314 evaluation panel leads out an RS232 interface through serial port 4, located at the "P2" position (DB9 seat) on the front of the bottom panel.
Test method
1)Prepare test
Short connect sending pin and receiving pin of RS232(no.2 and no.3 pin of P2).
2)Execute test command
- $ ./uart_test /dev/ttymxc3 "www.myzr.com.cn"
- $ ./uart_test /dev/ttymxc3 "www.myzr.com.cn"
Note: since RS232 is introduced through UART4, the test can also follow the method of UART4
3)Test result figured
RTC Test
Test instruction
- Due to restrictions in transportation,MY-IMX6-EK314 evaluation board doesn't contatin battery in delivery,before RTC test please prepare button cell to install on “BT1”in rear view of base board(beside silkscreened name of“RTC”).
Test method
1)power off then reboot device,to check the time of system and hardware.
- Command to check clock of current system as below:
- $ date
- $ date
Message outputed by system as below:
Thu Jan 1 00:00:12 UTC 1970
- Command to check clock of RTC chip as below:
- $ hwclock
- $ hwclock
Message outputed by system as below:
Tue Nov 30 00:00:00 1999 0.000000 seconds
2)Set system clock and synchronously set to RTC chip
- Command to set system clock are with below reference:
- $ date -s "2015-09-02 12:34:56"
- $ date -s "2015-09-02 12:34:56"
- Command to write system clock into hardware as below:
- $ hwclock –w
- $ hwclock –w
3)Power off and reboot evaluation board,to check current system clock and hardware clock
- Please refer to step 1
4)Test result
It will be a newly-set clock after execution until step 3
Reference symbols
Below image is screenshots for step1 and step 2 in the test

Below image is the screenshots for step3 in the test

WatchDog Test
Test instruction
WatchDog consists of 2 items: one is reset test and the other is dog feeding test.
Reset test
1)Test instruction
Reset test will boot WatchDog,but doesn't feed dog,the system will reset after a timeout.
2)Execute test
- $ /unit_tests/wdt_driver_test.out 10 15 1
- $ /unit_tests/wdt_driver_test.out 10 15 1
3)Test result
Wait for 10 seconds after running of test command,WatchDog timeout,system is resetted。you can see message outputed by system rebooting on terminal.

Dog feeding test
1)Test instruction
The dog feeding test will start the WatchDog and feed the dog once every 2 seconds. The system will not reset due to the timeout of the WatchDog.
2)Execute test
- Booting WatchDog
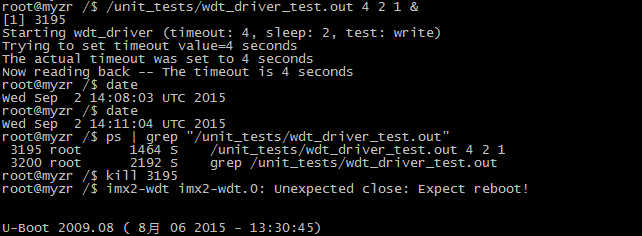
- $ /unit_tests/wdt_driver_test.out 4 2 1 &
- $ /unit_tests/wdt_driver_test.out 4 2 1 &
- View current time
- $ date
- $ date
3)Verification
- View current time
After a few minutes, the system is still not reset.Let's look at the current time.
- $ date
- $ date
- Stop feeding the dog
At this time, we terminate the Watchdog test program, so there is no program to feed the dog, and the system will reset within the timeout (here is 4 seconds).
- $ ps | grep "/unit_tests/wdt_driver_test.out"
- $ ps | grep "/unit_tests/wdt_driver_test.out"
3195root 1464 S /unit_tests/wdt_driver_test.out 4 2 1
As you can see, the pid of wdt_driver_test.out is 3195. Next, we terminate the process of 3195:
- $ kill 3195
- $ kill 3195
SPI Test
There are a group of SPI ports on MY-IMX6-EK314,located on“J13”,silkscreened as “SPI”。
Test instruction
SPI1 is used for SPI Nor Flash.Here we test SPI2.
MISO pin and MOSI pin of SPI port will be used for the test。SMISO pin of SPI port is “no.7 of J13”on the base board,and MOSI pin is “no.11 of J13”.
Test method
Adopt way of SPI self-sending(output)self-receiving(input).
1)Prepare test
Short connect MISO pin and MISO pin of SPI port,e.g.short connect pin no.7 and pin no.11 of J13 on the base board.
2)Execute test
- $ /app_test/spi_test -D /dev/spidev1.0
- $ /app_test/spi_test -D /dev/spidev1.0
3)Test result
If SPI is normal,you can see on terminal the following charaters:
- FF FF FF FF FF FF
- 40 00 00 00 00 95
- FF FF FF FF FF FF
- FF FF FF FF FF FF
- FF FF FF FF FF FF
- DE AD BE EF BA AD
- F0 0D
- FF FF FF FF FF FF
Figured
CAN interface test
Test instruction
Oscilloscope will be used for CAN test,please skip this step for users who don't have oscilloscope。
Test method
1)Configuration CAN0
- Instanced example as below:
- $ ip link set can0 up type can bitrate 250000
- $ ip link set can0 up type can bitrate 250000
2)Configuration of link for oscilloscope
Connect CH1 and CH2 with “R83”of evaluation board(the green stand on topside on front view of base board)。
Configure oscilloscope(for users who don't know how to use oscilloscope ,please ask hardware engineers for assistance ).
3)Execute test command
- $ /app_test/client_test
- $ /app_test/client_test
4)Test result
When exectue the test command,you can see a waving change on oscilloscope
Figured
PCIE interface test
Test instruction
System is already added with drivers for PCI port,in booting system will check out devices on PCI-E interface
Test method
Reset system,observe the message outputed by system booting
1)PCI-E driving program output messages
In the course of system booting, if there is outputed message as below,e.g PCI-E interface load is normal::
iMX6 PCIe PCIe RC mode imx_pcie_pltfm_probe entering.
PCIE: imx_pcie_pltfm_probe start link up.
2)Message outputed without link of PCI-E device
In the course of system booting,it there is not a valid device linked with PCI-E interface,system will prompt“link down!”on PCI-E port,something as below:
link up failed, DB_R0:0x00801600, DB_R1:0x08200000!
IMX PCIe port: link down!
3)Message outputed when there is a valid PCI-E device linked(here take Intel 4965AGN as an example)
In the course of system booting,if PCI-E port detect a valid device and the device module is normal,system will prompt“link up”on PCI-E port,as below:
IMX PCIe port: link up.
4)Linux test command:
- $ lspci
- $ lspci
If a valid PCI-E device is inserted on PCI-E port,information related to the module will be gained with lspci,something like this(what is linked is Intel 4965AGN in this case):
- 00:00.0 Class 0604: 16c3:abcd
- 01:00.0 Class 0280: 8086:4229
- 00:00.0 Class 0604: 16c3:abcd
If there is not device linked with PCI-E port,lspci system won't output any message。
Figured
Following figure is message outputed by system without a link with PCI-E device.

The following figure is message ouputed by system with a link to Intel 4965AGN
![]()
Following figure is message by use of lspci after entering system on the condition of a link with Intel 4965AGN

WIFI Test
Test instruction
Model no. of WIFI chip ussed for MY-I.MX6 evaluation board is RTL8188EUS。
Test method
1)Load WIFI module driver
Instanced command as below:
- $ insmod /lib/modules/wifi/wlan.ko
- $ insmod /lib/modules/wifi/wlan.ko
2)Generate WIFI config file
Refered command as below:
- $ wpa_passphrase MYZR_TP-LINK myzrd2302 > /etc/wpa_supplicant.conf
- $ wpa_passphrase MYZR_TP-LINK myzrd2302 > /etc/wpa_supplicant.conf
Both name and password of WIFI designated by this command are “MYZR_TP-LINK myzrd2302”,need to replace with your own linkable WIFI name and password
3)Link WIFI network
Instanced command as below:
- $ wpa_supplicant -B –c /etc/wpa_supplicant.conf -iwlan0
- $ wpa_supplicant -B –c /etc/wpa_supplicant.conf -iwlan0
4)Automaically gain IP
Instanced command as below:
- $ udhcpc -i wlan0
- $ udhcpc -i wlan0
Note:need to ensure a DHCP function opened for WIFI network in use。
5)Test WIFI network link
Instanced command as below:
- $ ping -I wlan0 www.baidu.com -c 2
- $ ping -I wlan0 www.baidu.com -c 2
6)Test result
Execute step 5 if ok, e.g. WIFI module is normal to work.
IPU Test
Test instruction
The whole IPU test will take over ten minutes 。
Test method
1)Execute test
enter directory where test program is located(must enter directory where test program is locased for a normal test script)
- $ cd /unit_tests/
- $ cd /unit_tests/
execute test script
- $ ./autorun-ipu.sh
- $ ./autorun-ipu.sh
2)Test result
In the whole test process,you can see a constant change of content on the display screen。
After test is over,you can see on terminal the following message:
autorun-ipu.sh: Exiting PASS
===============test stop at Wed Sep 2 16:08:55 UTC 2015 ===============================
Figured
GPU test
Test instruction
Verify GPU function.
Test method
- Execute test command
- $ cd /opt/viv_samples/vdk/ && ./tutorial3 -f 100
- $ cd /opt/viv_samples/vdk/ && ./tutorial4_es20 -f 100
- $ cd /opt/viv_samples/tiger/ &&./tiger
- $ cd /opt/viv_samples/vdk/ && ./tutorial3 -f 100
- Test process
When executing the test command, you can see that the display is changing.For more information, please refer to /unit_test/gpu.sh
Figured
VPU test
Test instruction
In the test,vedio file will be decoded with VPU and outputed to the display device.
Test method
- Execute test
enter directory where test program is located(must enter directory where test program is locased for a normal test script)
- $ cd /unit_tests/
- $ cd /unit_tests/
- Execute test script
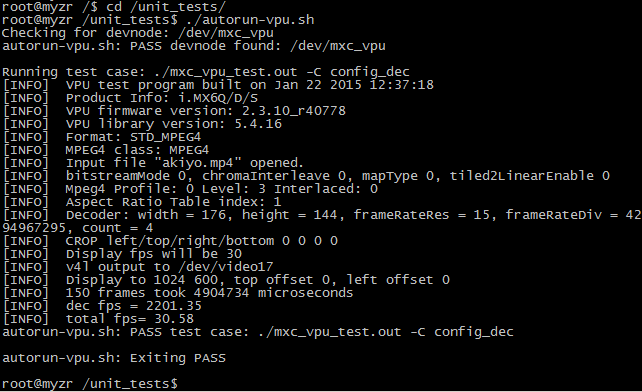
- $ ./autorun-vpu.sh
- $ ./autorun-vpu.sh
- Test process
In the whole test process,you can see the vedio decoded by VPU on the display screen.
Figured
Reveal function test
Instruction:need to re-boot system to enter u-boot command line for each reveal function test,enter command and press Enter key
Example as below:
Single screen display
Instruction:enter command and press Enter key,observe the displayed content on screen in the course of system booting,Linux Logo can be seen.
LVDS1
setenv bootargs console=ttymxc0,115200 ip=none root=/dev/mmcblk0p1 rootwait video=mxcfb0:dev=ldb,LDB-1024X600,if=RGB666; mmc dev 2; mmc read 0x10800000 0x800 0x2000; bootm
LVDS0
Enter u-boot command line,enter the following commands and press Enter key:
setenv bootargs console=ttymxc0,115200 ip=none root=/dev/mmcblk0p1 rootwait video=mxcfb0:dev=ldb,LDB-1024X600,if=RGB666 ldb=sin0; mmc dev 2; mmc read 0x10800000 0x800 0x2000; bootm
HDMI
setenv bootargs console=ttymxc0,115200 ip=none root=/dev/mmcblk0p1 rootwait video=mxcfb0:dev=hdmi,1920x1080M@60,if=RGB24; mmc dev 2; mmc read 0x10800000 0x800 0x2000; bootm
Tips:there is not reveal of Linux Logo on screen for HDMI display in booting。vedio can be played with gplay command after entering system,vedio transfered can be seen on display screen
Example for vedio playing command as below:
- $ gplay /unit_tests/akiyo.mp4
- $ gplay /unit_tests/akiyo.mp4
RGB
Setenv bootargs console=ttymxc0,115200 ip=none root=/dev/mmcblk0p1 rootwait video=mxcfb0:dev=lcd,SEIKO-WVGA,if=RGB24; mmc dev 2; mmc read 0x10800000 0x800 0x2000; bootm
Dual screens synchronous display
Instruction:enter command and press Enter key,Linux Logo is displayed on the two screens in kernel booting,and other operations to screen is also displayed on the two screens.
LVDS1+LVDS0 synchronous display
setenv bootargs console=ttymxc0,115200 ip=none root=/dev/mmcblk0p1 rootwait video=mxcfb0:dev=ldb,LDB-1024X600,if=RGB666 ldb=dul0 video=mxcfb1:dev=ldb,LDB-1024X600,if=RGB666; mmc dev 2; mmc read 0x10800000 0x800 0x2000; bootm
dual screen asynchronous display
Test commands probably to be used
- Turn on backlight of main display screen
- $ echo 0 > /sys/class/graphics/fb0/blank
- $ echo 0 > /sys/class/graphics/fb0/blank
- Turn on backlight of the second display screen
- $ echo 0 > /sys/class/graphics/fb2/blank
- $ echo 0 > /sys/class/graphics/fb2/blank
- Play the designated vedio file to vedio device(here video17 is related to main screen)
- $ gst-launch playbin2 uri=file:///unit_tests/akiyo.mp4 \
- $ gst-launch playbin2 uri=file:///unit_tests/akiyo.mp4 \
video-sink="mfw_v4lsink device=/dev/video17"
- Play the designated vedio file to vedio device(here video18 is related to the second screen).
- $ gst-launch playbin2 uri=file:///unit_tests/akiyo.mp4 \
- $ gst-launch playbin2 uri=file:///unit_tests/akiyo.mp4 \
video-sink="mfw_v4lsink device=/dev/video18"
Test method instruction
1)Enter u-boot command line and enter commands then press Enter key and wait until booting is over
Example as below:
2)Execute command turn on backlight of corresponding display screen
Example as below:
3)Execute vedio playing command to play the vedio to display screen
Example as below:
Instruction:in the mode of dual screen asynchronous display ,the backlight defaut of the second screen is closed after system boot,so need to execute step2).
LVDS1 as main screen
- LVDS1+LVDS0 dual screen asynchronous display
- LVDS1+LVDS0 dual screen asynchronous display
setenv bootargs console=ttymxc0,115200 ip=none root=/dev/mmcblk0p1 rootwait video=mxcfb0:dev=ldb,LDB-1024X600,if=RGB666 video=mxcfb1:dev=ldb,LDB-1024X600,if=RGB666; mmc dev 2; mmc read 0x10800000 0x800 0x2000; bootm
- LVDS1+RGB dual screen asynchronous display
- LVDS1+RGB dual screen asynchronous display
setenv bootargs console=ttymxc0,115200 ip=none root=/dev/mmcblk0p1 rootwait video=mxcfb0:dev=ldb,LDB-1024X600,if=RGB666 video=mxcfb1:dev=lcd, SEIKO-WVGA,if=RGB24; mmc dev 2; mmc read 0x10800000 0x800 0x2000; bootm
- LVDS1+HDMI dual screen asynchronous display
- LVDS1+HDMI dual screen asynchronous display
setenv bootargs console=ttymxc0,115200 ip=none root=/dev/mmcblk0p1 rootwait video=mxcfb0:dev=ldb,LDB-1024X600,if=RGB666 video=mxcfb1:dev=hdmi,1920x1080M@60,if=RGB24; mmc dev 2; mmc read 0x10800000 0x800 0x2000; bootm
LVDS0 as main screen
- LVDS0+LVDS1 dual screen asynchronous display:
- LVDS0+LVDS1 dual screen asynchronous display:
setenv bootargs console=ttymxc0,115200 ip=none root=/dev/mmcblk0p1 rootwait video=mxcfb0:dev=ldb,LDB-1024X600,if=RGB666 ldb=sep0 video=mxcfb1:dev=ldb,LDB-1024X600,if=RGB666; mmc dev 2; mmc read 0x10800000 0x800 0x2000; bootm
- LVDS0+RGB dual screen asynchronous display
- LVDS0+RGB dual screen asynchronous display
setenv bootargs console=ttymxc0,115200 ip=none root=/dev/mmcblk0p1 rootwait video=mxcfb0:dev=ldb,LDB-1024X600,if=RGB666 ldb=sin0 video=mxcfb1:dev=lcd,SEIKO-WVGA,if=RGB24; mmc dev 2; mmc read 0x10800000 0x800 0x2000; bootm
- LVDS0+HDMI dual screen asynchronous display
- LVDS0+HDMI dual screen asynchronous display
setenv bootargs console=ttymxc0,115200 ip=none root=/dev/mmcblk0p1 rootwait video=mxcfb0:dev=ldb,LDB-1024X600,if=RGB666 ldb=sin0 video=mxcfb1:dev=hdmi,1920x1080M@60,if=RGB24; mmc dev 2; mmc read 0x10800000 0x800 0x2000; bootm
RGB as main screen
- RGB+LVDS1 dual screen asynchronous display:
- RGB+LVDS1 dual screen asynchronous display:
setenv bootargs console=ttymxc0,115200 ip=none root=/dev/mmcblk0p1 rootwait video=mxcfb0:dev=lcd,SEIKO-WVGA,if=RGB24 video=mxcfb1:dev=ldb,LDB-1024X600,if=RGB666; mmc dev 2; mmc read 0x10800000 0x800 0x2000; bootm
- RGB+LVDS0 dual screen asynchronous display:
- RGB+LVDS0 dual screen asynchronous display:
setenv bootargs console=ttymxc0,115200 ip=none root=/dev/mmcblk0p1 rootwait video=mxcfb0:dev=lcd,SEIKO-WVGA,if=RGB24 video=mxcfb1:dev=ldb,LDB-1024X600,if=RGB666 ldb=sin0; mmc dev 2; mmc read 0x10800000 0x800 0x2000; bootm
HDMI as main screen
- HDMI+LVDS1 dual screen asynchronous display
- HDMI+LVDS1 dual screen asynchronous display
setenv bootargs console=ttymxc0,115200 ip=none root=/dev/mmcblk0p1 rootwait video=mxcfb0:dev=hdmi,1920x1080M@60,if=RGB24 video=mxcfb1:dev=ldb,LDB-1024X600,if=RGB666; mmc dev 2; mmc read 0x10800000 0x800 0x2000; bootm
- HDMI+LVDS0 dual screen asynchronous display
- HDMI+LVDS0 dual screen asynchronous display
setenv bootargs console=ttymxc0,115200 ip=none root=/dev/mmcblk0p1 rootwait video=mxcfb0:dev=hdmi,1920x1080M@60,if=RGB24 video=mxcfb1:dev=ldb,LDB-1024X600,if=RGB666 ldb=sin0; mmc dev 2; mmc read 0x10800000 0x800 0x2000; bootm
