“MYZR-IMX28 Linux-3.14.52 Build Manual”的版本间的差异
小 (Admin移动页面MY-IMX28 Linux-3.14.52 Build Manual至MYZR-IMX28 Linux-3.14.52 Build Manual,不留重定向) |
|
(没有差异)
| |
2020年10月22日 (四) 16:27的最新版本
目录
- 1 Document instruction
- 2 Prepare source code and relevant files
- 3 Prepare development environment
- 4 Install and configure cross compiler tool chain
- 5 U-Boot compilation
- 6 Compile kernel
- 7 Application compilation
- 8 File system
- 9 Programing mode
- 10 Login way
- 11 Test
Document instruction
System environment instruction
- CUP architeture of host used for compilation:64bit
- System of compiler host:Linux
- Linux release version:
- Ubuntu version type:saver version
- Ubuntu version no.:12.04.5
- Ubuntu system type:x86-64
Note: The development host should use ubuntu 12.04.5 x86-64(desktop and server version are available),Using other distribution of Linux and other versions of Ubuntu may encounter unnecessary problems.
Operation instruction
1)The line in the document which begins with “$”,which is followed by the Linux command.
2)All the Linux commands in the document are recommended to be entered into the host manually for execution.(Copying ,pasting to the host directly to execute may fail.
3)In all the Linux execution commands of the document,if the next character after the space is "-",(example:sudo apt-get –y install),please enter into Linux host to execute manually.(Copying ,pasting to the host directly to execute may fail ).
4)Any line of Linux commands whichi is not finished is recommended to be entered into the host for execution. (Because copy or paste commands cannot contain special character such as "line breaks").
5)Note whether the execution result is consistent with the document image when you enter and execute the command. check the command was entered incorrectly or failed to execute.
6)Please follow the document strictly to compile for the first time.Otherwise ,there may be unexpected error.
Screenshots instruction
To make the view look neat and tidy , the command prompt in the screenshot should use myzr$ uniformly.
Linux command in the image
In the image of the document, you can see the input Linux command visually from the lines that start with “myzr$” linux command.
Prepare source code and relevant files
Source code
The corresponding Linux version of the evaluation board and the corresponding source code files are shown in the table below:
| Evaluation board model | System version supported | u-boot source code | linux source code |
|---|---|---|---|
| MYZR-IMX28-EVK | Linux-3.14.54 | u-boot-2015.04.tar.bz2 | linux-3.14.54.tar.bz2 |
Cross compiler tool file
Linux program cross compiler tool:gcc-4.4.4-glibc-2.11.1-multilib-1.0.tar.bz2
Linux cross compiler tool configuration file:gcc-4.4.4-glibc-2.11.1-multilib-env
Creat working directory
1)Source code directory
$ mkdir -p ~/my-imx28/02_source
![]()
2)Tool directory
$ mkdir -p ~/my-imx28/03_tools
![]()
3)Image dirrectory
$ mkdir -p ~/my-imx28/04_image
![]()
4)Application directory
$ mkdir -p ~/my-imx28/01_application
![]()
Prepare development environment
Update source list of host
$ sudo apt-get update

It looks like below after the update

Install management tool of aptitude package and ia32-libs
Tips: if Linux of compilation host is 32bit,then you can skip this step
Install management tool of aptitude package
$ sudo apt-get -y install aptitude

Tips: the above image is the screenshots after re-execution of installation command when intallation of aptitude was completed.
Install ia32-libs with aptitude
$ sudo aptitude -y install ia32-libs

Tips: the above image is the screenshots after re-execution of installation command when intallation of aptitude and ia32-libs was completed.
Install mkimage tool
$ sudo apt-get -y install uboot-mkimage
Tips: the following image is the screenshots after re-execution of installation command when intallation of mkimage was completed.

Install ncurses-dev
make menuconfig is dependant to it
$ sudo aptitude -y install ncurses-dev

Tips: the above image is the screenshots after re-execution of installation command when intallation of aptitude and ia32-libs was completed.
Install and configure cross compiler tool chain
Install Linux cross compilation tool chain
1)Enter cross compilation tool chain diretory
$ cd ~/my-imx28/03_tools/
2)Copy Linux cross compilation tool to directory
Copy gcc-4.4.4-glibc-2.11.1-multilib-1.0.tar.bz2 to “~/my-imx28/03_tools”,this step need to be done in your own way.
3)Decompress Linux cross compilation tool
$ tar jxf gcc-4.4.4-glibc-2.11.1-multilib-1.0.tar.bz2
![]()
4)Copy cross compilation tool configuration file
Copy gcc-4.4.4-glibc-2.11.1-multilib-env to“~/my-imx28/03_tools”,this step need to be done in your own way
5)Check installation
$ source gcc-4.4.4-glibc-2.11.1-multilib-env
$ ${CROSS_COMPILE}gcc –v

U-Boot compilation
Prepare compilation
Copy source code package to development host
Copy“u-boot source code”downloaded to “~/my-imx6/02_source”of Linux development host
This step need to be done in your own way
Decompress u-boot source code package
$ cd ~/my-imx28/02_source/
$ tar jxf u-boot-2015.04.tar.bz2
![]()
Update library libssl-dev
$ sudo apt-get install libssl-dev

Compile
Validate compilation configuration file
$ source ~/my-imx28/03_tools/gcc-4.4.4-glibc-2.11.1-multilib-env
![]()
Validate compiler configuration file
$ cd ~/my-imx28/02_source/u-boot-2015.04
![]()
Remove u-boot temporary files
Configure u-boot
| Evaluation board main model | CPU type-memory capacity | Corresponaind configuration of u-boot |
|---|---|---|
| MYZR-IMX28-EVK | MX283/7, 128M | mx28_evk_config |
- Example for MYZR-IMX28-EVK configuration:
Execute compilation
$ make u-boot.sb
Tips:To speed up the compilation,add "-j4" after make.The Linux host used to compile is dual-core ,4 threads .So "-j" is followed by 4, which takes 4 threads to compile. The number behind "-j" is allocated based on system resources,but It should not exceed the maximum threads the host support

- Complete compilation
Tips: u-boot compiling process may take one or two minutes

Target file
- Compile file
You can get the compiled file u-boot .sb with ls command after compilation
$ ls

- Target file
The corresponding target file name for u-boot configuration of MY-IMX28 series evaluation board is shown in the table below.
| u-boot configuration | Target file |
|---|---|
| mx28_evk_config | imx28_ivt_uboot.sb |
Compile kernel
Prepare compilation
Copy source code package to development host
Copy“linux source code”downloaded to “~/my-imx28/02_source”of Linux development host
This step should be done in your own way
Decompress linux source code package
$ cd ~/my-imx28/02_source/
$ tar jxf linux-3.14.54.tar.bz2
![]()
Configuration of kernel compilation
Validate configuration file of compilation
$ source ~/my-imx28/03_tools/gcc-4.4.4-glibc-2.11.1-multilib-env
![]()
Remove kernel temporary file
- Enter linux source code directory
$ cd ~/my-imx28/02_source/linux-3.14.54
![]()
- Remove temporary file
Kernel configuration
Compile kernel
- Execute compilation
- Complete compilation
- Target file
arch/arm/boot/uImage is the kernel file compiled,you can check file information with ls command.
$ ls arch/arm/boot/uImage -la

Compife device tree
The correspondence between the type of evaluation board and device tree is shown below:
| Function | Source code position | Linux device and folder |
|---|---|---|
| Development main model | CPU type-memory capacity | Corresponding device tree file |
| MY-IMX28-EVK | MX283/7, 128M | imx28-evk.dtb |
- Take MY-IMX28-EVK as an example:
- Target file
You can browse the target device tree file information from compilation with ls command:
$ ls arch/arm/boot/dts/*.dtb
![]()
Compile module
- Command for compiling module
- Install module to the specified directory
$ make modules_install INSTALL_MOD_PATH=./modules

- Package the module file
$ cd modules
$ tar cjf ../modules.tar.bz2 *

Application compilation
Linux application compilation
Write an application
- Enter working directory
$ cd ~/my-imx28/01_application/
![]()
- Write souce code
$ vim hello.c
Write following code and save
- include <stdio.h>
int main(int argc, char **argv)
{
printf("Hello, MYZR!\n");
return;
}
- View code
Compife application
- Configure environment variables
$ source ~/my-imx28/03_tools/gcc-4.4.4-glibc-2.11.1-multilib-env
![]()
- Compile
$ ${CROSS_COMPILE}gcc hello.c -o hello.out

Note:The above command contains “$”,which is “${CROSS_COMPILE}gcc”. It is the environment variable generated when referring to our source.
- Target file
$ file hello.out
![]()
You can see the property of target file hello.out
File system
File system rootfs.tar.bz2
Add your own application by the following means: (copy MY-IMX28_Born_Tool\Profiles\MX28 Linux Update\OS Firmware\files\image-linux-31454/rootfs.tar.bz2 to directory of“~/my-imx28/04_image/”)

File system filesystem.ubifs
Copy mkfs.ubifs,ubinize to directory of“/usr/bin”of computer(if computer has both these two applications,the copy is not needed);copy build_rootfs和ubinize.cfg to directory of “~/my-imx28/04_image/”

Programing mode
So far,we get a set of programing file under directory of “~/my-imx28/02_source besides file system ,including “u-boot.sb”、“imx28-evk.dtb”、“zImage”、“rootfs.tar.bz2”
Program with MFGTOOL
Copy “u-boot.sb”、“imx28-evk.dtb”、“zImage”、“rootfs.tar.bz2 to the directory of “MY-IMX28_Born_Tool\Profiles\MX28 Linux Update\OS Firmware\files\image-linux-31454”.hold REC key,plug in MINI USB line and power cable,then open MfgTool.exe,click"scan device",detect HID device,release REC key,like below:
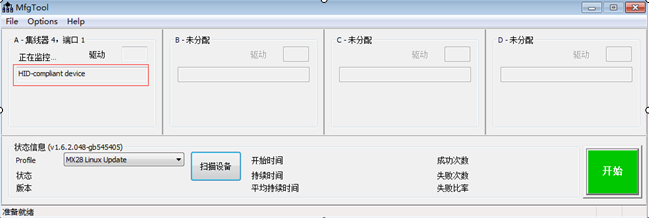
Click“Options”on menu,then select“MY-IMX28-3.14.54 NAND with uboot”on option of “Profiles”,then click“Enter”,finally click“start”

When programing is successful,click"stop",to be completed
Note: if file system in use is rootfs-qt.tar.bz2, please choose “QT-MY-IMX28-3.14.54 NAND with uboot”as programing image.
Program with network
Build up TFTP (ubuntu system)
(1) Setup tftp server files (download and install tftp)
$ sudo apt-get install tftpd tftp openbsd-inetd
(2) make a tftp directory (buid tftp directory and change its property)
Here we make /home/myzr/tftpt be a tftp directory.
$ mkdir /home/myzr/tftp
$ chmod 777 /home/myzr/tftp
(3) Open /etc/inetd.conf and edit it (change tftp directory of configured file)
$ sudo gedit /etc/inetd.conf
Coment this line :
- tftp dgram udp wait nobody /usr/sbin/tcpd /usr/sbin/in.tftpd /srv/tftp
Add new line:
tftp dgram udp wait nobody /usr/sbin/tcpd /usr/sbin/in.tftpd /home/myzr/tftp
(4)Restarting tftp service (reboot tftp)
$ sudo /etc/init.d/openbsd-inetd restart
Build NFS (network programing does't need nfs)
(1) Install NFS server package (Download and install nfs)
$ sudo apt-get install nfs-kernel-server
(2) Create NFS directory:/home/myzr/nfsroot (newly build nfs directory)
$ mkdir /home/myzr/nfsroot
(3) Configure mounted directory and authority (change nfs directory of configuration file)
$ sudo gedit /etc/exports
Add the following line at the end of the file:
/home/myzr/nfsroot *(rw,sync,no_root_squash)
(4) Restart the NFS service (reboot nfs)
$ sudo /etc/init.d/portmap restart
$ sudo /etc/init.d/nfs-kernel-server restart
tftp Download
(1) Copy “u-boot.sb”、“imx28-evk.dtb”、“zImage”、“filesystem.ubifs”to the directory of “/home/myzr/tftp”
(2) Set environment variables(directly connect board with computer lan line)
$ setenv ipaddr 192.168.3.104 (The board IP)
$ setenv serverip 192.168.3.110 (Computer IP)
(3) Program
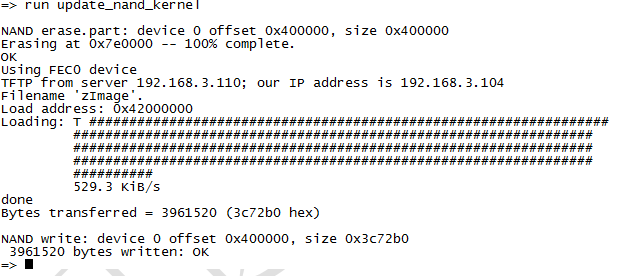
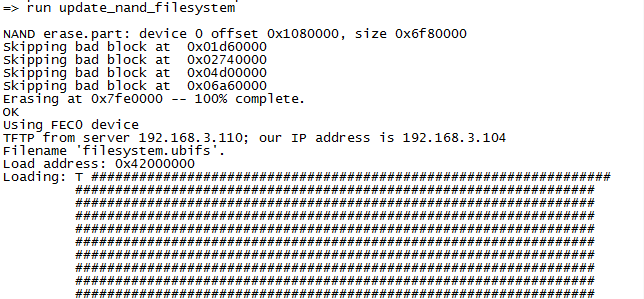
$ run update_nand_kernel.(program zImage)
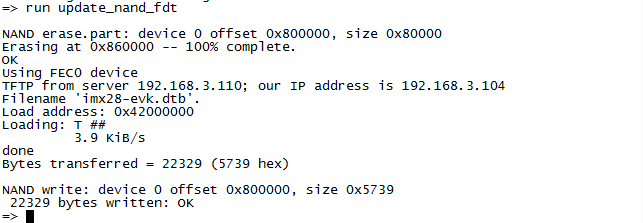
$ run update_nand_fdt. (program fdt)
$ run update_nand_filesyste.(program file system)
Login way
Serial port login
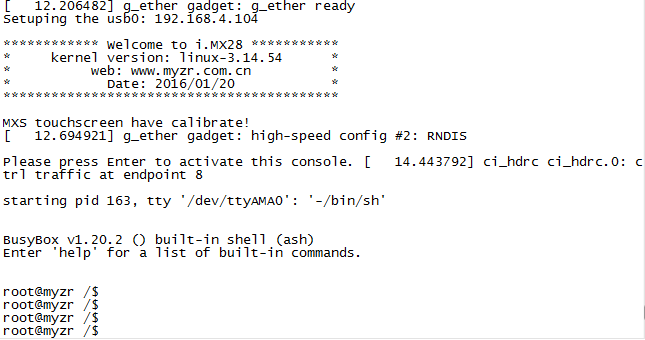
Plug in USB to serial port line and power supply,enter key Enter to enter system in about 10 minutes after starting the device
ssh Login
Ethernet login
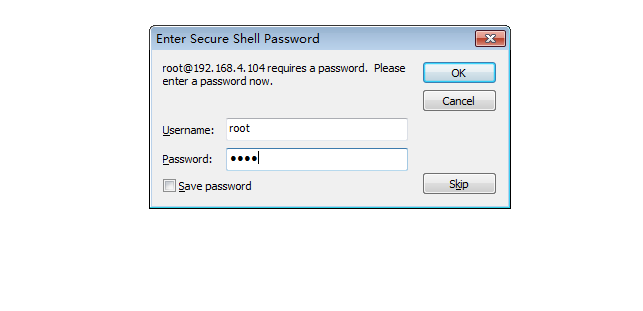
Plug in lan line and power supply,you can login via software SecureCRT in about 10 minutes after starting the device,the board default ehternet IP as 192.168.3.104,you can set computer IP as 192.168.3.110,then configure SecureCRT,enter root as user name and myzr as password,like below:
After entering is over,click "ok",the login is completed
USB login(USB can be identified as network port)
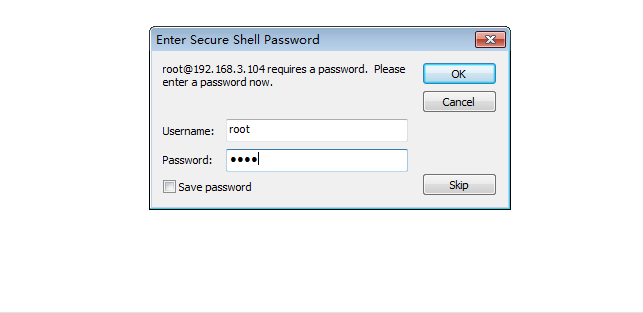
Plug in lan line and power supply,you can login via software SecureCRT in about 10 minutes after starting the device,the board default ehternet IP as 192.168.3.104,you can set computer IP as 192.168.3.110,then configure SecureCRT,enter root as user name and myzr as password,like below:
After entering is over,click "ok",the login is completed
Test
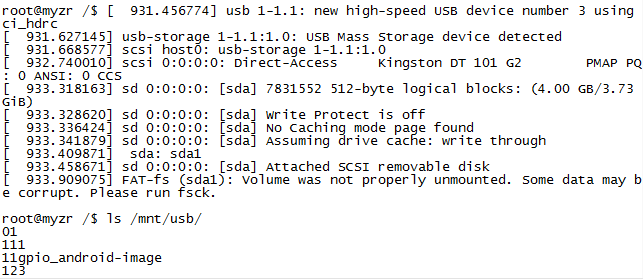
USB test
Directly insert U disk,you can see the content of U disk after mounting(if it is not QT system,there will be an automatic mounting)
SD card test
Directly SD card,you can see the content of SD card after mounting(if it is not QT system,there will be an automatic mounting)

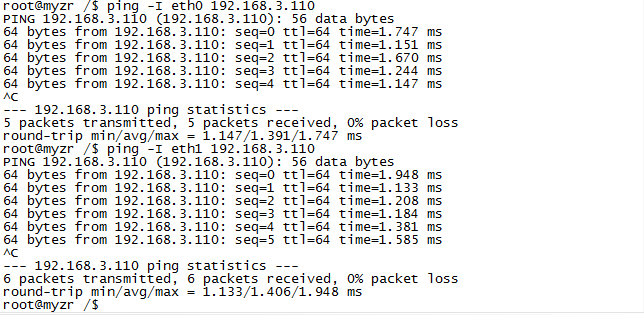
Ethernet test
Plug in lan line,test eth0 and eth1 network port directly with ping command. defaulted IP of eth0 is 192.168.3.104,let's set eth1 as 192.168.3.105,as below:
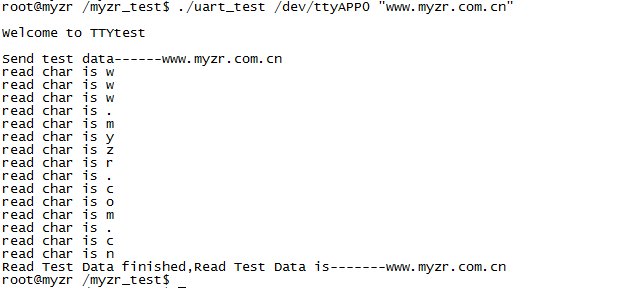
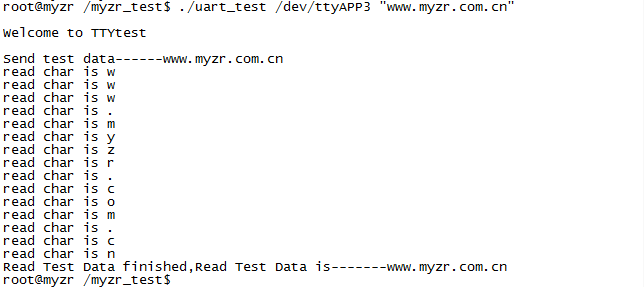
Uart serial port test
Device ttyAPP0 of serial port uat0,device ttyAPP3 of serial port uat3,please short connect transceiver pin in test.
gpio Test
GPIO_2_26,GPIO_2_25 and GPIO_2_27 were set as function of GPIO in driver configuration,take pin of GPIO_2_26 as an example to figure out the no.of pin of GPIO_2_26 is 2*32+26=90,the test as below:

SPI Test
SPI interface is semiduplex mode,here you only test the sending, you can see wave shape through oscilloscope .way number 1 is to only send 0x55 and 0x75,way number2 is to send charater string"myzr"

watchdog test
"watch dog",the full name is wathcdog timer,which is hardware timer to reset computer sytem when there is an error in software. usually a user space protect procedure will notice watchdog driver in kernel through special device /dev/watchdog in normal time interval that everything in user space is normal. if there is an error in user space(such as RAM error,kernel BUG and ect),the notice will be stopped,then hardware Watchdog will reset system after timeout.
/dev/watchdog device file will be opened in test program,and start Watchdog,feeding dog will happen once each second,system won't reboot.
![]()
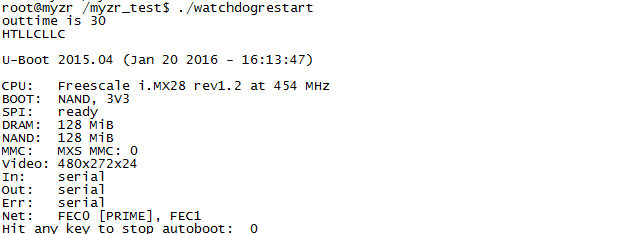
/dev/watchdog device file will be opened in test program,and start Watchdog,program come into cycling state,since there is not dog feeding, and system will reset in 30 seconds
