MYZR-IMX6-EK200 Android-4.2.2 Quick Start
目录
MY-IMX6-MB200 Front view

MY-IMX6-MB200 Rear view

Icon module
| Icon | Decription of interface | Silk screen | Icon | Decription of interface | Silk screen | |
|---|---|---|---|---|---|---|
| 1 | 18/24bit LVDS0 | J11 | 19 | RTC_Licell | BT1 | |
| 2 | 18/24bit RGB | J15 | 20 | UART5/TTL | J16 | |
| 3 | 18/24bit LVDS1 | J19 | 21 | UART4/TTL | J14 | |
| 4 | 10M/100M Ethernet | P1 | 22 | GPIO | J13 | |
| 5 | Audio | J26 | 23 | UART3/TTL | J12 | |
| 6 | HDMI | J23 | 24 | UART2/TTL | J10 | |
| 7 | USBOTG | J25 | 25 | SPI2 | J9 | |
| 8 | PWR_SATA | J27 | 26 | SPI1 | J8 | |
| 9 | SATA | J20 | 27 | MIPI_CSI | J7 | |
| 10 | USBHOST | J21 | 28 | CMOS_CSI | J6 | |
| 11 | UART1/RS232 | P2 | 29 | CAN2 | J5 | |
| 12 | PWR_Switch | J24 | 30 | CAN1 | J4 | |
| 13 | DC_5V_IN | J22 | 31 | I2C3 | J3 | |
| 14 | nRESET | SW4 | 32 | I2C2 | J2 | |
| 15 | KEY1 | SW3 | 33 | I2C1 | J1 | |
| 16 | KEY2 | SW2 | 34 | SD3 | J18 | |
| 17 | KEY3 | SW1 | 35 | WIFI | U8 | |
| 18 | SD2 | J18 | 36 | PCIE | J29 |
Android Fast boot
1).Check
Connection between base board and core board. if core board and base board is seperated,please insert core board in the base board in the way described in the appendix.
2).Prepare
Get ready serial port line(serial port line which can be connected directly with PC,or USB to serial port line),ethernet line,power supply(DC 5V,2A or above).
3).Configure serial port
- Choose proper serial port
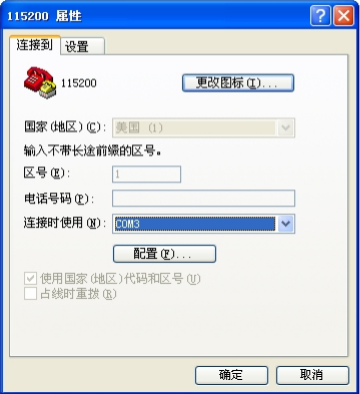
- Choose proper serial port

- Set interface as below
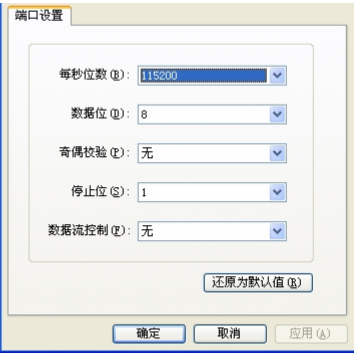
- Set interface as below

4).Operation
- Turn 2 bit dial switch to 1:OFF,2:ON .
- Connect serial port line to serial port of base board of MY-I.MX6X (icon 11 in figure1).
- Turn swtich(icon12 in figure1) to be off status(1:closed,0:off).
- Plug 5V power supply in the power interface.
- Close the swtich, there will be output of information in the serial port.
- Defaulted booting by system start with SPI,load SD or kernel and file system in EMMC,defaulted display interface of crystal liquid by system is LVDS1(icon3 in figure1)
- After starting up,there will be a logo booting,if the starting up logo can't be displayed normally,please turn off power for 3 seconds,re-start up and wait untill the system is started up,enter android interface,then android operations can be done normally.capacitor screen is configured in android system,users can operate android system as they operate mobile phones.after the booting,test for function module can be conducted. test method for android can be refered to 《MY-I.MX6-DEMO-V2.2 Android test manual.
- Turn 2 bit dial switch to 1:OFF,2:ON .
Setting for environment variables of Android fast boot( versus V1.0 version of core board)
SPI+SD Start
$ setenv bootcmd booti mmc1
$ saveenv
SPI+SD LVDS1 Configuration
$ setenv bootargs console=ttymxc0,115200 init=/init video=mxcfb0:dev=ldb,LDB-XGA,bpp=32
video=mxcfb1:off video=mxcfb2:off fbmem=10M fb0base=0x27b00000 vmalloc=400M
androidboot.console=ttymxc0 androidboot.hardware=freescale
SPI+SD LVDS0 Configuration
$ setenv bootargs console=ttymxc0,115200 init=/init video=mxcfb0:dev=ldb,LDB-XGA,bpp=32 ldb=sin0
video=mxcfb1:off video=mxcfb2:off fbmem=10M fb0base=0x27b00000 vmalloc=400M
androidboot.console=ttymxc0 androidboot.hardware=freescale
SPI+SD Dual Displays: LVDS and HDMI Displays
$ setenv bootargs console=ttymxc0,115200 androidboot.console=ttymxc0 vmalloc=400M init=/init
video=mxcfb0:dev=ldb,bpp=32 video=mxcfb1:dev=hdmi,1920x1080M@60,bpp=32 video=mxcfb2:off
fbmem=10M androidboot.hardware=freescale
SPI+SD RGB Configuration
$ setenv bootargs console=ttymxc0,115200 init=/init
video=mxcfb0:dev=lcd,SEIKO-WVGA,bpp=32,if=RGB24 video=mxcfb1:off video=mxcfb2:off fbmem=10M
fb0base=0x27b00000 vmalloc=400M androidboot.console=ttymxc0 androidboot.hardware=freescale
SPI+SD HDMI Configuration
$ setenv bootargs console=ttymxc0,115200 androidboot.console=ttymxc0 vmalloc=400M init=/init
video=mxcfb0:dev=hdmi,1920x1080M@60,bpp=32 video=mxcfb1:off video=mxcfb2:off fbmem=28M
androidboot.hardware=freescale
Booting with Dual Displays: LVDS and HDMI Displays
$ setenv bootargs console=ttymxc0,115200 androidboot.console=ttymxc0 vmalloc=400M init=/init
video=mxcfb0:dev=ldb,bpp=32 video=mxcfb1:dev=hdmi,1920x1080M@60,bpp=32 video=mxcfb2:off
fbmem=10M androidboot.hardware=freescale
Setting for environment variables of Android fast boot( versus V2.1 version of core board)
SPI+EMMC Start up
$ setenv bootcmd booti mmc2
$ saveenv
SPI+EMMC LVDS1 Configuration
$ setenv bootargs console=ttymxc0,115200 init=/init video=mxcfb0:dev=ldb,LDB-XGA,bpp=32
video=mxcfb1:off video=mxcfb2:off fbmem=10M fb0base=0x27b00000 vmalloc=400M
androidboot.console=ttymxc0 androidboot.hardware=freescale
SPI+EMMC LVDS0 Configuration
$ setenv bootargs console=ttymxc0,115200 init=/init video=mxcfb0:dev=ldb,LDB-XGA,bpp=32 ldb=sin0
video=mxcfb1:off video=mxcfb2:off fbmem=10M fb0base=0x27b00000 vmalloc=400M
androidboot.console=ttymxc0 androidboot.hardware=freescale
SPI+SD Dual Displays: LVDS and HDMI Displays
$ setenv bootargs console=ttymxc0,115200 androidboot.console=ttymxc0 vmalloc=400M init=/init
video=mxcfb0:dev=ldb,bpp=32 video=mxcfb1:dev=hdmi,1920x1080M@60,bpp=32 video=mxcfb2:off
fbmem=10M androidboot.hardware=freescale
SPI+EMMC RGB Configuration
$ setenv bootargs console=ttymxc0,115200 init=/init
video=mxcfb0:dev=lcd,SEIKO-WVGA,bpp=32,if=RGB24 video=mxcfb1:off video=mxcfb2:off fbmem=10M
fb0base=0x27b00000 vmalloc=400M androidboot.console=ttymxc0 androidboot.hardware=freescale
SPI+EMMC HDMI Configuration
$ setenv bootargs console=ttymxc0,115200 androidboot.console=ttymxc0 vmalloc=400M init=/init
video=mxcfb0:dev=hdmi,1920x1080M@60,bpp=32 video=mxcfb1:off video=mxcfb2:off fbmem=28M
androidboot.hardware=freescale
SPI+EMMC: LVDS and HDMI Displays
$ setenv bootargs console=ttymxc0,115200 androidboot.console=ttymxc0 vmalloc=400M init=/init
video=mxcfb0:dev=ldb,bpp=32 video=mxcfb1:dev=hdmi,1920x1080M@60,bpp=32 video=mxcfb2:off
fbmem=10M androidboot.hardware=freescale
</div>