|
|
| (未显示同一用户的4个中间版本) |
| 第1行: |
第1行: |
| | <div> | | <div> |
| | | | |
| − | <span style="font-size:200%">串口的配置如下:<br></span>
| + | ='''串口的配置如下'''= |
| − | <span style="background:#CCCCCC">configuration of serial port as below:</span>
| + | |
| | <br> | | <br> |
| | [[文件:MY_IMX283_1.png]]<br> | | [[文件:MY_IMX283_1.png]]<br> |
| | | | |
| − | <span style="font-size:200%">开机准备<br></span> | + | ='''开机准备'''= |
| − | <span style="background:#CCCCCC">prepare to start</span><br> | + | |
| | + | *<span style="color:red">针对MYZR-I.MX28-DEMO-V3.1版本</span><br> |
| | + | |
| | + | 1)拿到评估板之后 ,如果有7寸液晶,将液晶接到RGB液晶接口接到4.3寸液晶下面的接插件。<br> |
| | + | |
| | + | 2)将4位拨码开关拨到1:OFF,2:OFF,3:ON,4:OFF(NandFlash启动)<br> |
| | | | |
| − | <span style="color:red">针对MY-I.MX28-DEMO-V3.1版本</span><br>
| + | 3)如果是SD卡启动,1:ON,2:OFF,3:OFF,4:ON<br> |
| − | <span style="background:#CCCCCC">versus MY-I.MX28-DEMO-V3 version</span><br>
| |
| | | | |
| − | 拿到评估板之后 ,如果有7寸液晶,将液晶接到RGB液晶接口接到4.3寸液晶下面的接插件。<br>
| + | 4)将串口线公头插入到调试串口(DEBUG UART)位置,另一头连接电脑。将MINIUSB线一端插到电脑,一端插到DEMO板 MINI USB 口处,或者<span style="color:red">5V</span>电源插入到电源插孔(DC-5V-IN)处,此时串口上面有系统正常启动的log信息。<br> |
| − | <span style="background:#CCCCCC">having evaluation board in hands,if 7 inch crystal liquid is in place, connect the crystal liquid to crystal liquid interface of RGB then plug in the connector of 4.3 inch crystal liquid.</span><br> | |
| | | | |
| − | 将4位拨码开关拨到1:OFF,2:OFF,3:ON,4:OFF(NandFlash启动)<br>
| + | [[文件:iMX28_DEMO_front.jpg|646px]]<br> |
| − | <span style="background:#CCCCCC">switch 4bit dial switch to 1:OFF,2:OFF,3:ON,4:OFF(NandFlash boot)</span><br>
| |
| | | | |
| − | 如果是SD卡启动,1:ON,2:OFF,3:OFF,4:ON<br>
| |
| − | <span style="background:#CCCCCC">if it is booted by SD card,then switch to 1:ON,2:OFF,3:OFF,4:ON</span><br>
| |
| | | | |
| − | 将串口线公头插入到下图标示6(调试串口)位置,另一头连接电脑。将MINIUSB线一端插到电脑,一端插到DEMO板MINI USB口(图示20)处,或者<span style="color:red">5V</span>电源插入到下图标示21(电源插孔)处,此时串口上面有系统正常启动的log信息。<br>
| |
| − | <span style="background:#CCCCCC">insert male head of serial port line into icon6(debug serial port) in the following image,another end is connected to computer.insert one end of MINIUSB line in computer another end into MINI USB port(icon20) on DEMO board,or insert <span style="color:red">5V</span> power supply into icon21(power jack),then there will be log information on serial port showing normalization of system booting.</span><br>
| |
| − | [[文件:MY_IMX283_3.png]]<br>
| |
| | </div> | | </div> |
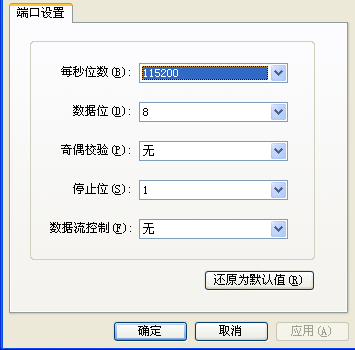
串口的配置如下
开机准备
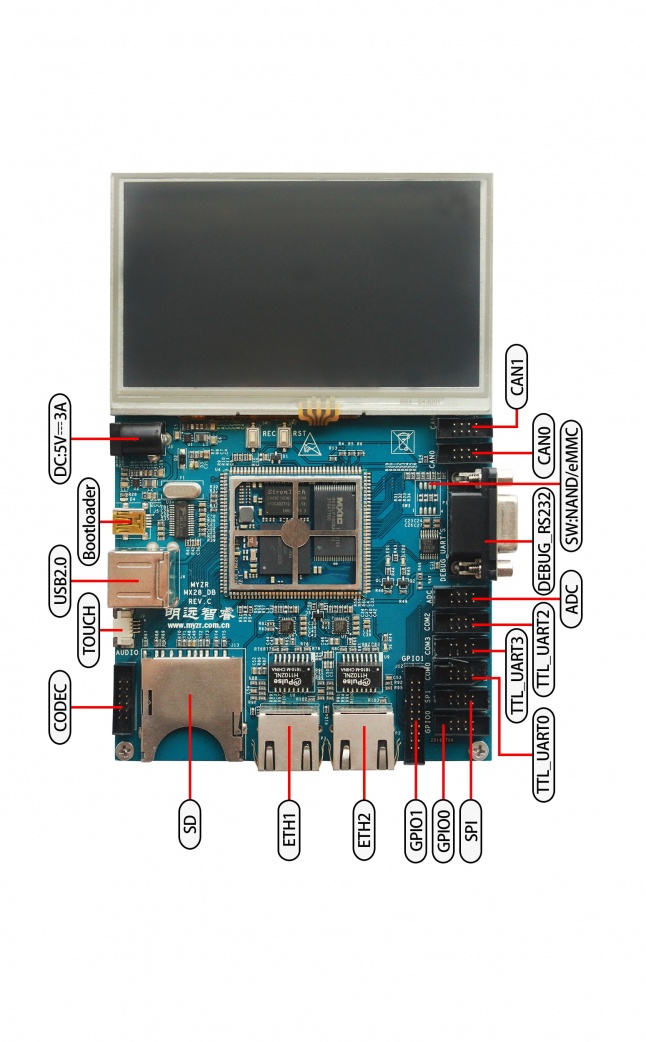
- 针对MYZR-I.MX28-DEMO-V3.1版本
1)拿到评估板之后 ,如果有7寸液晶,将液晶接到RGB液晶接口接到4.3寸液晶下面的接插件。
2)将4位拨码开关拨到1:OFF,2:OFF,3:ON,4:OFF(NandFlash启动)
3)如果是SD卡启动,1:ON,2:OFF,3:OFF,4:ON
4)将串口线公头插入到调试串口(DEBUG UART)位置,另一头连接电脑。将MINIUSB线一端插到电脑,一端插到DEMO板 MINI USB 口处,或者5V电源插入到电源插孔(DC-5V-IN)处,此时串口上面有系统正常启动的log信息。