|
|
| (未显示同一用户的9个中间版本) |
| 第1行: |
第1行: |
| | + | <div> |
| | | | |
| − | = '''准备开发板套件(prepare development board suites)''' = | + | = '''准备开发板套件''' = |
| | ---- | | ---- |
| | 开发板套件由开发板和开发板配件组成。<br> | | 开发板套件由开发板和开发板配件组成。<br> |
| − | <span style="background:#CCCCCC">Development board suites are made up of development board and development board accessories</span><br>
| |
| | | | |
| − | == '''开发板(Development board )''' == | + | == '''开发板''' == |
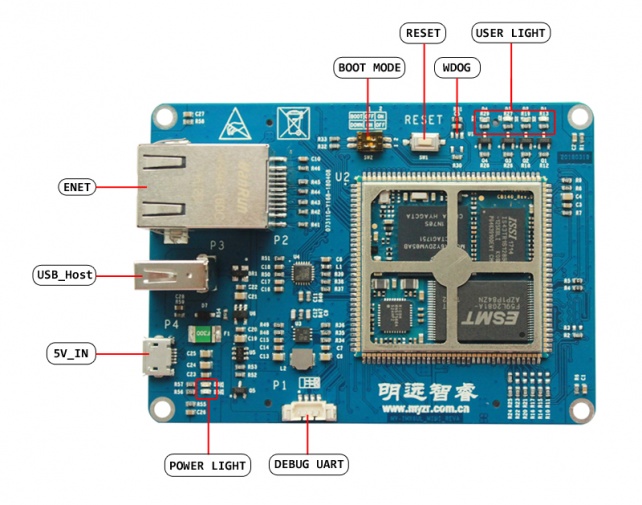
| | 开发板由以下器件组成:<br> | | 开发板由以下器件组成:<br> |
| − | <span style="background:#CCCCCC">Development board are made up of devices below:</span><br>
| + | * MYZR-IMX6-CB140(核心板)一片<br> |
| − | * MY-IMX6-CB140(核心板)一片<br> | + | * MYZR-IMX6-MB140(底板)一片<br> |
| − | <span style="background:#CCCCCC">MY-IMX6-CB140(a core board)</span><br>
| |
| − | * MY-IMX6-MB140(底板)一片<br> | |
| − | <span style="background:#CCCCCC">MY-IMX6-MB140(a base board)</span><br>
| |
| | 说明:核心板是直接焊接到底板上的,不可拆卸。<br> | | 说明:核心板是直接焊接到底板上的,不可拆卸。<br> |
| − | <span style="background:#CCCCCC">instruction: core board is directly welded to the base board ,which is not disassembled.</span><br>
| |
| | | | |
| | | | |
| − | == '''开发板配件(Development board accessories)''' == | + | == '''开发板配件''' == |
| − | MY-IMX6-EK140 标准配置无配件。赠送配件如下:<br>
| + | MYZR-IMX6-EK140 标准配置无配件。赠送配件如下:<br> |
| − | <span style="background:#CCCCCC">MY-IMX6-EK140 is standard,no accessories.The complimentary part is below:</span><br>
| |
| | * 串口模块(带杜邦线)一组<br> | | * 串口模块(带杜邦线)一组<br> |
| − | <span style="background:#CCCCCC">A set of serial module (with dupont line)</span><br>
| |
| | | | |
| | | | |
| − | == '''开发板可选配件(Development board optional accessories)''' == | + | == '''开发板可选配件''' == |
| | * 加速度传感器<br> | | * 加速度传感器<br> |
| − | <span style="background:#CCCCCC">acceleration sensor</span><br>
| |
| | * 3轴数字陀螺仪<br> | | * 3轴数字陀螺仪<br> |
| − | <span style="background:#CCCCCC">3D digital gyroscope</span><br>
| |
| | * 3轴地磁传感器<br> | | * 3轴地磁传感器<br> |
| − | <span style="background:#CCCCCC">3D magnetic sensor </span><br>
| |
| | * 显示模块(显示屏和触摸屏)<br> | | * 显示模块(显示屏和触摸屏)<br> |
| − | <span style="background:#CCCCCC">display module(display panel and touch panel)</span><br>
| |
| | | | |
| | | | |
| − | == '''需自已准备的配件(Self-prepared accessories)''' == | + | == '''需自已准备的配件''' == |
| − | === 开发及调试配件(Develop and debug accessories) === | + | === 开发及调试配件 === |
| | * 串口线<br> | | * 串口线<br> |
| − | <span style="background:#CCCCCC">serial line</span><br>
| |
| | * Micro USB 线<br> | | * Micro USB 线<br> |
| − | <span style="background:#CCCCCC">Micro USB cable</span><br>
| |
| | * 标准网线<br> | | * 标准网线<br> |
| − | <span style="background:#CCCCCC">network cable</span><br>
| |
| | | | |
| | | | |
| − | === 供电用的配件(Power supply accessories) === | + | === 供电用的配件 === |
| | * 5V 的 USB 电源适配器(Android 手机的充电器即可) | | * 5V 的 USB 电源适配器(Android 手机的充电器即可) |
| − | <span style="background:#CCCCCC">5V usb power adapter(Android mobile phone charger is ok)</span><br>
| |
| | * 直流电源 | | * 直流电源 |
| − | <span style="background:#CCCCCC">DC Power</span><br>
| |
| | 说明:支持电源适配器或直流电源供电,两种方式选一即可。<br> | | 说明:支持电源适配器或直流电源供电,两种方式选一即可。<br> |
| − | <span style="background:#CCCCCC">instruction : there are two ways of power supply power adapter and DC power ,choose one of them.</span><br>
| |
| | | | |
| | | | |
| − | = '''开发板接口概览(Development interface overview)''' = | + | = '''开发板接口概览''' = |
| | ---- | | ---- |
| − | 在启动开发板之前我们需要认识一些接口,并将这些接口正确连接到计算机。这里我先认识 MY-IMX6-EK140 的接口。<br> | + | 在启动开发板之前我们需要认识一些接口,并将这些接口正确连接到计算机。这里我先认识 MYZR-IMX6-EK140 的接口。<br> |
| − | <span style="background:#CCCCCC">We need to know some interfaces before booting development board,and connect these interfaces correctly to PC.We need to learn about MY-IMX6-EK140 interface first.</span><br>
| |
| | | | |
| | | | |
| − | == '''MY-IMX6-EK140正面图(MY-IMX6-EK140 top view)''' == | + | == '''MYZR-IMX6-EK140正面图''' == |
| − | [[文件:myimx6ek140_front.jpg|642px]] | + | [[文件:myimx6_mb140_mini_front.jpg|642px]] |
| | | | |
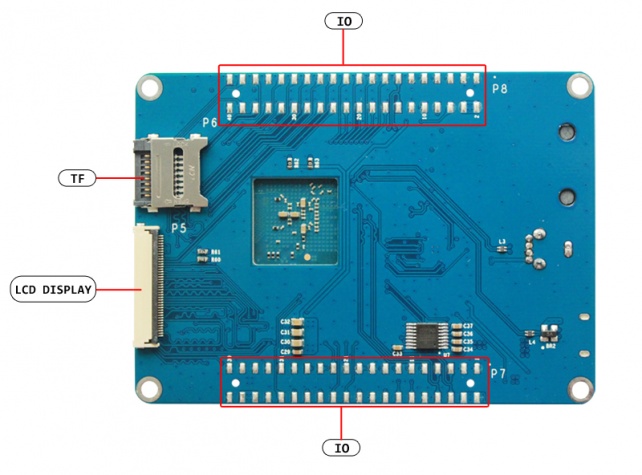
| | + | == '''MYZR-IMX6-EK140背面图''' == |
| | + | [[文件:myimx6_mb140_mini_rear.jpg|642px]] |
| | | | |
| − | == '''MY-IMX6-EK140背面图(MY-IMX6-EK140 back view)''' == | + | == '''MYZR-IMX6-EK140接口''' == |
| − | [[文件:myimx6ek140_back.jpg|642px]]
| |
| − | | |
| − | | |
| − | == '''MY-IMX6-EK140接口(MY-IMX6-EK140 interface)''' ==
| |
| | {| class="wikitable" | | {| class="wikitable" |
| | |- | | |- |
| − | ! width= "40" |标号<br>(no.) | + | ! width= "40" |标号 |
| − | ! width= "60" |接口<br>(interface) | + | ! width= "60" |接口 |
| − | ! width= "160" |功能<br>(function) | + | ! width= "160" |功能 |
| − | ! width= "200" |接口形式<br>(interface form) | + | ! width= "200" |接口形式 |
| − | ! width= "40" |丝印<br>(silk screen) | + | ! width= "40" |丝印 |
| | |- | | |- |
| | |1 | | |1 |
| | |USB OTG | | |USB OTG |
| − | |MFG Tool烧录口及USB OTG<br>(MFG Tool burning input port and USB OTG) | + | |MFG Tool烧录口及USB OTG |
| | |Micro USB | | |Micro USB |
| − | |J4 | + | |P4 |
| | |- | | |- |
| | |2 | | |2 |
| | |ENET | | |ENET |
| − | |10/100-Mbps以太网<br>(10/100-Mbps ethernet) | + | |10/100-Mbps以太网 |
| | |RJ-45 | | |RJ-45 |
| − | |P1 | + | |P3 |
| | |- | | |- |
| | |3 | | |3 |
| | |5V_IN | | |5V_IN |
| − | |电源输入<br>(power in) | + | |电源输入 |
| | |Micro USB | | |Micro USB |
| − | |J3 | + | |P4 |
| | |- | | |- |
| | |4 | | |4 |
| − | |5V_IN | + | |DEBUG UART |
| − | |电源输入<br>(power in) | + | |调试串口 |
| − | |单排插针(2针)<br>(single row pin( 2pins)) | + | |单排插针(4针) |
| − | |J2 | + | |P1 |
| | |- | | |- |
| | |5 | | |5 |
| − | |DEBUG UART | + | |TF |
| − | |调试串口<br>(debug serial port) | + | |TF卡 |
| − | |单排插针(4针)<br>(singla row pin(4 pins)) | + | |TF卡座(翻盖式) |
| − | |J1 | + | |P6 |
| | |- | | |- |
| | |6 | | |6 |
| − | |BOOT Device | + | |LCD DISPLAY |
| − | |启动设备选择<br>(boot device option) | + | |LCD显示接口 |
| − | |拨码开关(4位)<br>(dial switch (4bit)) | + | |FPC插座(翻盖式,40 Pin) |
| − | |SW1 | + | |P5 |
| | |- | | |- |
| | |7 | | |7 |
| − | |TF
| |
| − | |TF卡<br>(TF card)
| |
| − | |TF卡座(翻盖式)<br>(TF card boot(flip type))
| |
| − | |U2
| |
| − | |-
| |
| − | |8
| |
| − | |LCD DISPLAY
| |
| − | |LCD显示接口<br>(LCD display interface)
| |
| − | |FPC插座(翻盖式,40 Pin)<br>(FPC socket(flip type,40pins))
| |
| − | |U1
| |
| − | |-
| |
| − | |9
| |
| | |BOOT MODE | | |BOOT MODE |
| − | |启动模式选择<br>(boot mode option) | + | |启动模式选择 |
| − | |拨码开关(2位)<br>(dial swtich(2bit)) | + | |拨码开关(2位) |
| | |SW2 | | |SW2 |
| | |- | | |- |
| − | |10 | + | |8 |
| | |RESET | | |RESET |
| − | |复位按钮<br>(reset button) | + | |复位按钮 |
| − | |按键(两脚)<br>(key(2 pins)) | + | |按键(两脚) |
| − | |SW3 | + | |SW1 |
| | |- | | |- |
| − | |11 | + | |9 |
| | |FXLS8471Q | | |FXLS8471Q |
| − | |加速度传感器<br>(acceleration sensor) | + | |加速度传感器 |
| − | |无<br>(none) | + | |无 |
| | |U8 | | |U8 |
| | |- | | |- |
| − | |12 | + | |10 |
| | |FXAS21002CQ | | |FXAS21002CQ |
| − | |3轴数字陀螺仪<br>(3D digital gyroscope) | + | |3轴数字陀螺仪 |
| − | |无<br>(none) | + | |无 |
| | |U10 | | |U10 |
| | |- | | |- |
| − | |13 | + | |11 |
| | |MAG3110 | | |MAG3110 |
| − | |3轴地磁传感器<br>(3D magnetic sensor) | + | |3轴地磁传感器 |
| − | |无<br>(none) | + | |无 |
| | |U9 | | |U9 |
| | |- | | |- |
| − | |14 | + | |12 |
| | |TS | | |TS |
| − | |电阻触摸屏接口<br>(resistance touch screen interface) | + | |电阻触摸屏接口 |
| − | |PFC插座(抽屉式,4 Pin)<br>(PFC socket(drawer-type,4 Pin)) | + | |PFC插座(抽屉式,4 Pin) |
| | |J5 | | |J5 |
| | |- | | |- |
| − | |15 | + | |13 |
| | |J6 | | |J6 |
| − | |功能插座<br>(function socket) | + | |功能插座 |
| − | |双排插座(40 Pin)<br>(dual row socket) | + | |双排插座(40 Pin) |
| − | |J3 | + | |P8 |
| | |- | | |- |
| − | |16 | + | |14 |
| | |J7 | | |J7 |
| − | |功能插座<br>(function socket) | + | |功能插座 |
| − | |双排插座(40 Pin)<br>(dual row socket) | + | |双排插座(40 Pin) |
| − | |SW1 | + | |P7 |
| | |- | | |- |
| − | |17 | + | |15 |
| | |USER LIGHT | | |USER LIGHT |
| − | |用户LED灯<br>(user LED light) | + | |用户LED灯 |
| − | |LED灯(4个)<br>(LED light(4 units)) | + | |LED灯(4个) |
| | |D* | | |D* |
| | |- | | |- |
| − | |18 | + | |16 |
| | |POWER LIGHT | | |POWER LIGHT |
| − | |电源指示灯<br>(power indication light) | + | |电源指示灯 |
| − | |LED灯(2个)<br>(LED light(2 units)) | + | |LED灯(2个) |
| | |D* | | |D* |
| | |} | | |} |
| | | | |
| − | = '''快速启动开发板(Quick start developmenD board)''' =
| |
| − | ----
| |
| − | 1)跳到“开发板与计算机的连接”那一节中“连接供电接口”操作。<br>
| |
| − | <span style="background:#CCCCCC">Skip to the section "connection between development board and computer " ,select "connect the power supply interface" to operate.</span><br>
| |
| − | 2)跳到“开发板的启动”那一节中的“为开发板上电”,从那开始继续操作。<br>
| |
| − | <span style="background:#CCCCCC">Skip to the section "start the development board" and select "supply power for development board" to continue to the next step.</span><br>
| |
| − | 说明:快速启动由于开发板与计算机没有连接,所以在计算机上看不到开发板的启动过程及状态。但是开发板系统启动后图示17的D2和D4会一直闪烁。<br>
| |
| − | <span style="background:#CCCCCC">Instruction:Because the development board has no connection with the computer ,you cannot see the booting process and state of the development board during the quick start.But after the development board system is started, the D2 and D4 shown in figure 17 will be flashin</span><br>
| |
| | | | |
| − | = '''开发板与计算机的连接(connection between developmenD board and computer)''' = | + | = '''开发板与计算机的连接''' = |
| | ---- | | ---- |
| | 由于在很多情况下我们需要连接开发板与计算机,下面内容将描述开发板与计算机的连接方式。 | | 由于在很多情况下我们需要连接开发板与计算机,下面内容将描述开发板与计算机的连接方式。 |
| − | <span style="background:#CCCCCC">We need to connect development board to the computer in many cases. So the following contents will tell the ways of the connection between the development board and computer.</span><br>
| |
| | | | |
| | | | |
| − | == '''串口的连接(Serial port link)''' == | + | == '''串口的连接''' == |
| − | === 串口模块的连接(Connection of serial port module) === | + | === 串口模块的连接 === |
| − | 1)找到开发板上的调试串口(MY-IMX6-EK140 的图示5)。<br>
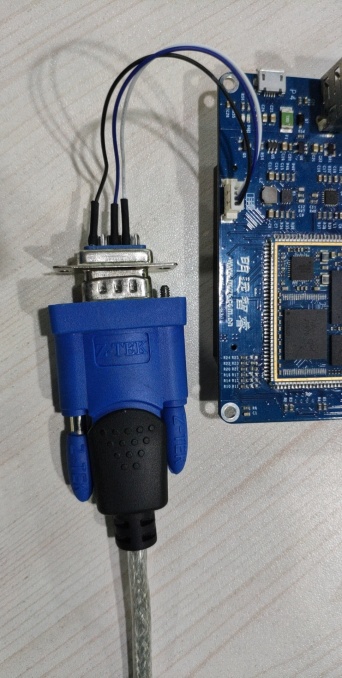
| + | 1)串口模块接上开发板的调试接口(DEBUG UART)。<br> |
| − | <span style="background:#CCCCCC">find the debug serial port of the development board(shown in Fig 5. of MY-IMX6-EK140)</span><br>
| + | 2)将自备的串口线或USB串口线把开发板的串口模块与计算机相连接。<br> |
| − | 2)将调试串口的GND与串口模块的GND用杜邦线连接。<br>
| + | [[文件:MYIMXEK140-debuguart.jpg|342px]] |
| − | <span style="background:#CCCCCC">connect the debug serial port GND to the serial port module GND with dupont line.</span><br>
| |
| − | 3)将调试串口的3V3与串口模块的VDD用杜邦线连接。<br>
| |
| − | <span style="background:#CCCCCC">connect the debug serial port 3V3 pin to the serial port module VDD pin with dupont line.</span><br>
| |
| − | 4)将调试串口的RX与串口模块的RX(R1OUT)用杜邦线连接。<br>
| |
| − | <span style="background:#CCCCCC">connect the debug serial port RX pin to the serial port module RX(R1out) pin with dupont line.</span><br>
| |
| − | 5)将调试串口的TX与串口模块的RX(T1IN)用杜邦线连接。<br>
| |
| − | <span style="background:#CCCCCC">connect the debug serial port TX pin to the serial port module RX(T1IN) pin with dupont line.</span><br>
| |
| − | 6)将自备的串口线或USB串口线把开发板的串口模块与计算机相连接。<br>
| |
| − | <span style="background:#CCCCCC">connect serial port module to the computer with self-prepared serial port line or usb serial line.</span><br>
| |
| | | | |
| | | | |
| − | === 串口终端工具配置(Tool configuration of serial port terminal) === | + | === 串口终端工具配置=== |
| | 通过Windows的设备管理器找到计算机上我们使用端口号。<br> | | 通过Windows的设备管理器找到计算机上我们使用端口号。<br> |
| − | <span style="background:#CCCCCC">Find the port number on the computer using windows device manager.</span><br>
| |
| | 配置串口终端工具的各参数。<br> | | 配置串口终端工具的各参数。<br> |
| − | <span style="background:#CCCCCC">Configure parameters of serial terminal tools.</span><br>
| |
| | SecureCRT & USB串口3 示例配置如下:<br> | | SecureCRT & USB串口3 示例配置如下:<br> |
| − | <span style="background:#CCCCCC">SecureCRT&USB serial port 3 are configured as follows:</span><br>
| + | [[文件:securecrt_quick_connect_com3.jpg]] |
| − | [[文件:securecrt_quick_connect_com3.jpg]] | + | 参考 **[[终端软件XShell参考手册]]** 新建串口会话并打开会话。 |
| | | | |
| − | == '''网线的连接(Network cable connection)''' == | + | |
| − | 1)找到开发板上的网口(MY-IMX6-EK140 的图示2)。<br>
| + | == '''网线的连接''' == |
| − | <span style="background:#CCCCCC">Find the ethernet port of the development board(Figure 2 in MY-IMX6-EK140)</span><br>
| + | 1)找到开发板上的网口(ENET)。<br> |
| | 2)将自备的网线把开发板的网口与计算机的网口相连接。<br> | | 2)将自备的网线把开发板的网口与计算机的网口相连接。<br> |
| − | <span style="background:#CCCCCC">Connect one end of self-prepared ethernet cable to the development board port and the other end to PC port .</span><br>
| |
| | | | |
| | | | |
| − | == '''USB下载线的连接(USB download cable connection)''' == | + | == '''USB下载线的连接''' == |
| − | 1)找到开发板上的USB OTG口(MY-IMX6-EK140 的图示1)。<br> | + | 1)找到开发板上的USB OTG口(5V_IN)。<br> |
| − | <span style="background:#CCCCCC">Find the Usb OTG port of the development.(Figure 1.in MY-IMX6-EK140)。</span><br>
| |
| | 2)将自备的Micro USB线把开发板的USB OTG口与计算机的USB口相连接。<br> | | 2)将自备的Micro USB线把开发板的USB OTG口与计算机的USB口相连接。<br> |
| − | <span style="background:#CCCCCC">Connect one end of your self-prepared micro-usb line to the USB OTG port of the development and the other end to your computer USB port.</span><br>
| |
| | | | |
| | | | |
| − | == '''显示模块的连接(Display module connection)''' == | + | == '''显示模块的连接''' == |
| | 说明:显示模块是可选配件(包括显示屏和触摸屏)。<br> | | 说明:显示模块是可选配件(包括显示屏和触摸屏)。<br> |
| − | <span style="background:#CCCCCC">Instruction:display module is optional(include display panel and touch panel)。</span><br>
| |
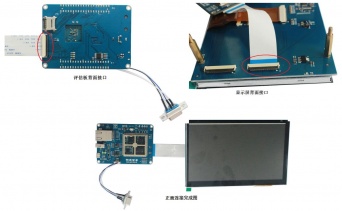
| | 显示模块的连接请找硬件工程师请求帮助。<br> | | 显示模块的连接请找硬件工程师请求帮助。<br> |
| − | <span style="background:#CCCCCC">Please ask hardware for help about display module connection.</span><br>
| + | 1)将触摸屏正确连接到显示屏上。<br> |
| − | 1)将触摸屏正确连接到开发板的图示14。<br>
| + | 2)将显示屏正确连接到开发板背面显示接口(LCD DISPLAY)(显示屏接口的接触点朝上)。<br> |
| − | <span style="background:#CCCCCC">Connect touch panel correctly to the development board ,shown in figure 14。</span><br>
| + | [[文件:myimx6_mb140_mini_Displays_connection.jpg|342px]] |
| − | 2)将显示屏正确连接到开发板的图示8(显示屏接口的接触点朝上)。<br>
| |
| − | <span style="background:#CCCCCC">Connect display panel correctly to the development board,shown in figure 8.(touch points of the display panel interface are upward)。</span><br>
| |
| − | | |
| − | | |
| − | == '''连接供电接口(connections of power supply interface)''' ==
| |
| − | MY-IMX6-EK140 有两个供电接口,一个是Micro USB的供电口,一个是2P的插座。<br>
| |
| − | <span style="background:#CCCCCC">MY-IMX6-EK140 has two power supply interfaces,one is Micro USB power supply port,the other is 2P socket.</span><br>
| |
| − | 两个供电接口根据自己的使用方便程度选择其中一种。<br>
| |
| − | <span style="background:#CCCCCC">you can choose one of them for your convenience .</span><br>
| |
| − | 建议在条件充足的情况下使用直流电源连接到2P插座为开发板供电。<br>
| |
| − | <span style="background:#CCCCCC">It is recommended to connect to 2pin socket for development board power supply using DC power.</span><br>
| |
| − | | |
| | | | |
| − | === USB供电接口的连接方式(USB port interface for power supply) === | + | == '''连接供电接口''' == |
| − | 1)找到开发板上的USB供电口(MY-IMX6-EK140 的图示3)。<br>
| + | 1)找到开发板上的USB供电口(5V_IN)。<br> |
| − | <span style="background:#CCCCCC">Find the USB port for power supply on development board(shown in Figure 3. of MY-IMX6-EK140 )。</span><br>
| |
| | 2)将自备的Micro USB线把开发板USB供电口与USB电源适配器相连接。<br> | | 2)将自备的Micro USB线把开发板USB供电口与USB电源适配器相连接。<br> |
| − | <span style="background:#CCCCCC">Connect one end of self-prepared Micro USB line to the USB port of the development board and the other end to the power adapter. </span><br>
| |
| | 说明:USB供电方式使用计算机的USB也可以为开发板供电。但是为保证USB供电功率及供电的稳定请使用USB电源适配器(手机使用的USB电源适配器即可,注意供电电压是5V,电流应超过1A)。<br> | | 说明:USB供电方式使用计算机的USB也可以为开发板供电。但是为保证USB供电功率及供电的稳定请使用USB电源适配器(手机使用的USB电源适配器即可,注意供电电压是5V,电流应超过1A)。<br> |
| − | <span style="background:#CCCCCC">Instruction:You can also use computer USB port to supply power when you choose the way that USB port interface for power supply.Please use USB power adapter to ensure the power supply and power stability.(USB power adapter for mobile phone is ok,but note that the power voltage is 5V and the current should exceed 1A)</span><br>
| |
| | | | |
| | | | |
| − | === 2P插座供电接口的连接方式(2-pin socket interface for power) ===
| + | = '''开发板的启动''' = |
| − | 1)找到开发板上的2P插座的供电口(MY-IMX6-EK140 的图示4)。<br>
| |
| − | <span style="background:#CCCCCC">Find the 2-pin socket port for power supply on development board.(shown in Figure 4 of MY-IMX6-EK140 )。</span><br>
| |
| − | 2)准备好自备的直流电源并关闭直流电源的输出。<br>
| |
| − | <span style="background:#CCCCCC">Prepare your self-prepared DC power and turn off the output of the power.</span><br>
| |
| − | 3)预设直流电源的电压输出为5V,最大输出电流为3A。<br>
| |
| − | <span style="background:#CCCCCC">The voltage output of the DC power is set to 5V and the maximum current output is 3A.</span><br>
| |
| − | 4)将自备的直流电源的“+”极连接到开发板的供电口的“+”。<br>
| |
| − | <span style="background:#CCCCCC">Connect "+" of the self-prepared DC power to power supply port "+" of the development
| |
| − | board.</span><br>
| |
| − | 5)将自备的直流电源的“-”极连接到开发板的供电口的“-”。<br>
| |
| − | <span style="background:#CCCCCC">Connect "-" of the self-prepared DC power to power supply port "-" of the development
| |
| − | board.</span><br>
| |
| − | | |
| − | | |
| − | = '''开发板的启动(Development board booting)''' = | |
| | ---- | | ---- |
| | 在“开发板与计算机的连接”中按照顺序进行操作后,我们的开发板与计算机的连接已经完成了。要使开发板启动,我们需要为开发板上电。<br> | | 在“开发板与计算机的连接”中按照顺序进行操作后,我们的开发板与计算机的连接已经完成了。要使开发板启动,我们需要为开发板上电。<br> |
| − | <span style="background:#CCCCCC">We have completed the connection between development board and computer after We do it in the right order referring to "connection between development board and computer". We have to supply power if we want to boot the development board. </span><br>
| |
| | | | |
| | | | |
| − | == '''检查开发板的启动配置(check booting configuration of the development board)''' == | + | == '''检查开发板的启动配置''' == |
| − | === 启动模式检查(Check boot mode) === | + | === 启动模式检查 === |
| − | 1)找到开发板上的图示9位置。<br>
| + | 1)找到开发板上2位拨码开关(BOOT MODE)。<br> |
| − | <span style="background:#CCCCCC">Find the position shown in figure 9 of the development board.</span><br>
| |
| | 2)检查并确保1是拨到ON,2是拨动OFF的状态。<br> | | 2)检查并确保1是拨到ON,2是拨动OFF的状态。<br> |
| − | <span style="background:#CCCCCC">Check and make sure 1 is switched to the state ON and 2 is switched to OFF.</span><br>
| |
| | | | |
| | | | |
| − | === 启动设备检查(Check the boot device) ===
| |
| − | 1)找到开发板上的图示6位置。<br>
| |
| − | <span style="background:#CCCCCC">Find the position shown in figure 6 of the development board.</span><br>
| |
| − | 2)检查并确保1,2,3是拨到ON的状态,4是拨到OFF的状态。<br>
| |
| − | <span style="background:#CCCCCC">Check and make sure that 1,2,3 are switched to the state ON and 4 is switched to OFF.</span><br>
| |
| − | 注意:PCB版本MY-IMX6UL-MB140_Rev.C图示6器件的丝印有误,所以需要把1,2,3拨到ON的状态,4拨到OFF。<br>
| |
| − | <span style="background:#CCCCCC">Instruction:There's a silkscreen mistake of the component shown in figure 6 in PCB MY-IMX6UL-MB140_Rev.C. So 1,2,3 should be switched to ON and 4 to OFF.</span><br>
| |
| | | | |
| − | | + | == '''为开发板上电''' == |
| − | == '''为开发板上电(Supply power for development board)''' == | + | === USB供电方式的上电 === |
| − | === USB供电方式的上电(Supply power with USB port) === | |
| | 将USB电源适配器正确连接使能输入电源到开发板。<br> | | 将USB电源适配器正确连接使能输入电源到开发板。<br> |
| − | <span style="background:#CCCCCC">Connect USB adapter correctly to the power input port of development board.</span><br>
| |
| | | | |
| | | | |
| − | === 2P供电接口方式的上电(Supply power with 2-pin socket interface) === | + | == '''观察启动状况''' == |
| − | 再次检查直流电源的输出是否为5V ~ 3A。确认直流电源的输出配置后开启直流电源。<br>
| + | === 串口终端动态=== |
| − | <span style="background:#CCCCCC">Check and make sure that the output of DC power is 5V~3A once again.After checking the output configuration of DC power, then turn on.
| + | 在计算机的串口终端软件上可以看到开发板启动过程中输出的启动过程信息。<br> |
| − | </span><br>
| |
| | | | |
| | | | |
| − | == '''观察启动状况(watch the start-up status)''' == | + | === 开发板动态 === |
| − | === 串口终端动态(serial port terminal dynamics) === | + | 启动到一定阶段后,开发板上的D2和D3会一直闪烁,D4常亮。<br> |
| − | 在计算机的串口终端软件上可以看到开发板启动过程中输出的启动过程信息。<br>
| |
| − | <span style="background:#CCCCCC">you can watch the output booting process information of the development board through serial terminal software of the computer.</span><br>
| |
| | | | |
| | | | |
| − | === 开发板动态(Development board dynamics) === | + | === 显示屏状态=== |
| − | 启动到一定阶段后,开发板上图示17的D2和D4会一直闪烁。<br>
| + | 如果有选配液晶显示屏并正确连接,会看到在开发板的启动过程中显示屏有输出图像。<br> |
| − | <span style="background:#CCCCCC">After starting to a certain stage , D2 and D4 shown in figure 17 will be always flashing.</span><br>
| |
| | | | |
| | + | </div> |
| | + | # **开发板登录** |
| | | | |
| − | === 显示屏状态(Display panel state) ===
| + | -------------------------------------------------------------------------------- |
| − | 如果有选配液晶显示屏并正确连接,会看到在开发板的启动过程中显示屏有输出图像。<br>
| + | 启动系统完后,可以登录: |
| − | <span style="background:#CCCCCC">If you choose LCD display and connect correctly,you will watch the output image on the screen during the booting process of the development board.</span><br>
| + | 【用户名】:root |
| | + | 【密码】:无 |
| | + | 注:登录后可以通过“passwd”命令来设置和修改密码。 |
| | + | <br/> |
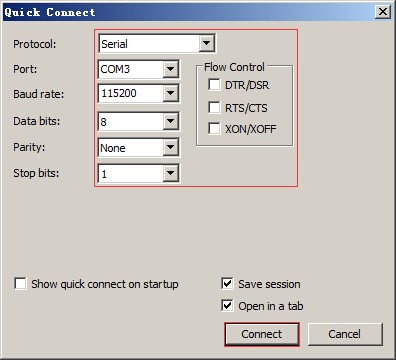 参考 **终端软件XShell参考手册** 新建串口会话并打开会话。
