“MYZR-IMX8M-EK300 Startup Manual”的版本间的差异
| 第5行: | 第5行: | ||
<br/> | <br/> | ||
| − | ### | + | ### MYZR-IMX8M-EK300 packing list |
-------------------------------------------------------------------------------- | -------------------------------------------------------------------------------- | ||
#### Standard Parts | #### Standard Parts | ||
| − | 【Backplane】: | + | 【Backplane】: MYZR-IMX8M-MB300, 1 piece <br> |
| − | 【Core board】: | + | 【Core board】: MYZR-IMX8M-CB300, 1 piece <br> |
【Power adapter】: 12V, 1 <br> | 【Power adapter】: 12V, 1 <br> | ||
【Network cable】: 1 <br> | 【Network cable】: 1 <br> | ||
| 第19行: | 第19行: | ||
<br/> | <br/> | ||
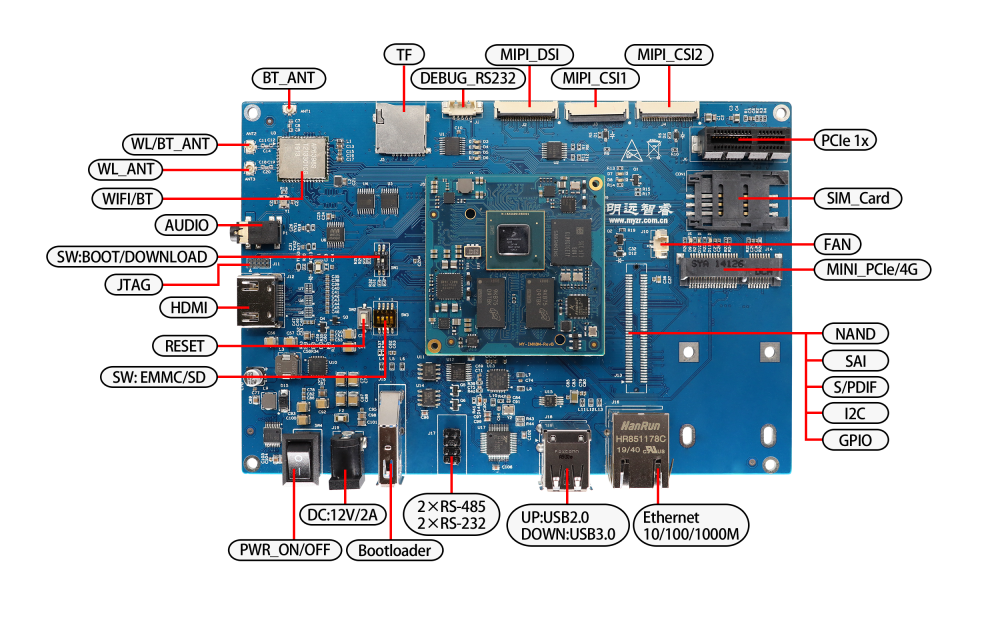
| − | ### | + | ### MYZR-IMX8M-MB300 Main interface |
-------------------------------------------------------------------------------- | -------------------------------------------------------------------------------- | ||
2020年10月22日 (四) 16:10的版本
目录
MYZR-IMX8M-EK300 packing list
Standard Parts
【Backplane】: MYZR-IMX8M-MB300, 1 piece
【Core board】: MYZR-IMX8M-CB300, 1 piece
【Power adapter】: 12V, 1
【Network cable】: 1
【Serial cable】: 1
User-supplied parts
【Dual USB cable】:1,Use when downloading
【USB to serial cable】:1,Use when debugging (if the computer does not have a DB9 serial port, you need to prepare it yourself)
MYZR-IMX8M-MB300 Main interface
Development board connection
Check the power switch
Press the "o" of the power switch "SWITCH" of the development board to ensure that the power switch of the development board is off。
Connection of serial cable
Connect one end of the serial cable to the "DEBUG" port of the development board, and connect the other end to the computer's serial port or USB port.
Reference ** Terminal Software XShell Reference Manual ** Create a new serial port session and open the session.
Network cable connection
Connect one end of the network cable to "ETH1" and the other end to the network port of the computer。
USB download cable connection
Connect one end of the double-ended USB cable to J15 and the other end to the rear USB port of the computer。
Connecting the power cord
Connect one end of the power adapter to the "12V_IN" of the development board, and plug the other end into the mains (220V AC) socket.
HDMI display connection
Connect one end of the HDMI display cable to the development board and the other end to the HDMI display, and power on the HDMI display.
Note: It is recommended that the resolution of the HDMI display be 1080P and the display using the HDMI interface, instead of being converted to the HDMI interface.
Start development board
Check the development mode of the development board
Set the "BOOT MODE" DIP switch of the development board to the normal startup mode。
【Startup mode】:1(ON),2(OFF)
【Download mode】:1(OFF),2(ON)
Note: ON of the DIP switch is on the letter side and OFF is on the number side。
Power up the development board
Press the "-" of the power switch "SWITCH" of the development board to turn on the power switch of the development board. At this time, you can see that the development board LED lights are partially on.
Interpretation of the startup information of the development board
After the development board is powered on, you can see the startup information output by the development board on the serial terminal software.。
U-Boot 2019.04-04784-g7666e4b (Dec 23 2019 - 10:15:13 +0800)

CPU:   Freescale i.MX8MQ rev2.1 1500 MHz (running at 1000 MHz)
CPU:   Commercial temperature grade (0C to 95C) at 26C
Reset cause: POR
Model: MYZR i.MX8M Evaluation Kit (300 pins)
DRAM:  2 GiB
MMC:   FSL_SDHC: 0, FSL_SDHC: 1
Loading Environment from MMC... *** Warning - bad CRC, using default environment


......

Starting kernel ...

Booting Linux on physical CPU 0x0
Linux version 4.14.98 (myzr@u14045) (gcc version 7.3.1 20180425 [linaro-7.3-2018.05 revision d29120a424ecfbc167ef90065c0eeb7f91977701] (Linaro GCC 7.3-2018.05)) #2 SMP PREEMPT Tue Jan 14 14:30:15 CST 2020
Boot CPU: AArch64 Processor [410fd034]
Machine model: MYZR i.MX8M Evaluation Kit (300 pins)

......

[  OK  ] Reached target Multi-User System.
         Starting Update UTMP about System Runlevel Changes...
[  OK  ] Started Session c1 of user root.
[  OK  ] Started User Manager for UID 0.
[  OK  ] Started Update UTMP about System Runlevel Changes.

NXP i.MX Release Distro 4.14-sumo imx8mqek300 ttymxc0
U-Boot information
In the startup message“U-Boot 2019.04-04784-g7666e4b (Dec 23 2019 - 10:15:13 +0800)”Contains the following information:
【u-boot version】:2019.04;
【Source version number】:g7666e4b;
【u-boot File compile time】:Dec 23 2019 - 10:15:13 +0800。
Kernel information
In the startup message“Linux version 4.14.98 (myzr@u14045) (gcc version 7.3.1 20180425 [linaro-7.3-2018.05 revision d29120a424ecfbc167ef90065c0eeb7f91977701] (Linaro GCC 7.3-2018.05)) #2 SMP PREEMPT Tue Jan 14 14:30:15 CST 2020”Contains the following information:
【Kernel version】:Linux-4.14.98;
【Build the GCC version of the kernel】:7.3.1;
【Kernel file compile time】:Tue Jan 14 14:30:15 CST 2020。
Development Board Login
When outputting "imx8mqek300 login ::" after starting the system, you can log in:
【username】:root
【password】:无
Note: After logging in, you can set and change the password through the "passwd" command。
--------------------------------------------------------------------------------
* 珠海明远智睿科技有限公司
* ZhuHai MYZR Technology CO.,LTD.
* Latest Update: 2020/2/20
* Supporter: Tang Bin
--------------------------------------------------------------------------------
