“MY-IMX6 MfgTool User Guide”的版本间的差异
(创建页面,内容为“ [^_^]: MY-IMX6 MfgTool-v2.6 User Guide <br/> ### Identify the system you need -----------------------------------------------------------------------------...”) |
|||
| (未显示同一用户的2个中间版本) | |||
| 第4行: | 第4行: | ||
<br/> | <br/> | ||
| − | + | ### Prepare burning tools | |
| − | ### | ||
-------------------------------------------------------------------------------- | -------------------------------------------------------------------------------- | ||
| − | + | ##### Download burning tools | |
| − | ##### | + | Download the corresponding burning tool under the “\*\_system\_\*/04_burning tool” directory on the network disk according to your own evaluation board model and the required target system. |
| − | + | Description: | |
| + | :MY-IMX6-EK140、MY-IMX6-EK140P ownload the burn tool directory beginning with MfgTool-MYIMX6A7. | ||
| + | :MY-IMX6-EK200、MY-IMX6-EK314、MY-IMX6-EK3336 download the burn tool directory beginning with MfgTool-MYIMX6A9. | ||
| + | Schedule: System supported by the evaluation board | ||
{| class="wikitable" style="width: 512px" | {| class="wikitable" style="width: 512px" | ||
!rowspan=2 style="background:blue;color:white"|Evaluation board | !rowspan=2 style="background:blue;color:white"|Evaluation board | ||
| 第45行: | 第47行: | ||
|} | |} | ||
| − | ##### | + | ##### Configuration burning tool |
| − | + | 1. Run the burning tool configuration program "MfgConfig.exe". | |
| − | + | 2. Evaluation Kit: Choose according to the main model of your development board. | |
| − | + | 3. CPU Type: Choose according to your own development board specifications | |
| − | + | 4. Memory Size: Choose according to your own board specifications (if you are not sure, try Default first). | |
| − | + | 5. OS Select: Choose according to the directory system you need. | |
| − | + | 6. Rootfs File: Choose according to the file system you need (see the instructions below). | |
| − | + | 7. Click "Make", the configuration tool will generate the configuration file "cfg.ini" used by the burning tool. | |
| − | + | 8. Run the main program "MfgTool2.exe" of the burning tool (if you get an error, try to operate on another computer). | |
| − | |||
| − | |||
| − | |||
| − | |||
| − | |||
| − | |||
| − | |||
| − | |||
| − | |||
| − | |||
| − | |||
| − | |||
| − | |||
| − | |||
| − | |||
| − | |||
| − | |||
| − | |||
| − | |||
| − | |||
| − | |||
| − | |||
| − | |||
| − | |||
| − | |||
| − | |||
| − | |||
| − | |||
| − | |||
| − | |||
| − | |||
| − | |||
| − | |||
| − | |||
| − | |||
| − | |||
| − | |||
| − | |||
| − | |||
| − | |||
| − | |||
| − | |||
| − | |||
| − | |||
| − | |||
| − | |||
| − | |||
| − | |||
| − | |||
| − | |||
| − | |||
| − | |||
| − | |||
| − | |||
| − | |||
| − | |||
| − | |||
| − | |||
| − | |||
| − | + | Description: | |
| − | + | Rootfs File Rootfs File option with a "minimal" is a very small number of Linux File systems (many applications of Linux systems might not). | |
| − | + | Rootfs File option with "Linux" is a regular Linux File system (containing many more applications of Linux than minimal). | |
| − | + | Rootfs File option with "qt" is a Linux File system with qt (containing regular Linux systems and qt). | |
| − | + | The QT version of Linux-3.0.35 is 4.8.5 | |
| − | + | The QT version of Linux-3.14.52 is 5.5.0 | |
| − | + | The QT version of Linux-4.1.15 is 5.6.1 | |
| − | |||
| − | |||
| − | |||
| − | |||
| − | |||
| − | |||
| − | |||
| − | 4. | ||
| − | 5 | ||
| − | |||
| − | |||
| − | |||
| − | |||
<br> | <br> | ||
| 第141行: | 第71行: | ||
-------------------------------------------------------------------------------- | -------------------------------------------------------------------------------- | ||
##### Keep the development board in download mode | ##### Keep the development board in download mode | ||
| − | + | Find the two-bit dial SWITCH indicated by "BOOTMODE" or "BOOT SWITCH" ON the development board, 1 ON and 2 OFF. | |
##### Connect the development board to the computer | ##### Connect the development board to the computer | ||
| − | 1. Connect the MiniUSB cable to the development board and computer. | + | 1. Connect the MiniUSB cable to the development board and computer.(To ensure the stability of the programming, please use the rear USB port of the computer. If you are using a USB HUB, please connect the USB HUB to the power supply). |
2. Connect the development board to the computer with the serial line and open the serial port software on the computer. | 2. Connect the development board to the computer with the serial line and open the serial port software on the computer. | ||
3. Connect the power cord to the development board and power it on. | 3. Connect the power cord to the development board and power it on. | ||
##### Burning system to development board | ##### Burning system to development board | ||
1. Close the main program "MfgTool2.exe" of the burning tool and run it again. | 1. Close the main program "MfgTool2.exe" of the burning tool and run it again. | ||
| − | [[File | + | [[File:MY_IMX6_MfgTool_3.3.0.1.jpg]] |
| − | + | *If the main program starts incorrectly, close the "MfgTool" in the process list of the Windows task manager, and then run the main program. | |
| − | + | *If the main program displays "No Device Connected", check the connection status of the MiniUSB cable and confirm whether the dial code of the development board is in download mode. | |
2. Click the "Start" button on the main interface of the burn tool to Start the burn. | 2. Click the "Start" button on the main interface of the burn tool to Start the burn. | ||
| − | [[File | + | [[File:MY_IMX6_MfgTool_3.5.0.1.jpg]] |
| − | 3. In the process of burning, PC opportunity assessment board recognition as a storage device, then whether you need the pop-up dialog prompt formatting, here "cancel" or ignore the dialog or close the dialog box. | + | 3. In the process of burning, PC opportunity assessment board recognition as a storage device, then whether you need the pop-up dialog prompt formatting, here "cancel" or ignore the dialog or close the dialog box. |
| − | [[File | + | [[File:MY_IMX6_MfgTool_3.5.0.2.jpg]] |
| − | 4. When the burn is complete, the message bar prints "Done" and the status bar turns green.Click "Stop" to complete the burn.Click "Exit" to Exit MFG Tools. | + | 4. When the burn is complete, the message bar prints "Done" and the status bar turns green.Click "Stop" to complete the burn.Click "Exit" to Exit MFG Tools. |
| − | [[File | + | [[File:MY_IMX6_MfgTool_3.5.0.3.jpg]] |
| − | #####Burning error handling | + | ##### Burning error handling |
| − | 1. Observe and retain the information on the main program of the burning tool. This information will indicate the specific stage of the burning error. | + | 1. Observe and retain the information on the main program of the burning tool. This information will indicate the specific stage of the burning error. |
| − | 2. Observe and retain the last part of the computer serial terminal software, this information will indicate the specific cause of the burning error. | + | 2. Observe and retain the last part of the computer serial terminal software, this information will indicate the specific cause of the burning error. |
| − | * If you don't understand it, you can send these two pieces of information to our email (service@myzr.com.cn) or forum (bbs.myzr.com.cn) for support. | + | *If you don't understand it, you can send these two pieces of information to our email (service@myzr.com.cn) or forum (bbs.myzr.com.cn) for support. |
| − | ##### Start the development board | + | ##### Start the development board |
| − | * Power off the development board | + | *Power off the development board |
| − | + | After the burning is completed, turn off the power of the development board, and prepare to change the boot mode of the development board. | |
| − | * Change Boot mode to boot mode | + | *Change Boot mode to boot mode |
| − | + | Find the two-digit DIP switch indicated by “BOOTMODE” or “BOOT SWITCH” on the development board, turn 1 to OFF and 2 to ON. | |
| − | * For development of board power | + | *For development of board power |
| − | + | Power on the development board, and the serial terminal software will see the information about the system startup. | |
| − | |||
<br> | <br> | ||
| 第175行: | 第104行: | ||
-------------------------------------------------------------------------------- | -------------------------------------------------------------------------------- | ||
##### Configure burn tool to burn multiple equipment at the same time | ##### Configure burn tool to burn multiple equipment at the same time | ||
| − | + | Our current burn tool can burn seven devices at the same time by: | |
| − | + | Open UICfg.ini in the burning tool and change "PortMgrDlg=1" to "PortMgrDlg=7". Then the computer connects seven devices through the USB HUB, then turn on the burning tool, and then burn according to the process. | |
##### Burn your own compiled Image | ##### Burn your own compiled Image | ||
| − | + | According to the following "system version and corresponding file relationship table", replace the file compiled by yourself with the corresponding file in the burning tool, and re-burn the system for the development board. | |
| − | + | For example, if the u-boot of the Linux-3.14.52 MY-IMX6-EK200-6Q-1G development board is compiled, then open the burn tool to the “image-linux-31452” directory and replace the compiled u-boot file with uboot-myimx6ek200-6q.imx. | |
##### Burn your own application | ##### Burn your own application | ||
| − | + | Package your application as "my-demo. Tar.bz2" and replace the "my-demo. Tar.bz2" in the burn tool and re-burn the system for the development board based on the later "system version and corresponding file relational table". | |
| − | + | Note: "my-demo.tar.bz2" will be burned to the "/" directory of the development board. | |
##### Burn your own file system updates | ##### Burn your own file system updates | ||
| − | + | According to the following "system version and corresponding file relationship table", package a self-updating package, replace the corresponding file in the burning tool, and re-burn the system for the development board. | |
| − | + | Note: the file system update package will be burned to the root of the development board. | |
##### Other instructions | ##### Other instructions | ||
1. All the above points can be replaced before burning. | 1. All the above points can be replaced before burning. | ||
2. In the process of production, if no changes are made to the configuration of the burn tool, there is no need to exit and run the burn tool repeatedly, or even click the STOP button of the main program of the burn tool.When a device is burned out, the power of the device can be cut off. After connecting to the new device, the recording tool will burn the device. | 2. In the process of production, if no changes are made to the configuration of the burn tool, there is no need to exit and run the burn tool repeatedly, or even click the STOP button of the main program of the burn tool.When a device is burned out, the power of the device can be cut off. After connecting to the new device, the recording tool will burn the device. | ||
| − | |||
<br> | <br> | ||
| 第208行: | 第136行: | ||
!rowspan=5 style="background:blue;color:white"|Linux-3.0.35 | !rowspan=5 style="background:blue;color:white"|Linux-3.0.35 | ||
|U-Boot file | |U-Boot file | ||
| − | |rowspan=5|image- | + | |rowspan=5|Profiles/Linux/OS Firmware |
| − | + | |image-L3.0.35-uboot/uboot-<ek name>-<ek spec>.bin | |
|- | |- | ||
| − | |core files||uImage- | + | |core files||image-L3.0.35-kernel/uImage-myimx6a9 |
|- | |- | ||
| − | |Kernel module package||kernel-modules.tar.bz2 | + | |Kernel module package||image-L3.0.35-kernel/kernel-modules-myimx6a9.tar.bz2 |
|- | |- | ||
| − | |File system update package||rootfs-update.tar.bz2 | + | |File system update package||image-L3.0.35-update/L3035-rootfs-update.tar.bz2 |
|- | |- | ||
| − | |MYZR Demo||my-demo.tar.bz2 | + | |MYZR Demo||image-L3.0.35-update/my-demo.tar.bz2 |
|- | |- | ||
| || || || | | || || || | ||
| 第223行: | 第151行: | ||
!rowspan=6 style="background:blue;color:white"|Linux-3.14.52 | !rowspan=6 style="background:blue;color:white"|Linux-3.14.52 | ||
|U-Boot file | |U-Boot file | ||
| − | |rowspan=6|image- | + | |rowspan=6|Profiles/Linux/OS Firmware |
| − | + | |image-L3.14.52-uboot/uboot-<ek name>-<ek spec>.imx | |
|- | |- | ||
| − | |core files||zImage-myimx6 | + | |core files||image-L3.14.52-kernel/zImage-myimx6\[a9 \| a7 \] |
|- | |- | ||
| − | |Kernel module package||kernel-modules-myimx6.tar.bz2 | + | |Kernel module package||image-L3.14.52-kernel/kernel-modules-myimx6\[a9 \| a7\].tar.bz2 |
|- | |- | ||
| − | |Device tree file||<ek name>-<ek spec>.dtb | + | |Device tree file||image-L3.14.52-dtb/<ek name>-<ek spec>.dtb |
|- | |- | ||
| − | |File system update package|| | + | |File system update package||image-L3.14.52-update/L31452-rootfs-update.tar.bz2 |
|- | |- | ||
| − | |MYZR Demo||my-demo.tar.bz2 | + | |MYZR Demo||image-L3.14.52-update/my-demo.tar.bz2 |
|- | |- | ||
| || || || | | || || || | ||
|- | |- | ||
!rowspan=6 style="background:blue;color:white"|Linux-4.1.15 | !rowspan=6 style="background:blue;color:white"|Linux-4.1.15 | ||
| − | |U-Boot file | + | |U-Boot file |
| − | |rowspan=6| | + | |rowspan=6|Profiles/Linux/OS Firmware |
| − | |image-uboot / uboot-<ek name>-<ek spec>.imx | + | |image-L4.1.15-uboot/uboot-<ek name>-<ek spec>.imx |
|- | |- | ||
| − | |core files||image-kernel / zImage-myimx6\[a7 \| a9\] | + | |core files||image-L4.1.15-kernel/zImage-myimx6\[a7 \| a9\] |
|- | |- | ||
| − | |Kernel module package||image-kernel / kernel-modules-myimx6\[a7 \| a9\].tar.bz2 | + | |Kernel module package||image-L4.1.15-kernel/kernel-modules-myimx6\[a7 \| a9\].tar.bz2 |
|- | |- | ||
| − | |Device tree file||image-dtb / <ek name>-<ek spec>.dtb | + | |Device tree file||image-L4.1.15-dtb/<ek name>-<ek spec>.dtb |
|- | |- | ||
| − | |File system update package||image-update / | + | |File system update package||image-L4.1.15-update/L4115-rootfs-update.tar.bz2 |
|- | |- | ||
| − | |MYZR Demo||image-update / my-demo.tar.bz2 | + | |MYZR Demo||image-L4.1.15-update/my-demo.tar.bz2 |
|- | |- | ||
| || || || | | || || || | ||
| 第257行: | 第185行: | ||
!rowspan=4 style="background:blue;color:white"|Android-4.2.2 | !rowspan=4 style="background:blue;color:white"|Android-4.2.2 | ||
|U-Boot file | |U-Boot file | ||
| − | |rowspan=4|image-android-422 | + | |rowspan=4|Profiles/Linux/OS Firmware |
| − | + | |image-android-422/uboot-ard422-<ek name>-<ek spec>.bin | |
|- | |- | ||
| − | |Boot Image||boot-ard422-<ek name>.img | + | |Boot Image||image-android-422/boot-ard422-<ek name>.img |
|- | |- | ||
| − | |Recovery Image||recovery-ard422-<ek name>.img | + | |Recovery Image||image-android-422/recovery-ard422-<ek name>.img |
|- | |- | ||
| − | |System Image||system-ard422-<ek name>.img | + | |System Image||image-android-422/system-ard422-<ek name>.img |
|- | |- | ||
| || || || | | || || || | ||
| 第270行: | 第198行: | ||
!rowspan=4 style="background:blue;color:white"|Android-4.4.2 | !rowspan=4 style="background:blue;color:white"|Android-4.4.2 | ||
|U-Boot file | |U-Boot file | ||
| − | |rowspan=4|image-android-442 | + | |rowspan=4|Profiles/Linux/OS Firmware |
| − | + | |image-android-442/uboot-ard442-<ek name>-<ek spec>.bin | |
|- | |- | ||
| − | |Boot Image||boot-ard442-<ek name>.img | + | |Boot Image||image-android-442/boot-ard442-<ek name>.img |
|- | |- | ||
| − | |Recovery Image||recovery-ard442-<ek name>.img | + | |Recovery Image||image-android-442/recovery-ard442-<ek name>.img |
|- | |- | ||
| − | |System Image||system-ard442-<ek name>.img | + | |System Image||image-android-442/system-ard442-<ek name>.img |
|- | |- | ||
| || || || | | || || || | ||
| 第283行: | 第211行: | ||
!rowspan=4 style="background:blue;color:white"|Android-5.1.1 | !rowspan=4 style="background:blue;color:white"|Android-5.1.1 | ||
|U-Boot file | |U-Boot file | ||
| − | |rowspan=4|image-android-511 | + | |rowspan=4|Profiles/Linux/OS Firmware |
| − | + | |image-android-511/uboot-ard511-<ek name>-<ek spec>.bin | |
|- | |- | ||
| − | |Boot Image||boot-ard511-<ek name>.img | + | |Boot Image||image-android-511/boot-ard511-<ek name>.img |
|- | |- | ||
| − | |Recovery Image||recovery-ard511-<ek name>.img | + | |Recovery Image||image-android-511/recovery-ard511-<ek name>.img |
|- | |- | ||
| − | |System Image||system-ard511.img | + | |System Image||image-android-511/system-ard511.img |
|} | |} | ||
<br> | <br> | ||
| 第299行: | 第227行: | ||
* Looking forward to communicating with you for more functions and field applications. | * Looking forward to communicating with you for more functions and field applications. | ||
* ZhuHai MYZR Technology CO.,LTD. | * ZhuHai MYZR Technology CO.,LTD. | ||
| − | * Latest Update: 2018/ | + | * Latest Update: 2018/08/15 |
| − | * Supporter: Tang Bin | + | * Supporter: Tang Bin |
-------------------------------------------------------------------------------- | -------------------------------------------------------------------------------- | ||
</pre> | </pre> | ||
2018年8月23日 (四) 15:42的最新版本
目录
Prepare burning tools
Download burning tools
Download the corresponding burning tool under the “*_system_*/04_burning tool” directory on the network disk according to your own evaluation board model and the required target system.
Description:
- MY-IMX6-EK140、MY-IMX6-EK140P ownload the burn tool directory beginning with MfgTool-MYIMX6A7.
- MY-IMX6-EK200、MY-IMX6-EK314、MY-IMX6-EK3336 download the burn tool directory beginning with MfgTool-MYIMX6A9.
Schedule: System supported by the evaluation board
| Evaluation board | Supported Linux versions | ||||
|---|---|---|---|---|---|
| Linux-3.0.35 | Linux-3.14.52 | Linux-4.1.15 | |||
| MY-IMX6-EK140 | √ | ||||
| MY-IMX6-EK140P | √ | ||||
| MY-IMX6-EK200 | √ | √ | √ | ||
| MY-IMX6-EK314 | √ | √ | √ | ||
| MY-IMX6-EK336 | √ | √ | |||
| Evaluation board | Supported Android versions | ||||
|---|---|---|---|---|---|
| Android-4.2.2 | Android-4.4.2 | Android-5.1.1 | |||
| MY-IMX6-EK140 | |||||
| MY-IMX6-EK140P | |||||
| MY-IMX6-EK200 | √ | √ | √ | ||
| MY-IMX6-EK314 | √ | √ | |||
| MY-IMX6-EK336 | √ | ||||
Configuration burning tool
- Run the burning tool configuration program "MfgConfig.exe".
- Evaluation Kit: Choose according to the main model of your development board.
- CPU Type: Choose according to your own development board specifications
- Memory Size: Choose according to your own board specifications (if you are not sure, try Default first).
- OS Select: Choose according to the directory system you need.
- Rootfs File: Choose according to the file system you need (see the instructions below).
- Click "Make", the configuration tool will generate the configuration file "cfg.ini" used by the burning tool.
- Run the main program "MfgTool2.exe" of the burning tool (if you get an error, try to operate on another computer).
Description:
Rootfs File Rootfs File option with a "minimal" is a very small number of Linux File systems (many applications of Linux systems might not).
Rootfs File option with "Linux" is a regular Linux File system (containing many more applications of Linux than minimal).
Rootfs File option with "qt" is a Linux File system with qt (containing regular Linux systems and qt).
The QT version of Linux-3.0.35 is 4.8.5
The QT version of Linux-3.14.52 is 5.5.0
The QT version of Linux-4.1.15 is 5.6.1
For the development of board burning system
Keep the development board in download mode
Find the two-bit dial SWITCH indicated by "BOOTMODE" or "BOOT SWITCH" ON the development board, 1 ON and 2 OFF.
Connect the development board to the computer
- Connect the MiniUSB cable to the development board and computer.(To ensure the stability of the programming, please use the rear USB port of the computer. If you are using a USB HUB, please connect the USB HUB to the power supply).
- Connect the development board to the computer with the serial line and open the serial port software on the computer.
- Connect the power cord to the development board and power it on.
Burning system to development board
- Close the main program "MfgTool2.exe" of the burning tool and run it again.
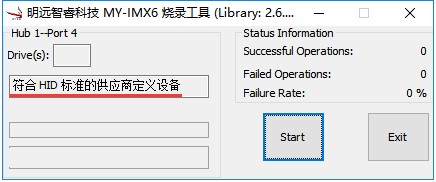
- If the main program starts incorrectly, close the "MfgTool" in the process list of the Windows task manager, and then run the main program.
- If the main program displays "No Device Connected", check the connection status of the MiniUSB cable and confirm whether the dial code of the development board is in download mode.
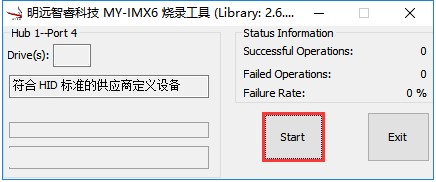
- Click the "Start" button on the main interface of the burn tool to Start the burn.
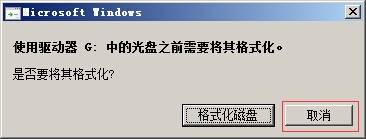
- In the process of burning, PC opportunity assessment board recognition as a storage device, then whether you need the pop-up dialog prompt formatting, here "cancel" or ignore the dialog or close the dialog box.
- When the burn is complete, the message bar prints "Done" and the status bar turns green.Click "Stop" to complete the burn.Click "Exit" to Exit MFG Tools.


Burning error handling
- Observe and retain the information on the main program of the burning tool. This information will indicate the specific stage of the burning error.
- Observe and retain the last part of the computer serial terminal software, this information will indicate the specific cause of the burning error.
- If you don't understand it, you can send these two pieces of information to our email (service@myzr.com.cn) or forum (bbs.myzr.com.cn) for support.
Start the development board
- Power off the development board
After the burning is completed, turn off the power of the development board, and prepare to change the boot mode of the development board.
- Change Boot mode to boot mode
Find the two-digit DIP switch indicated by “BOOTMODE” or “BOOT SWITCH” on the development board, turn 1 to OFF and 2 to ON.
- For development of board power
Power on the development board, and the serial terminal software will see the information about the system startup.
Production use of burning tools
Configure burn tool to burn multiple equipment at the same time
Our current burn tool can burn seven devices at the same time by: Open UICfg.ini in the burning tool and change "PortMgrDlg=1" to "PortMgrDlg=7". Then the computer connects seven devices through the USB HUB, then turn on the burning tool, and then burn according to the process.
Burn your own compiled Image
According to the following "system version and corresponding file relationship table", replace the file compiled by yourself with the corresponding file in the burning tool, and re-burn the system for the development board.
For example, if the u-boot of the Linux-3.14.52 MY-IMX6-EK200-6Q-1G development board is compiled, then open the burn tool to the “image-linux-31452” directory and replace the compiled u-boot file with uboot-myimx6ek200-6q.imx.
Burn your own application
Package your application as "my-demo. Tar.bz2" and replace the "my-demo. Tar.bz2" in the burn tool and re-burn the system for the development board based on the later "system version and corresponding file relational table".
Note: "my-demo.tar.bz2" will be burned to the "/" directory of the development board.
Burn your own file system updates
According to the following "system version and corresponding file relationship table", package a self-updating package, replace the corresponding file in the burning tool, and re-burn the system for the development board.
Note: the file system update package will be burned to the root of the development board.
Other instructions
- All the above points can be replaced before burning.
- In the process of production, if no changes are made to the configuration of the burn tool, there is no need to exit and run the burn tool repeatedly, or even click the STOP button of the main program of the burn tool.When a device is burned out, the power of the device can be cut off. After connecting to the new device, the recording tool will burn the device.
Attached Table
Table 1: system version and corresponding file relational table
| system version | file type | Location | corresponding file |
|---|---|---|---|
| Linux-3.0.35 | U-Boot file | Profiles/Linux/OS Firmware | image-L3.0.35-uboot/uboot-<ek name>-<ek spec>.bin |
| core files | image-L3.0.35-kernel/uImage-myimx6a9 | ||
| Kernel module package | image-L3.0.35-kernel/kernel-modules-myimx6a9.tar.bz2 | ||
| File system update package | image-L3.0.35-update/L3035-rootfs-update.tar.bz2 | ||
| MYZR Demo | image-L3.0.35-update/my-demo.tar.bz2 | ||
| Linux-3.14.52 | U-Boot file | Profiles/Linux/OS Firmware | image-L3.14.52-uboot/uboot-<ek name>-<ek spec>.imx |
| core files | image-L3.14.52-kernel/zImage-myimx6[a9 | a7 ] | ||
| Kernel module package | image-L3.14.52-kernel/kernel-modules-myimx6[a9 | a7].tar.bz2 | ||
| Device tree file | image-L3.14.52-dtb/<ek name>-<ek spec>.dtb | ||
| File system update package | image-L3.14.52-update/L31452-rootfs-update.tar.bz2 | ||
| MYZR Demo | image-L3.14.52-update/my-demo.tar.bz2 | ||
| Linux-4.1.15 | U-Boot file | Profiles/Linux/OS Firmware | image-L4.1.15-uboot/uboot-<ek name>-<ek spec>.imx |
| core files | image-L4.1.15-kernel/zImage-myimx6[a7 | a9] | ||
| Kernel module package | image-L4.1.15-kernel/kernel-modules-myimx6[a7 | a9].tar.bz2 | ||
| Device tree file | image-L4.1.15-dtb/<ek name>-<ek spec>.dtb | ||
| File system update package | image-L4.1.15-update/L4115-rootfs-update.tar.bz2 | ||
| MYZR Demo | image-L4.1.15-update/my-demo.tar.bz2 | ||
| Android-4.2.2 | U-Boot file | Profiles/Linux/OS Firmware | image-android-422/uboot-ard422-<ek name>-<ek spec>.bin |
| Boot Image | image-android-422/boot-ard422-<ek name>.img | ||
| Recovery Image | image-android-422/recovery-ard422-<ek name>.img | ||
| System Image | image-android-422/system-ard422-<ek name>.img | ||
| Android-4.4.2 | U-Boot file | Profiles/Linux/OS Firmware | image-android-442/uboot-ard442-<ek name>-<ek spec>.bin |
| Boot Image | image-android-442/boot-ard442-<ek name>.img | ||
| Recovery Image | image-android-442/recovery-ard442-<ek name>.img | ||
| System Image | image-android-442/system-ard442-<ek name>.img | ||
| Android-5.1.1 | U-Boot file | Profiles/Linux/OS Firmware | image-android-511/uboot-ard511-<ek name>-<ek spec>.bin |
| Boot Image | image-android-511/boot-ard511-<ek name>.img | ||
| Recovery Image | image-android-511/recovery-ard511-<ek name>.img | ||
| System Image | image-android-511/system-ard511.img |
--------------------------------------------------------------------------------
* Looking forward to communicating with you for more functions and field applications.
* ZhuHai MYZR Technology CO.,LTD.
* Latest Update: 2018/08/15
* Supporter: Tang Bin
--------------------------------------------------------------------------------