MYZR-IMX6-EK140 Quick Start
目录
[隐藏]- 1 Prepare development board suites
- 2 Development interface overview
- 3 Quick start developmenD board
- 4 Connection between developmenD board and computer
- 5 Development board booting
Prepare development board suites
Development board suites are made up of development board and development board accessories
Development board
Development board are made up of devices below:
- MYZR-IMX6-CB140(a core board)
- MYZR-IMX6-MB140(a base board)
Instruction: core board is directly welded to the base board ,which is not disassembled.
Development board accessories
MYZR-IMX6-EK140 is standard,no accessories.The complimentary part is below:
- A set of serial module (with dupont line)
Development board optional accessories
- Acceleration sensor
- 3D digital gyroscope
- 3D magnetic sensor
- Display module(display panel and touch panel)
Self-prepared accessories
Develop and debug accessories
- Serial line
- Micro USB cable
- Standard network cable
Power supply accessories
- 5V usb power adapter(Android mobile phone charger is ok)
- DC Power
Instruction : there are two ways of power supply power adapter and DC power ,choose one of them.
Development interface overview
We need to know some interfaces before booting development board,and connect these interfaces correctly to PC.We need to learn about MYZR-IMX6-EK140 interface first.
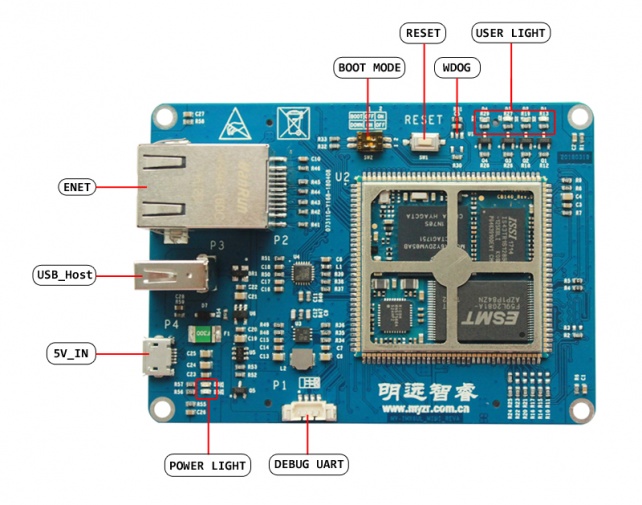
MYZR-IMX6-EK140 Front view
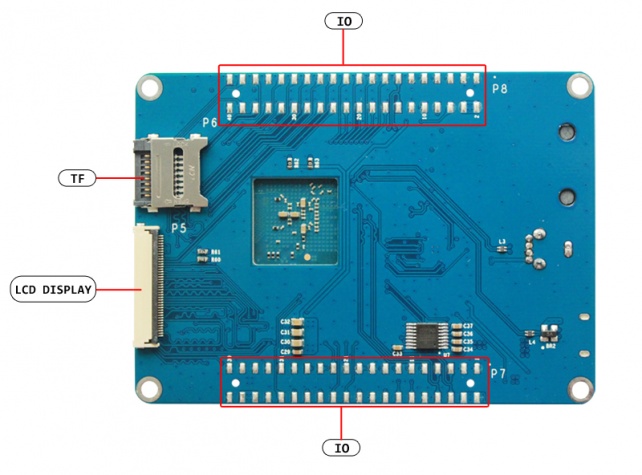
MYZR-IMX6-EK140 Rear view
MYZR-IMX6-EK140 interface
| No. | Interface | Function | Interface form | Silk screen |
|---|---|---|---|---|
| 1 | USB OTG | MFG Tool burning input port and USB OTG | Micro USB | J4 |
| 2 | ENET | 10/100-Mbps ethernet | RJ-45 | P1 |
| 3 | 5V_IN | Power in | Micro USB | J3 |
| 4 | 5V_IN | Power in | single row pin(2pins) | J2 |
| 5 | DEBUG UART | debug serial port | singla row pin(4 pins) | J1 |
| 6 | BOOT Device | boot device option | dial switch (4bit) | SW1 |
| 7 | TF | TF card | TF card boot(flip type) | U2 |
| 8 | LCD DISPLAY | LCD display interface | FPC socket(flip type,40pins) | U1 |
| 9 | BOOT MODE | boot mode option | dial swtich(2bit) | SW2 |
| 10 | RESET | reset button | key(2 pins) | SW3 |
| 11 | FXLS8471Q | acceleration sensor | none | U8 |
| 12 | FXAS21002CQ | 3D digital gyroscope | none | U10 |
| 13 | MAG3110 | 3D magnetic sensor | none | U9 |
| 14 | TS | resistance touch screen interface | PFC socket(drawer-type,4 Pin) | J5 |
| 15 | J6 | function socket | dual row socket | J3 |
| 16 | J7 | function socket | dual row socket | SW1 |
| 17 | USER LIGHT | user LED light | LED light(4 units) | D* |
| 18 | POWER LIGHT | power indication light | LED light(2 units) | D* |
Quick start developmenD board
1)Skip to the section "connection between development board and computer " ,select "connect the power supply interface" to operate.
2)Skip to the section "start the development board" and select "supply power for development board" to continue to the next step.
Instruction:Because the development board has no connection with the computer ,you cannot see the booting process and state of the development board during the quick start.But after the development board system is started, the D2 and D4 shown in figure 17 will be flashin
Connection between developmenD board and computer
We need to connect development board to the computer in many cases. So the following contents will tell the ways of the connection between the development board and computer.
Serial port link
Connection of serial port module
1)Find the debug serial port of the development board(shown in Fig 5. of MYZR-IMX6-EK140)
2)Connect the debug serial port GND to the serial port module GND with dupont line.
3)Connect the debug serial port 3V3 pin to the serial port module VDD pin with dupont line.
4)Connect the debug serial port RX pin to the serial port module RX(R1out) pin with dupont line.
5)Connect the debug serial port TX pin to the serial port module RX(T1IN) pin with dupont line.
6)Connect serial port module to the computer with self-prepared serial port line or usb serial line.
Tool configuration of serial port terminal
1)Find the port number on the computer using windows device manager.
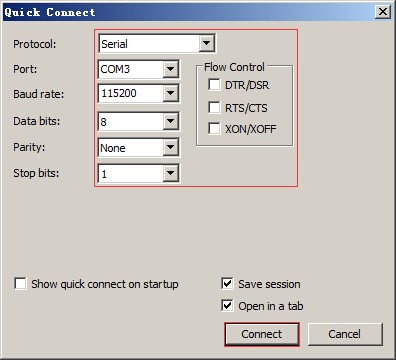
2)Configure parameters of serial terminal tools.
- SecureCRT&USB serial port 3 are configured as follows:
Network cable connection
1)Find the ethernet port of the development board(Figure 2 in MY-IMX6-EK140)
2)Connect one end of self-prepared ethernet cable to the development board port and the other end to PC port .
USB download cable connection
1)Find the Usb OTG port of the development.(Figure 1.in MY-IMX6-EK140)。
2)Connect one end of your self-prepared micro-usb line to the USB OTG port of the development and the other end to your computer USB port.
Display module connection
Instruction:display module is optional(include display panel and touch panel)
Please ask hardware for help about display module connection.
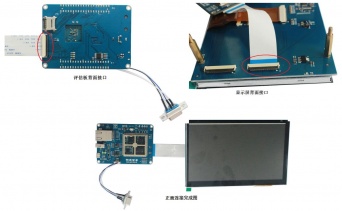
1)Connect touch panel correctly to the development board ,shown in figure 14。
2)Connect display panel correctly to the development board,shown in figure 8.(touch points of the display panel interface are upward).

Connections of power supply interface
1)MYZR-IMX6-EK140 has two power supply interfaces,one is Micro USB power supply port,the other is 2P socket.
2)You can choose one of them for your convenience .
3)It is recommended to connect to 2pin socket for development board power supply using DC power.
USB port interface for power supply
1)Find the USB port for power supply on development board(shown in Figure 3. of MY-IMX6-EK140 )。
2)Connect one end of self-prepared Micro USB line to the USB port of the development board and the other end to the power adapter.
Instruction:You can also use computer USB port to supply power when you choose the way that USB port interface for power supply.Please use USB power adapter to ensure the power supply and power stability.(USB power adapter for mobile phone is ok,but note that the power voltage is 5V and the current should exceed 1A)
2-pin socket interface for power
1)Find the 2-pin socket port for power supply on development board.(shown in Figure 4 of MY-IMX6-EK140 )。
2)Prepare your self-prepared DC power and turn off the output of the power.
3)The voltage output of the DC power is set to 5V and the maximum current output is 3A.
4)Connect "+" of the self-prepared DC power to power supply port "+" of the development board.
5)Connect "-" of the self-prepared DC power to power supply port "-" of the development board.
Development board booting
We have completed the connection between development board and computer after We do it in the right order referring to "connection between development board and computer". We have to supply power if we want to boot the development board.
Check booting configuration of the development board
Check boot mode
1)Find the position shown in figure 9 of the development board.
2)Check and make sure 1 is switched to the state ON and 2 is switched to OFF.
Check the boot device
1)Find the position shown in figure 6 of the development board.
2)Check and make sure that 1,2,3 are switched to the state ON and 4 is switched to OFF.
Instruction:There's a silkscreen mistake of the component shown in figure 6 in PCB MY-IMX6UL-MB140_Rev.C. So 1,2,3 should be switched to ON and 4 to OFF.
Supply power for development board
Supply power with USB port
Connect USB adapter correctly to the power input port of development board.
Supply power with 2-pin socket interface
Check and make sure that the output of DC power is 5V~3A once again.After checking the output configuration of DC power, then turn on.
Watch the start-up status
Serial port terminal dynamics
You can watch the output booting process information of the development board through serial terminal software of the computer.
Development board dynamics
After starting to a certain stage , D2 and D4 shown in figure 17 will be always flashing.
Display panel state
If you choose LCD display and connect correctly,you will watch the output image on the screen during the booting process of the development board.


